Diabetic-Friendly No-Bake Creamy Cake: Indulgence Without the Sugar
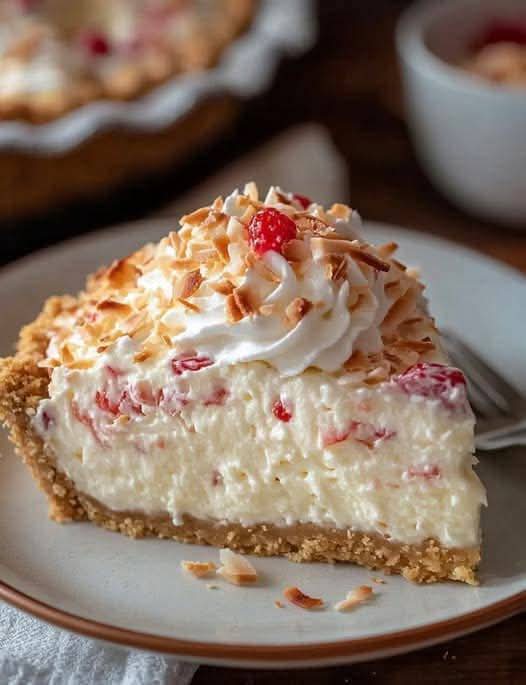
Looking for a dessert that is both indulgent and health-conscious? This Diabetic-Friendly No-Bake Creamy Cake is a dream come true. Imagine a smooth, velvety filling that melts in your mouth, paired with a crunchy, nutty crust that adds the perfect contrast. The best part? This dessert is low in carbs and sugar-conscious, making it ideal for anyone monitoring their blood sugar levels while still craving a sweet treat.
Whether you’re diabetic, following a low-carb lifestyle, or simply want to enjoy a guilt-free dessert, this cake hits all the right notes. It is quick to prepare, highly customizable, and requires no baking—making it perfect for busy schedules or a last-minute indulgence. You can top it with fresh berries, sugar-free fruit preserves, or a hint of chocolate to personalize it for any occasion. Every bite delivers creamy richness without the sugar crash.
Ingredients & Their Roles
For the Crust:
- 1 ½ cups almond flour – Provides a low-carb, gluten-free base with a naturally nutty flavor that forms the foundation of the crust.
- 2 tablespoons unsweetened coconut flakes (optional) – Adds subtle texture and tropical flavor, complementing the almond flour perfectly.
- 2 tablespoons melted butter – Binds the crust ingredients together while adding richness and a satisfying mouthfeel.
- 1 tablespoon stevia or monk fruit sweetener – Sweetens the crust naturally without affecting blood sugar, keeping the dessert diabetic-friendly.
For the Creamy Filling:
- 8 ounces cream cheese, softened – Forms the smooth, rich, and creamy base of the filling, providing a luxurious texture and tangy flavor.
- 1 cup heavy whipping cream – Adds lightness and a silky, melt-in-your-mouth texture to the filling, balancing the cream cheese richness.
- 2 tablespoons stevia or monk fruit sweetener – Naturally sweetens the filling while keeping it low in sugar.
- 1 teaspoon vanilla extract – Enhances flavor and aroma, giving the filling a warm, inviting taste.
Understanding the role of each ingredient ensures that this cake achieves the perfect balance of sweetness, creaminess, and crunch. The almond flour and coconut create a firm, flavorful crust, while the cream cheese and whipping cream form a dreamy, creamy filling that holds together beautifully. Stevia or monk fruit sweetener keeps the dessert diabetic-friendly without compromising on taste, and vanilla adds a subtle depth of flavor that makes every bite irresistible.
In the next section, we’ll walk through the step-by-step instructions for making this no-bake creamy cake, including tips to get the perfectly smooth filling and crisp crust.
Step-by-Step Instructions
- Prepare the crust: In a medium bowl, combine almond flour, unsweetened coconut flakes (if using), melted butter, and stevia or monk fruit sweetener. Mix until the ingredients are fully combined and the mixture holds together when pressed. This step ensures the crust is firm, flavorful, and slightly nutty.
- Press the crust into the pan: Line an 8-inch springform pan with parchment paper. Press the crust mixture evenly into the bottom of the pan using the back of a spoon or your fingers. Make sure it is compacted firmly to prevent crumbling. A well-pressed crust gives a stable foundation for the creamy filling.
- Chill the crust: Place the pan in the refrigerator for at least 10–15 minutes while preparing the filling. Chilling the crust allows it to set, making it easier to slice the cake later and enhancing the texture.
- Prepare the creamy filling: In a mixing bowl, beat the softened cream cheese with stevia or monk fruit sweetener until smooth and free of lumps. Slowly add heavy whipping cream and vanilla extract, whipping until the mixture forms soft peaks. This ensures a silky, airy texture that melts in your mouth.
- Assemble the cake: Pour the creamy filling over the chilled crust and spread it evenly with a spatula. Smooth the surface for an elegant finish. Optional: gently fold in sugar-free berries or chocolate chips to customize flavor and texture.
- Chill to set: Refrigerate the assembled cake for at least 2–3 hours, or until the filling is firm. Longer chilling (overnight) produces the best results, allowing flavors to meld and the texture to become perfectly creamy.
- Serve and garnish: Carefully remove the cake from the springform pan. Garnish with fresh berries, sugar-free fruit preserves, or a sprinkle of cocoa powder. Slice with a sharp knife for clean cuts. Presentation enhances the visual appeal and indulgent feel of this diabetic-friendly dessert.
Following these steps guarantees a perfectly creamy, no-bake cake with a firm, flavorful crust. The key techniques include mixing the filling until smooth, chilling the crust before adding the filling, and allowing the cake to set properly in the refrigerator. These small details ensure a dessert that is luxurious, melt-in-your-mouth, and diabetic-friendly.
Why This Recipe Is Loved
The Diabetic-Friendly No-Bake Creamy Cake is adored for its combination of rich flavor and effortless preparation. Every bite delivers a creamy, luxurious texture that melts in your mouth, balanced perfectly by a nutty, slightly crunchy almond crust. Unlike traditional desserts, this cake is low-carb, sugar-conscious, and diabetic-friendly, allowing you to indulge guilt-free. Its versatility is another reason for its popularity—you can personalize the cake with fresh berries, sugar-free chocolate, or fruit preserves without compromising the flavor or nutritional goals.
Readers love how simple the recipe is, requiring no baking and minimal prep time, yet producing a dessert that looks and tastes like it came from a professional kitchen. The smooth, airy filling contrasts with the firm crust, creating a dessert that satisfies cravings for sweetness while remaining light and balanced. It’s perfect for weekend treats, family gatherings, or special occasions.
Pro Tips for Perfecting This Cake
- Use room temperature cream cheese: Ensures a smooth, lump-free filling.
- Whip the cream carefully: Beat until soft peaks form to achieve a light, airy texture without overwhipping.
- Press the crust firmly: Compacting the almond mixture ensures it holds together when slicing.
- Customize toppings: Use berries, sugar-free chocolate, or a sprinkle of cocoa powder for visual appeal and flavor variety.
- Chill adequately: Refrigerate for at least 2–3 hours or overnight for the best texture and flavor integration.
- Knife tips for serving: Use a sharp, warm knife to slice for clean edges.
Serving Suggestions
- Serve chilled on a dessert plate for a refreshing, elegant treat.
- Pair with a cup of unsweetened coffee or tea for a balanced low-carb indulgence.
- Top with a few fresh mint leaves or a dusting of cinnamon for added aroma.
- Perfect as a dessert for diabetic-friendly parties or gatherings where guests want indulgence without sugar.
Conclusion
This Diabetic-Friendly No-Bake Creamy Cake proves that you can enjoy a decadent dessert without sugar or guilt. With its creamy, melt-in-your-mouth filling, firm nutty crust, and customizable toppings, it delivers luxury, taste, and satisfaction in every bite. Easy to prepare, versatile, and visually stunning, this cake is ideal for anyone seeking a low-carb, diabetic-friendly treat that doesn’t compromise on flavor. Whether it’s a quick weeknight dessert or a special occasion centerpiece, this cake will become a go-to indulgence for anyone wanting sweetness the healthy way.