Never Fail Fruit Cake – A Timeless Holiday Classic
Few desserts evoke the warmth and nostalgia of the holiday season quite like a Never Fail Fruit Cake. This classic recipe is cherished for its rich, dense texture, sweet and spiced fruitiness, and buttery undertones. Each slice is a celebration of tradition, offering a delightful mix of textures and flavors that have made this cake a beloved family favorite for generations.
The Magic Behind Never Fail Fruit Cake
The secret to a truly memorable fruit cake lies in the balance of ingredients and their preparation. From plumping dried fruits to the careful combination of spices and sugars, each component contributes to the depth of flavor and moistness. Unlike other cakes, a fruit cake is dense, hearty, and meant to be savored slowly, with every bite revealing the tender chew of fruit and the warm aroma of spices.
Ingredients and Their Purpose
Mixed Dried Fruit (2 cups)
A medley of raisins, currants, chopped dates, candied cherries, and candied pineapple forms the backbone of the fruit cake. These fruits provide natural sweetness, vibrant color, and a chewy, satisfying texture. Soaking or cooking them in a bit of liquid helps them plump, releasing their flavors into the batter.
Brown Sugar (1 cup)
Brown sugar adds a deep caramel note that enhances the richness of the dried fruits. Its slight molasses content complements the buttery base, giving the cake a warm and luxurious flavor profile.
Butter (½ cup)
Butter contributes both moisture and richness to the cake. It ensures that the dense fruit mixture remains tender rather than dry, creating a melt-in-your-mouth texture that balances the chew of the fruits.
Water (1 cup)
Water is essential for plumping the dried fruits. When combined with the butter and sugar, it helps dissolve the sugar and infuse the fruits with moisture, ensuring a juicy, tender cake.
Cinnamon (1 tsp)
Cinnamon brings a warm, aromatic spice that defines the holiday flavor of fruit cakes. It pairs perfectly with the sweetness of the fruit and the richness of the butter, creating a comforting aroma that fills the kitchen.
Nutmeg (½ tsp)
Nutmeg adds an earthy depth and subtle warmth. Its slightly sweet, nutty flavor complements the cinnamon and brown sugar, creating a layered spice profile that enhances every bite.
Allspice (¼ tsp, optional)
Allspice rounds out the spice mix, adding complexity and a hint of clove-like flavor. While optional, it contributes a sophisticated note that elevates the overall taste.
Additional Ingredients for Depth and Structure
Eggs (4 large)
Eggs are the binding agent in this fruit cake. They provide structure, helping the dense fruit and butter mixture hold together while baking. Eggs also contribute moisture and richness, enhancing the overall tenderness of the cake. Using large eggs at room temperature ensures they blend smoothly with the other ingredients, avoiding curdling or uneven texture.
All-Purpose Flour (2 cups)
Flour forms the backbone of the cake’s structure. It supports the heavy fruit and nut mixture while keeping the cake tender. Sifting the flour before mixing aerates it, preventing clumps and ensuring an even distribution throughout the batter.
Baking Powder (2 tsp)
Baking powder acts as the leavening agent, providing lift to the dense batter. It ensures that the cake rises evenly without collapsing, creating a soft, light crumb despite the heavy fruit and nut content.
Vanilla Extract (2 tsp)
Vanilla rounds out the flavors, enhancing the richness of the butter and the sweetness of the fruit. It adds depth and complexity, transforming a simple fruit cake into an aromatic, bakery-quality dessert.
Chopped Nuts (1 cup, optional)
Walnuts or pecans add crunch and texture contrast to the soft, dense cake. Toasting the nuts lightly before adding them releases their natural oils and enhances their flavor, making every bite more aromatic and satisfying.
Step-by-Step Preparation – Part 1
1. Plump the Dried Fruit
Place your dried fruit mixture in a medium saucepan with the ½ cup butter, 1 cup water, and 1 cup brown sugar. Heat gently over medium-low heat, stirring occasionally. The goal is to melt the sugar, soften the butter, and allow the fruit to absorb moisture. Simmer for 5–7 minutes until the fruit is plump and glossy.
💡 Pro Tip: Avoid boiling the mixture. High heat can make the fruit tough and chewy. Gentle simmering ensures that each piece of fruit becomes tender while releasing its natural sweetness into the mixture.
2. Cool the Fruit Mixture
Once the fruits are plump and the sugar has dissolved, remove the saucepan from heat and allow the mixture to cool slightly. Cooling prevents the eggs from cooking prematurely in the next step and ensures even incorporation of all ingredients.
3. Cream the Eggs
In a separate mixing bowl, beat the 4 large eggs until light and frothy. This introduces air into the eggs, which helps lift the dense batter slightly. Gradually add the slightly cooled fruit mixture to the eggs, stirring constantly to avoid curdling. This step combines richness with structure, forming the base of the cake batter.
4. Combine Dry Ingredients
In another bowl, sift together 2 cups of all-purpose flour and 2 tsp baking powder. Sifting prevents clumps, aerates the flour, and ensures an even rise. Gently fold the flour mixture into the egg and fruit mixture using a spatula, taking care not to overmix.
5. Add Vanilla and Nuts
Fold in the 2 tsp vanilla extract and, if using, 1 cup toasted nuts. This final fold integrates flavor and texture evenly throughout the batter, without overworking the gluten in the flour.
Preparing the Pan and Pouring the Batter
1. Prepare the Cake Pan
Choose a 9×5-inch loaf pan or a similar-sized baking dish for your fruit cake. Line the pan with parchment paper or grease it thoroughly with butter. For added security against sticking, lightly dust the pan with flour after greasing. This step ensures that your cake will release cleanly after baking, preserving its shape and presentation.
💡 Pro Tip: Double-line the pan with parchment if possible. This makes it easier to lift the cake out intact without crumbling, especially important for dense fruit cakes.
2. Pour the Batter
Carefully transfer the prepared fruit cake batter into the lined pan. Use a spatula to spread it evenly, smoothing the top gently. Avoid pressing too hard—the goal is an even surface, not compacting the batter. Even spreading helps the cake bake uniformly from edge to center.
3. Tap the Pan
Give the pan a few gentle taps on the countertop to remove any large air bubbles. This step ensures there won’t be tunnels or gaps in the finished cake. Air pockets can lead to uneven baking and holes in your fruit cake.
Baking the Cake
4. Preheat the Oven Correctly
Preheat your oven to 325°F (163°C). Lower-than-usual temperatures are critical for fruit cakes, as the dense, moist batter needs to bake slowly. High heat can cause the outside to brown too quickly while leaving the interior undercooked.
5. Position the Pan
Place the loaf pan in the center of the oven for even heat distribution. Avoid putting it too close to the top or bottom racks. Using a middle rack ensures the cake bakes evenly and prevents scorching of the fruit on the top or bottom.
6. Bake Slowly and Carefully
Bake for approximately 70–90 minutes, depending on your oven and the moisture content of the fruit. Fruit cakes are denser than regular cakes, so they require extended baking. Begin checking for doneness at the 70-minute mark. Insert a skewer or toothpick in the center—it should come out clean or with only a few moist crumbs attached.
💡 Pro Tip: If the top starts browning too quickly, tent a piece of aluminum foil over the pan. This shields the top while allowing the inside to cook through.
7. Monitor Internal Temperature
For optimal results, the internal temperature of the fruit cake should reach about 200°F (93°C). This ensures the batter is fully set without overbaking, which can dry out the cake.
Cooling the Fruit Cake
8. Allow the Cake to Rest in the Pan
Remove the pan from the oven and place it on a cooling rack. Let it rest in the pan for 15–20 minutes. This brief cooling period allows the cake to firm up slightly and makes it easier to remove from the pan without breaking.
9. Remove from Pan and Cool Completely
Gently lift the cake out using the parchment paper. Place it on a wire rack to cool completely. Cooling on a wire rack prevents condensation from forming at the bottom, which could make the cake soggy.
10. Optional Wrapping for Moisture Retention
For an even moister cake, wrap it tightly in plastic wrap once cooled. Let it sit for a few hours or overnight to allow flavors to meld and the texture to settle. This step is particularly helpful for fruit cakes that benefit from aging slightly before serving.
Finishing Touches and Serving Your Fruit Cake
11. Optional Glaze or Brushing
To elevate your fruit cake to bakery-quality presentation, consider brushing the top with a thin layer of apricot jam or simple sugar syrup. Heat 2 tablespoons of jam with 1 teaspoon of water until smooth, then brush lightly over the cake surface. This gives a glossy finish, enhances sweetness, and locks in moisture.
💡 Pro Tip: Use a soft pastry brush and apply gently to avoid displacing fruit pieces on top.
12. Decorative Toppings
Enhance the visual appeal by sprinkling a few chopped nuts, candied cherries, or a light dusting of powdered sugar. These finishing touches add texture, color, and a professional appearance. For holiday cakes, consider maraschino cherries strategically placed for a festive look.
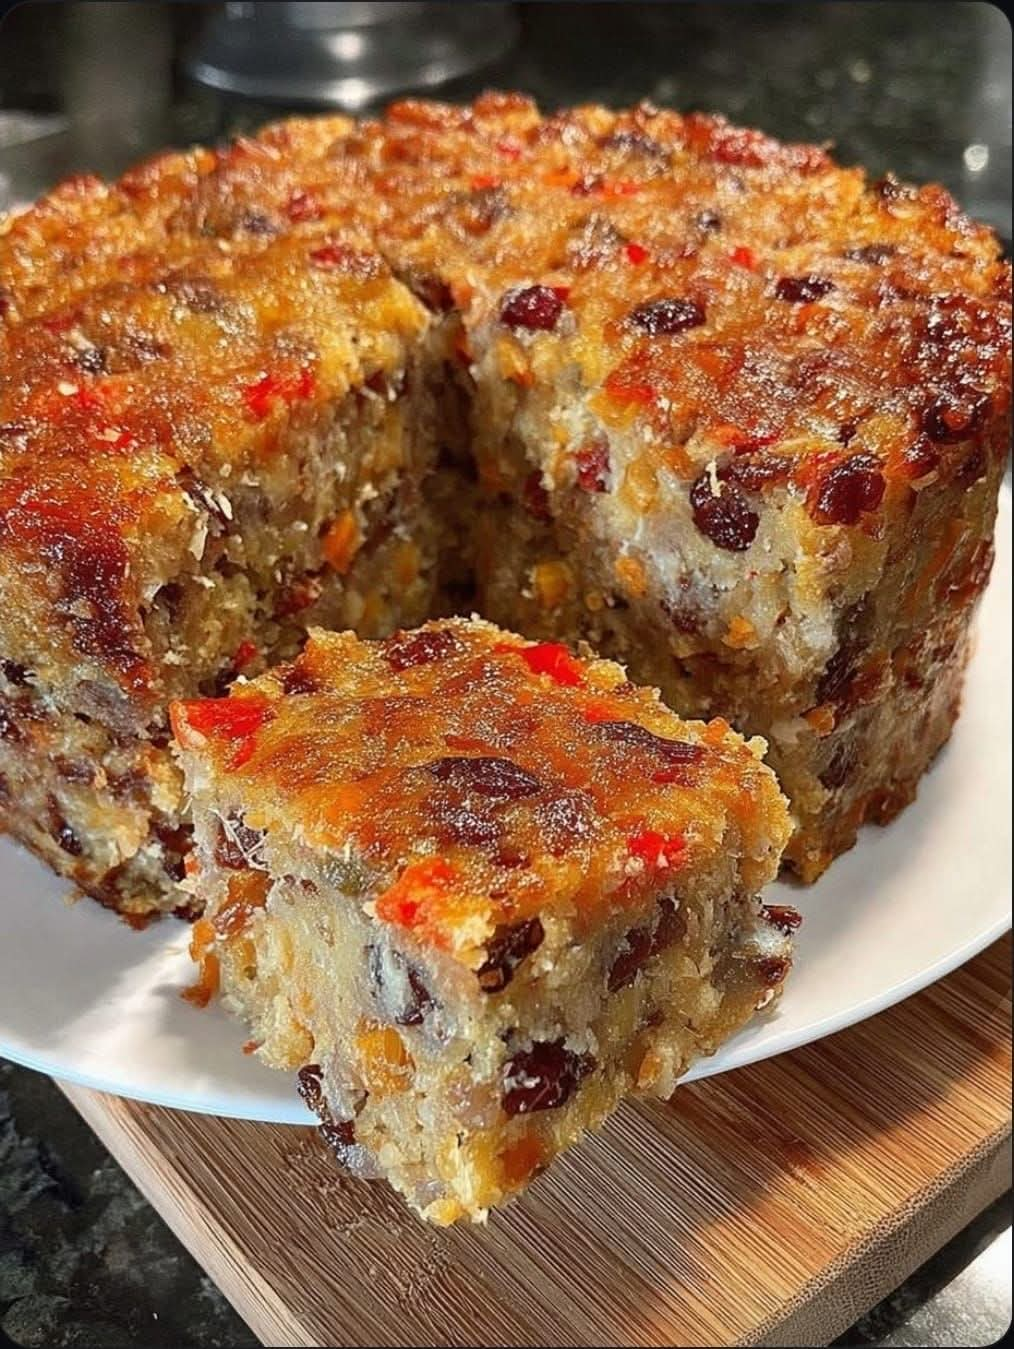
13. Slicing and Portioning
Use a serrated knife to slice the cake, as its dense texture makes straight cuts challenging with a standard knife. Clean the blade between cuts to maintain neat edges. Each slice should showcase the colorful fruit distribution evenly.
14. Serving Suggestions
- Serve slightly warm or at room temperature with a cup of coffee or tea for a cozy treat.
- Pair slices with vanilla ice cream or whipped cream for dessert presentation.
- For a holiday platter, cut into smaller squares for bite-sized portions ideal for parties.
15. Storage and Shelf Life
Fruit cakes benefit from proper storage to maintain flavor and moisture. Wrap the cooled cake tightly in plastic wrap and then in aluminum foil to prevent air exposure. Store at room temperature for up to 2 weeks. For longer storage, refrigerate for up to a month or freeze for up to 3 months.
💡 Pro Tip: For an extra moist cake, periodically “feed” it with a tablespoon of brandy, rum, or fruit juice over several days. This enhances flavor depth and maintains a tender crumb.
16. Rejuvenating Leftover Cake
If the cake dries slightly after extended storage, lightly brush each slice with warm sugar syrup, juice, or liquor before serving. Wrap again and let it rest for 15–20 minutes. The moisture will redistribute, restoring softness and intensifying flavors.
17. Presentation Tips
- Serve on a decorative platter lined with parchment paper or doilies for elegance.
- Garnish with fresh mint leaves or edible flowers for a colorful touch.
- Pair with complementary beverages like spiced tea, mulled wine, or hot chocolate for festive occasions.
18. Why This Fruit Cake Is Foolproof
The genius of this Never Fail Fruit Cake lies in its simplicity. By carefully controlling fruit hydration, baking temperature, and storage methods, it remains tender, flavorful, and visually appealing every time. Even novice bakers can achieve professional results without special equipment or complicated techniques.
19. Flavor Development
Allowing the cake to rest for a day or two after baking intensifies flavors. The sugars, spices, and fruit meld together, producing a depth that makes each bite richer than the last. This aging process is key to the classic fruit cake experience and ensures that your effort is rewarded with an indulgent, aromatic dessert.
20. Additional Serving Ideas
Consider turning slices into mini trifles layered with custard and whipped cream, or crumbling it as a base for ice cream parfaits. The dense, moist texture allows it to be versatile while retaining flavor integrity.
Advanced Tips, Tricks, and Enhancements for Never Fail Fruit Cake
21. Selecting the Best Ingredients
The quality of each ingredient dramatically affects the final outcome. Choose ripe, high-quality dried fruits free from preservatives and additives. Opt for unsalted butter for consistent control over flavor. Freshly grated nutmeg and cinnamon provide more aroma and depth than pre-ground versions stored for long periods. For liquid, filtered water or fruit juice ensures purity and prevents unwanted flavors.
22. Pre-Soaking Fruit for Maximum Flavor
Soaking dried fruits overnight in brandy, rum, orange juice, or even apple cider enhances plumpness and intensifies natural sweetness. This step ensures fruits integrate seamlessly into the batter, preventing them from absorbing moisture during baking and drying out the cake.
💡 Pro Tip: Strain the fruit before adding it to the batter to avoid excess liquid that could affect baking.
23. Mixing Techniques for Perfect Texture
When combining the fruit mixture with the batter, fold gently rather than stir vigorously. Overmixing develops gluten, making the cake dense and less tender. The goal is an even distribution of fruit without compromising the soft, moist crumb.
24. Pan Preparation and Lining
Use a high-quality loaf or bundt pan. Line the bottom and sides with parchment paper for easy removal. Grease lightly with butter and dust with flour to prevent sticking. Proper pan prep ensures uniform baking and clean edges, contributing to the cake’s professional appearance.
25. Baking Techniques for Even Cooking
Bake at a moderate temperature, typically 325°F (165°C), to allow the cake to cook evenly without burning the edges. Use an oven thermometer to avoid temperature fluctuations. Place a pan of water in the oven to add gentle humidity, preventing the cake from drying out during long bake times.
26. Testing for Doneness
Check doneness with a skewer inserted into the center. It should come out clean or with just a few moist crumbs. Avoid opening the oven repeatedly as this can lower temperature and affect rise. A properly baked fruit cake will have a firm top and slightly springy center.
27. Enhancing Flavor Post-Bake
Once cooled, consider brushing the cake with a thin layer of brandy, rum, or simple syrup. Wrap the cake in wax paper and foil, then store in a cool place. This “feeding” technique deepens flavor, keeps it moist, and produces the classic dense, aromatic fruit cake associated with holiday traditions.
28. Freezing for Long-Term Enjoyment
For extended storage, freeze the cake after it has cooled and been wrapped tightly. Thaw at room temperature when ready to serve. This preserves freshness and flavor for months, making it convenient to prepare ahead for holidays or celebrations.
29. Presentation for Special Occasions
Slice the cake with a sharp serrated knife, plate elegantly, and optionally garnish with fresh berries, candied citrus peel, or a light dusting of powdered sugar. Pair with whipped cream, custard, or a complementary liqueur for a gourmet touch. The cake’s dense texture and colorful fruits make it visually appealing on any dessert table.
30. Avoiding Common Pitfalls
- Do not overbake – dry cakes lose the moist, tender texture.
- Ensure fruits are evenly hydrated but not soggy.
- Use room-temperature ingredients for consistent mixing.
- Wrap and store properly to prevent the cake from absorbing unwanted odors or drying out.
31. Why This Recipe Outshines Others
The Never Fail Fruit Cake balances sweetness, spice, and fruitiness perfectly. Each step, from ingredient selection to careful mixing and controlled baking, ensures consistent results. Even novice bakers can produce a cake that rivals bakery-quality versions. Its versatility, long shelf life, and improved flavor over time make it a reliable, indulgent dessert for holidays, celebrations, or gifting.
32. Summary and Final Thoughts
This fruit cake is a true classic that combines tradition, flavor, and practicality. By following these steps and tips, you achieve a moist, flavorful cake with vibrant fruit, aromatic spices, and a tender crumb. From selecting premium ingredients to applying advanced storage and flavor techniques, you can create a dessert that impresses guests and delights family. The Never Fail Fruit Cake is not just a recipe—it’s a timeless tradition, a testament to baking precision, and a celebration of flavor that lasts long after the first slice is enjoyed.