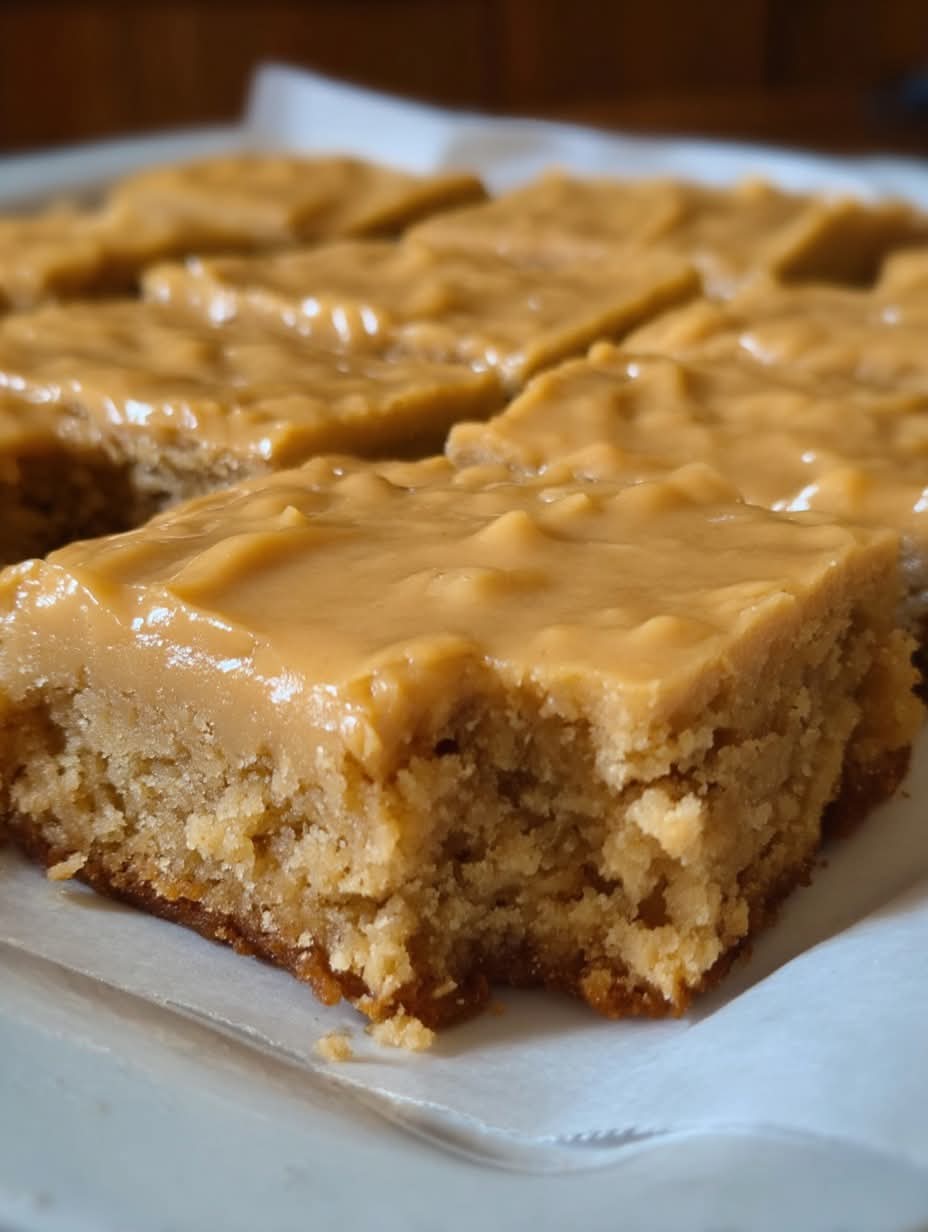
Peanut Butter Lunch Lady Bars
These Peanut Butter Lunch Lady Bars are a nostalgic treat that brings back the comforting flavors of school cafeteria desserts, but elevated for the home kitchen. Imagine biting into a bar with a soft, moist base, layered with a creamy peanut butter filling, and finished with a luxurious, sweet frosting. Perfect for potlucks, lunchboxes, or just indulging at home, these bars strike the ideal balance between sweet, salty, and nutty flavors. Their rich texture and unbeatable flavor make them an instant favorite for kids and adults alike.
This recipe is designed to be easy to follow yet comprehensive, ensuring that each component—from the base to the frosting—is perfected. With detailed explanations for why each ingredient matters, step-by-step guidance, and expert tips, you’ll understand not only how to make these bars but also why each step contributes to the final masterpiece.
Ingredients for the Base
- 2 cups all-purpose flour: Forms the structural foundation of the bars. It provides stability while keeping the base soft and tender. Sifting the flour can prevent lumps and ensures an even texture.
- 2 cups granulated sugar: Sweetens the base uniformly and helps with caramelization during baking, giving a subtle depth of flavor. Use fresh sugar for optimal sweetness.
- 1 teaspoon baking soda: Acts as a leavening agent, creating tiny air pockets for a light, slightly airy base. Proper measurement is key to avoid excessive rise or a soapy taste.
- 1 teaspoon salt: Enhances all flavors, balancing the sweetness and highlighting the natural nutty taste of the peanut butter.
- ½ cup whole milk: Adds moisture and richness, blending the dry ingredients into a smooth, cohesive batter. Whole milk gives the best flavor and texture.
- 1 teaspoon vanilla extract: Infuses aromatic warmth and complements the nutty peanut butter flavor. Pure vanilla extract is preferable for the most authentic taste.
- 2 large eggs, beaten: Bind the ingredients together and add richness to the base. Eggs also contribute to the tender structure and slight chewiness in each bite.
- 1 cup unsalted butter (2 sticks): Adds richness and moisture. Melting the butter before combining ensures even distribution and a uniform texture.
- 1 cup creamy peanut butter: The star ingredient that delivers a deep, nutty flavor and creamy consistency. Choose a high-quality peanut butter without added sugars for a cleaner, more pronounced flavor.
Ingredients for the Frosting
- ½ cup unsalted butter (1 stick): Provides the creamy foundation for the frosting and balances the sweetness of powdered sugar.
- ½ cup creamy peanut butter: Intensifies the peanut flavor and contributes to a luscious, spreadable frosting consistency.
- 2 tablespoons milk: Adjusts the frosting’s consistency to make it smooth and easily spreadable without becoming runny.
- 4 cups powdered sugar: Sweetens and thickens the frosting. Sifting it ensures a silky texture without lumps.
In this first step, we have covered the full ingredients list and explained why each component is crucial for the success of these bars. In the next part, we will dive into the detailed step-by-step preparation, ensuring your bars come out perfectly every time
Step-by-Step Instructions: Preparing the Base
Now that we understand the ingredients, it’s time to create the foundation of these Peanut Butter Lunch Lady Bars. The base is where flavor and texture begin, so following these steps carefully will ensure a perfect outcome.
Step 1: Preheat Your Oven
Start by preheating your oven to 350°F (175°C). Using a properly preheated oven ensures even baking and helps the bars set correctly without being soggy. Prepare a 9×13-inch baking pan by greasing it lightly with butter or cooking spray. For best results, line the pan with parchment paper, leaving an overhang to lift the bars out easily after baking.
Step 2: Combine Dry Ingredients
In a large mixing bowl, sift together:
- 2 cups all-purpose flour
- 2 cups granulated sugar
- 1 teaspoon baking soda
- 1 teaspoon salt
Sifting ensures there are no lumps and helps aerate the mixture, resulting in a lighter, more even-textured base. Use a whisk to blend the ingredients thoroughly, ensuring that the baking soda and salt are evenly distributed for consistent rising and flavor balance.
Step 3: Prepare the Wet Ingredients
In a separate bowl, combine:
- ½ cup whole milk
- 1 teaspoon vanilla extract
- 2 large eggs, beaten
- 1 cup melted unsalted butter
- 1 cup creamy peanut butter
Whisk these ingredients together until smooth and well blended. Melting the butter ensures a uniform texture and prevents lumps of solid fat in the base. Adding peanut butter at this stage integrates its rich, nutty flavor into the batter fully, so every bite has that unmistakable peanut butter essence.
Step 4: Combine Wet and Dry Ingredients
Slowly pour the wet mixture into the dry ingredients while stirring gently with a spatula or wooden spoon. Avoid overmixing—just blend until no streaks of flour remain. Overmixing can develop gluten in the flour, making the base tough rather than tender.
Step 5: Press the Base into the Pan
Once combined, transfer the batter into the prepared baking pan. Use a spatula or the back of a spoon to spread the mixture evenly. Press lightly to ensure there are no air pockets. A uniformly pressed base bakes evenly and creates a solid foundation to support the creamy peanut butter frosting later.
Pro Tips for the Perfect Base
- For extra flavor, lightly toast the flour in a dry skillet for 2–3 minutes before mixing.
- If your peanut butter is very thick, warm it slightly in the microwave for 15 seconds to make it easier to blend.
- Do not overfill the pan; these bars expand slightly during baking.
- Check the oven temperature with a thermometer. An inaccurate oven can cause undercooked or overly dry bars.
Once your base is ready, bake it in the preheated oven for approximately 20–25 minutes, until the top is set and lightly golden. Let the pan cool completely before adding the frosting to prevent melting.
This completes the base preparation. The next step is creating the rich, creamy peanut butter frosting that transforms these bars into a decadent treat.
Step-by-Step Instructions: Frosting and Assembly
Now that the base has baked and cooled completely, it’s time to move on to the next crucial layer: the creamy, decadent peanut butter frosting. This step transforms the bars into the indulgent treat everyone loves.
Step 1: Prepare Your Frosting Ingredients
Gather the following ingredients for the frosting:
- ½ cup (1 stick) unsalted butter – Adds richness and smooth texture.
- ½ cup creamy peanut butter – Provides a nutty, luscious flavor that’s the hallmark of these bars.
- 2 tablespoons milk – Lightens the frosting and makes it spreadable.
- 4 cups powdered sugar – Sweetens and stabilizes the frosting for a creamy, yet firm consistency.
It’s essential that the butter is softened to room temperature. Cold butter will create lumps and make it difficult to achieve a smooth frosting. Likewise, use creamy peanut butter to ensure the frosting spreads evenly without clumps.
Step 2: Cream Butter and Peanut Butter
In a large mixing bowl, use a hand mixer or stand mixer to beat the softened butter and peanut butter together until smooth and fully combined. This should take about 2–3 minutes on medium speed. The mixture should be light in color and fluffy, which helps create a frosting that isn’t too dense or heavy.
Step 3: Add Milk Gradually
Slowly pour in the milk while mixing on low speed. This step ensures the frosting reaches the perfect consistency: creamy, spreadable, and glossy. Too much milk can make it runny, so add gradually until you achieve a soft, spreadable texture.
Step 4: Incorporate Powdered Sugar
Gradually sift in the powdered sugar, mixing on low first to prevent a cloud of sugar dust. Once incorporated, increase the speed to medium and beat for 2–3 minutes until the frosting is smooth, thick, and creamy. Taste and adjust sweetness if desired.
Step 5: Frost the Bars
Using an offset spatula or butter knife, evenly spread the frosting over the cooled base. Start in the center and work your way outward to ensure a smooth layer. For extra polish, dip the spatula in warm water and shake off excess before smoothing; this will create a silky finish.
Step 6: Optional Garnishes
Sprinkle crushed peanuts, chocolate shavings, or festive sprinkles on top for added texture, flavor, and visual appeal. These garnishes not only enhance the appearance but also give each bite a delightful crunch.
Step 7: Chill and Set
For best results, refrigerate the bars for at least 1–2 hours before slicing. This allows the frosting to firm up and makes cutting clean squares much easier. Use a sharp knife and wipe it between cuts to prevent smearing.
Pro Tips for Perfect Frosting
- Always use room-temperature butter to prevent a grainy texture.
- If frosting seems too thick, add a teaspoon of milk at a time until it reaches desired spreadability.
- Beat frosting on medium-high speed for extra fluffiness.
- For a richer flavor, lightly toast peanuts before sprinkling on top.
With these steps, your Peanut Butter Lunch Lady Bars now have a perfectly creamy, nutty, and decadent frosting layer, ready to impress anyone who tries them.
Step-by-Step Instructions: Cutting, Serving, and Storage
Step 1: Chill Bars Before Cutting
Once the frosting has been evenly spread, it’s essential to allow the bars to chill for at least 1–2 hours in the refrigerator. Chilling serves several purposes:
- Firm Frosting: Ensures that the peanut butter frosting sets properly, making cutting easier and cleaner.
- Enhanced Flavor: Cold bars allow the flavors to meld, intensifying the rich peanut butter and buttery base.
- Neat Presentation: Prevents the frosting from smearing and maintains perfect square edges.
Step 2: Use the Right Tools for Cutting
For best results, use a sharp chef’s knife or serrated knife. Here’s how to cut without ruining the frosting:
- Warm the knife slightly under hot water and dry it before slicing.
- Use a gentle sawing motion rather than pressing straight down.
- Wipe the blade clean between cuts to avoid frosting build-up and maintain neat edges.
- Cut into uniform squares or rectangles, depending on the desired serving size.
Step 3: Serving Suggestions
These bars are incredibly versatile and can be enjoyed in various settings:
- Lunchbox Treat: Individually wrap bars in parchment paper for a perfect on-the-go snack.
- Party Dessert: Arrange the squares on a festive platter and garnish with extra peanuts or chocolate drizzle.
- Holiday Gift: Package in decorative tins or boxes; they hold well and travel easily.
- Family Dessert: Serve chilled with a glass of milk or a cup of coffee for a cozy treat.
Step 4: Storage Tips for Longevity
Proper storage ensures your bars stay fresh and maintain their chewy, creamy texture:
- Room Temperature: Store in an airtight container for up to 2 days if you plan to enjoy them quickly.
- Refrigeration: Keep in an airtight container in the fridge for up to 1 week. This is ideal if the frosting is soft or the bars are exposed to warm environments.
- Freezing: Wrap individual bars in plastic wrap and place them in a freezer-safe container. Freeze for up to 2 months. Thaw in the refrigerator overnight before serving.
- Always layer bars with parchment paper to prevent sticking if stacking in a container.
Pro Tips for Perfect Bars
- Cut bars with care—rushing can cause frosting smears.
- For extra flair, lightly dust with cocoa powder or drizzle melted chocolate over the top.
- Pair with a glass of cold milk or creamy hot chocolate to complement the peanut butter flavor.
- If the base is slightly overbaked, chilling will still firm it and enhance chewiness.
Following these steps ensures that your Peanut Butter Lunch Lady Bars not only look professional but also taste perfectly balanced: chewy, creamy, and sweet with the rich peanut butter flavor shining through.
Decorative Toppings and Presentation
Once your bars are cut and ready, consider adding a few eye-catching finishes to make them irresistible:
- Chocolate Drizzle: Melt semi-sweet chocolate and lightly drizzle over each bar for added richness and visual appeal.
- Chopped Nuts: Sprinkle finely chopped peanuts or pecans on top for extra texture and nutty aroma.
- Festive Sprinkles: For holiday versions, use colored sprinkles to match the season, making them perfect for gifting.
- Powdered Sugar Dusting: A gentle dust of powdered sugar enhances the look and adds subtle sweetness to the surface.
Flavor Enhancements and Variations
These bars are highly versatile. Enhance flavors with simple tweaks:
- Chocolate Peanut Butter: Fold in mini chocolate chips into the batter for melty chocolate pockets.
- Salted Caramel Twist: Drizzle warm caramel over the bars before serving to balance sweetness with a hint of saltiness.
- Espresso Boost: Add 1 teaspoon of instant espresso powder to the batter to deepen the chocolate flavor and add sophistication.
- Nutty Swirl: Create a swirl effect by layering extra peanut butter before baking for a marbled presentation.
Professional Serving Tips
Serving these bars in an appealing way can elevate the dessert experience:
- Cut into uniform squares and place on a decorative serving tray for parties.
- For gift-giving, wrap each square in parchment or wax paper and place them in a tin for a polished look.
- Pair with a small glass of cold milk, hot chocolate, or even coffee for contrast between creamy, sweet bars and the beverage.
- Layer with parchment paper when storing multiple layers in a container to prevent sticking.
Pro Tips for Exceptional Results
- Always let bars cool completely before applying toppings or frosting for clean presentation.
- Use high-quality peanut butter and chocolate for maximum flavor impact.
- Chill bars in the fridge for 15–30 minutes after adding decorative toppings to set them perfectly.
- For an extra indulgent treat, serve a slightly warm bar with a scoop of vanilla ice cream on top.