Chocolate Butterfinger Balls – Irresistibly Crunchy, Sweet & Chocolatey
Indulge in the perfect combination of creamy peanut butter, crunchy Butterfinger candy, and rich chocolate with these Chocolate Butterfinger Balls. This no-bake treat is ideal for holidays, parties, or simply satisfying your chocolate and peanut butter cravings in a single bite. These bites are crunchy, sweet, and delightfully decadent, making them impossible to resist.
Ingredients & Their Purpose
- 1 cup creamy peanut butter: The heart of the recipe, providing a smooth, creamy texture and rich, nutty flavor while binding the ingredients together.
- 2 cups crushed Butterfinger candy bars: Adds signature crunch and caramelized peanut flavor. The crushed candy creates a texture contrast that makes each bite irresistible.
- 1½ cups powdered sugar: Sweetens the mixture and helps the balls hold their shape, giving them structure without becoming grainy.
- ½ cup unsalted butter, melted: Enhances richness and helps bind the peanut butter and candy mixture together, ensuring the balls stay intact.
- 2 cups semi-sweet chocolate chips: Creates a glossy, chocolatey coating that hardens, adding a decadent exterior and a smooth chocolate flavor.
Why This Recipe Works
Each ingredient plays a critical role. The peanut butter forms the creamy base, the Butterfinger candy provides crunch and flavor complexity, powdered sugar stabilizes the mixture, butter adds richness and binding, and chocolate chips provide the finishing touch that makes these balls visually appealing and delicious.
Step-by-Step Preparation: Mixing & Shaping
Now that we’ve gathered all ingredients and understood their roles, it’s time to bring them together. Follow these detailed steps to achieve perfectly shaped, creamy, and crunchy Chocolate Butterfinger Balls:
- Prepare the Butterfinger Candy: Using a food processor or placing the candy bars in a sealed plastic bag, crush the Butterfinger bars into small, uneven pieces. Aim for a mix of fine crumbs and slightly larger chunks. This texture creates a delightful crunch in every bite. Be careful not to pulverize them completely into powder; you want some chunks for added texture.
- Combine Peanut Butter, Butter, and Powdered Sugar: In a large mixing bowl, combine the creamy peanut butter and melted butter. Stir until smooth and well incorporated. Gradually sift in the powdered sugar while mixing continuously. The mixture should become slightly stiff but still pliable, making it easy to shape into balls. If the mixture is too soft, add a little more powdered sugar, one tablespoon at a time.
- Add Crushed Butterfinger: Gently fold in the crushed Butterfinger candy. Use a spatula to ensure even distribution without breaking down the candy further. The goal is a uniform mixture with visible candy chunks in every portion, which ensures every bite is packed with flavor and texture.
- Chill the Mixture: Cover the bowl with plastic wrap and refrigerate for at least 30 minutes. Chilling firms up the mixture, making it much easier to roll into perfectly round balls and preventing them from sticking to your hands.
- Shape the Balls: Once chilled, scoop a tablespoon of the mixture and roll it gently between your palms to form smooth, round balls. Place each ball on a parchment-lined baking sheet. Keep the balls evenly spaced to allow easy coating with chocolate later.
- Pro Tips for Perfect Balls:
- Use a small cookie scoop for uniform size and even cooking if baking is involved in variations.
- Lightly dust your hands with powdered sugar or cocoa powder to prevent sticking while rolling.
- Chill the formed balls again for 10–15 minutes before dipping in chocolate; this helps the coating adhere better.
These steps ensure that the Chocolate Butterfinger Balls maintain their structure, have a perfect balance of creamy peanut butter and crunchy candy, and are ready for the final chocolate coating. Taking your time during this stage is crucial for creating professional-looking treats that taste as good as they look.
Step-by-Step Preparation: Chocolate Coating & Finishing
After shaping the Chocolate Butterfinger Balls, the next step is giving them their luscious chocolate coating. This stage is where the treats transform from simple peanut butter balls into decadent, glossy, irresistible delights. Follow these detailed steps to achieve a perfect coating every time.
- Melt the Chocolate: In a medium heatproof bowl, combine the semi-sweet chocolate chips with a teaspoon of vegetable oil or unsalted butter to ensure a smooth, glossy finish. Melt using a double boiler or microwave in 30-second intervals, stirring thoroughly after each interval. Avoid overheating, as chocolate can seize and become grainy.
- Prepare for Dipping: Line a baking sheet with parchment or wax paper. Using a fork, toothpick, or dipping tool, pick up each peanut butter ball and prepare to submerge it into the melted chocolate. Ensure your dipping tool allows chocolate to coat evenly without damaging the ball.
- Dip Each Ball: Submerge each ball fully into the melted chocolate, gently shaking off excess coating before placing it on the prepared baking sheet. This ensures an even, professional-looking chocolate layer without drips pooling at the bottom.
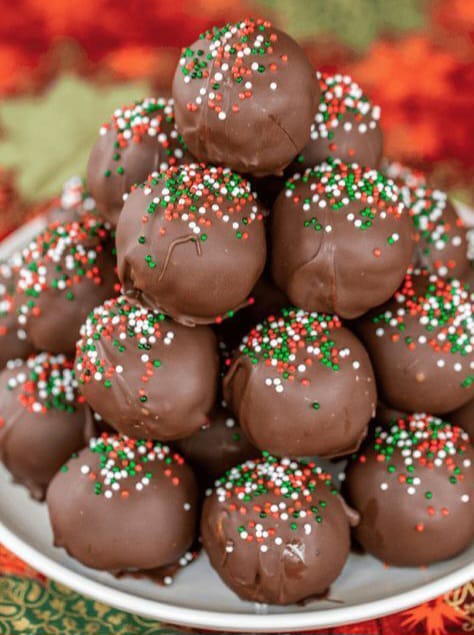
- Optional Decoration: Before the chocolate sets, you can sprinkle:
- Extra crushed Butterfinger pieces
- Chopped nuts like pecans or peanuts
- Colored sprinkles for festive occasions
These not only add visual appeal but also enhance texture and flavor.
- Chill and Set: Place the baking sheet in the refrigerator for at least 20–30 minutes to allow the chocolate to firm completely. This step ensures the coating is crisp to the bite while protecting the creamy, crunchy center.
- Serving Suggestions:
- Arrange the Chocolate Butterfinger Balls on a decorative platter for holiday parties.
- Wrap individually in cupcake liners or clear cellophane bags for gifts.
- Pair with a glass of cold milk or hot coffee to enhance the rich peanut butter and chocolate flavors.
- Pro Tips for Perfection:
- Use room temperature balls for dipping; cold balls may cause chocolate to crack.
- Maintain a consistent chocolate temperature; too hot will melt the peanut butter inside, too cool will cause thick uneven coating.
- If chocolate seizes, add a few drops of vegetable oil or warm milk to bring it back to smooth consistency.
By carefully following these steps, you ensure that each Chocolate Butterfinger Ball has a glossy, even chocolate coating with a creamy, crunchy interior. The combination of textures and flavors makes them irresistible, and the attention to detail elevates them to a professional, bakery-quality treat.
Storage, Ingredient Substitutions & Holiday Presentation
Once your Chocolate Butterfinger Balls are perfectly coated and set, the next step is ensuring they stay fresh and delicious for days, while also exploring ways to customize the recipe for dietary needs or festive occasions. Here’s a detailed guide to make the most of your treats.
Storage Tips:
- Refrigeration: Store the Chocolate Butterfinger Balls in an airtight container in the refrigerator for up to 2 weeks. This keeps the chocolate firm and the peanut butter mixture fresh.
- Freezing: To enjoy them later, place the balls on a parchment-lined tray in a single layer and freeze for 1 hour. Then transfer to a freezer-safe container. They can last up to 3 months frozen. Thaw in the refrigerator before serving.
- Room Temperature: For short-term storage (1–2 days), keep them in a cool, dry place. Avoid direct sunlight or heat to prevent the chocolate from melting.
Ingredient Substitutions & Customization:
- Peanut Butter: Substitute with almond butter, cashew butter, or sunflower seed butter for a nut-free version.
- Butterfinger Pieces: Can be replaced with chopped Heath bars, Skor bars, or any crunchy caramel candy for variety.
- Chocolate Coating: Use dark, milk, or white chocolate depending on preference. For vegan options, choose dairy-free chocolate chips.
- Sweetener Adjustments: For lower sugar content, consider using sugar-free chocolate chips or a powdered sugar alternative for the mixture.
Holiday & Event Presentation Ideas:
- Place each ball in a decorative cupcake liner for individual servings.
- Arrange on a tiered dessert stand to create an elegant display for parties or buffets.
- Wrap in clear cellophane with ribbons for holiday gifts or party favors.
- Drizzle contrasting chocolate (white on dark, dark on milk) over the top for visual flair.
- Sprinkle crushed candy canes, festive sprinkles, or edible glitter to match seasonal themes.
By carefully storing, customizing, and presenting these Chocolate Butterfinger Balls, you can turn a simple homemade treat into a luxurious, gift-worthy dessert that’s perfect for holidays, birthdays, or any special occasion.
Flavor Enhancement, Professional Serving Tips & SEO-Friendly Conclusion
To elevate your Chocolate Butterfinger Balls to a truly gourmet dessert, focusing on flavor layers, texture contrast, and visual appeal is key. Here’s how to take these treats from simple to sensational.
Enhancing the Flavor:
- Roasted Peanut Butter: For deeper nutty notes, lightly roast your peanut butter in a pan for 2–3 minutes before mixing. This brings out natural oils and intensifies flavor.
- Toasted Candy: Gently toast Butterfinger pieces in a 350°F (175°C) oven for 5–7 minutes. This caramelizes sugars slightly and adds extra crunch.
- Sea Salt: A tiny pinch of flaky sea salt sprinkled over the chocolate coating balances sweetness and enhances the overall taste.
- Flavor Infusions: Optional extracts like vanilla, almond, or even a hint of espresso powder can be added to the peanut butter mixture for complexity.
- Chocolate Tempering: Temper the chocolate before coating to achieve a glossy, professional finish that snaps delightfully when bitten.
Professional Serving Tips:
- Serve on a decorative platter lined with parchment or festive doilies for an elegant display.
- Pair with coffee, hot chocolate, or milk for a complete dessert experience.
- Create a mini dessert buffet by mixing these balls with other small treats like truffles, fudge squares, or caramel popcorn.
- Use a piping bag to drizzle contrasting chocolate or caramel over the balls for a bakery-style presentation.
- Label each type of candy with small signs for parties or holiday gatherings, enhancing the visual experience.