Cherry Snowball Cookies – A Timeless Holiday Delight
If you are searching for a dessert that combines buttery softness, delicate sweetness, and that iconic powdered sugar “snowball” look, Cherry Snowball Cookies are your answer. Perfect for holiday gatherings, gifts, or simply indulging in a cozy treat, these cookies carry generations of tradition while offering room for creative variations.
Originating from European festive traditions, these cookies were designed to be visually stunning and flavorful. They feature a tender, melt-in-your-mouth texture that contrasts beautifully with the optional bursts of cherry and nuts. Their light sweetness and soft crumb make them ideal for pairing with warm drinks like hot chocolate or spiced tea, completing the perfect holiday moment.
Ingredients & Their Roles – Understanding Why Each Matters
- 1 cup (2 sticks) unsalted butter, softened: The base of the cookie. Softened butter allows for easy mixing and contributes to the rich, tender texture characteristic of snowball cookies.
- 1/2 cup powdered sugar: Adds a delicate sweetness and contributes to the soft, fine crumb. Unlike granulated sugar, powdered sugar blends smoothly, helping create the iconic snowball appearance.
- 1 teaspoon vanilla extract: Infuses warmth and depth, balancing the buttery notes and complementing the optional cherry flavors.
- 2 1/4 cups all-purpose flour: Provides structure while maintaining a soft, airy texture. Proper measurement and gentle mixing are key to avoid dense cookies.
- Optional Add-ins: Chopped maraschino cherries, white chocolate chips, or finely chopped almonds can elevate the flavor and visual appeal of your snowballs.
By understanding the purpose of each ingredient, you can ensure consistent success every time you bake these cookies. Softened butter aerates when creamed with sugar, flour provides structure without toughness, and vanilla ties all the flavors together. Optional cherries or nuts add bursts of flavor and texture for a more festive, creative version.
Step-by-Step Instructions – Mixing & Preparing the Dough
Now that we have a clear understanding of each ingredient, it’s time to dive into creating the dough. The key to perfect Cherry Snowball Cookies lies in gentle mixing and proper handling of the butter, sugar, and flour. Here’s a detailed, foolproof method:
Step 1: Creaming the Butter and Sugar
In a large mixing bowl, add the softened butter and powdered sugar. Using a hand mixer or stand mixer on medium speed, cream them together for about 3–4 minutes until the mixture becomes light, fluffy, and pale. This aeration step is crucial—it helps create a soft, melt-in-your-mouth texture for your cookies.
Pro Tip: Make sure your butter is softened to room temperature. Cold butter will not incorporate well, and melted butter will produce greasy cookies. If needed, microwave butter for 5–10 seconds in short bursts.
Step 2: Adding Vanilla Extract
Add vanilla extract to the creamed butter-sugar mixture. Beat for another 30 seconds to evenly distribute the flavor. The vanilla doesn’t just add taste—it enhances the aroma and balances the richness of the butter.
Step 3: Incorporating the Flour
Sift the all-purpose flour over the creamed mixture. Gently fold the flour into the butter-sugar mixture using a spatula or low-speed mixer. Avoid overmixing; you want the dough just combined to maintain the soft texture. Overmixing will develop gluten, which may make the cookies tough.
Step 4: Optional Add-Ins
At this stage, fold in your optional ingredients, such as finely chopped maraschino cherries, white chocolate chips, or chopped nuts. These add subtle flavor bursts and festive color, making your snowball cookies visually stunning and even more irresistible.
Step 5: Chilling the Dough
Once combined, cover the dough with plastic wrap and refrigerate for at least 30 minutes. Chilling helps the dough firm up, making it easier to shape the cookies into perfect balls. It also prevents spreading during baking, ensuring your cookies maintain their iconic round shape.
Step 6: Preparing for Baking
While the dough chills, preheat your oven to 350°F (175°C) and line a baking sheet with parchment paper. Using a small cookie scoop or spoon, form the chilled dough into 1-inch balls. Place them evenly spaced on the baking sheet, leaving at least 2 inches between each cookie to allow for minimal spreading.
Pro Tip: If you want perfectly uniform snowballs, weigh each portion of dough to maintain consistent size and baking time.
Step 1: Baking
Place the cookie sheet in the preheated oven at 350°F (175°C). Bake for 12–15 minutes or until the edges just begin to turn a very light golden hue. Remember, overbaking will compromise the delicate texture, so keep a close eye on them during the final minutes.
Pro Tip: Rotate the baking sheet halfway through baking for even heat distribution. This ensures each cookie comes out perfectly uniform, without burnt edges or undercooked centers.
Step 2: Cooling
Remove the cookies from the oven and allow them to cool on the baking sheet for 5 minutes. This step prevents breaking when transferring. Then, carefully move the cookies to a wire rack to cool completely. Cooling is essential for the powdered sugar coating to adhere properly.
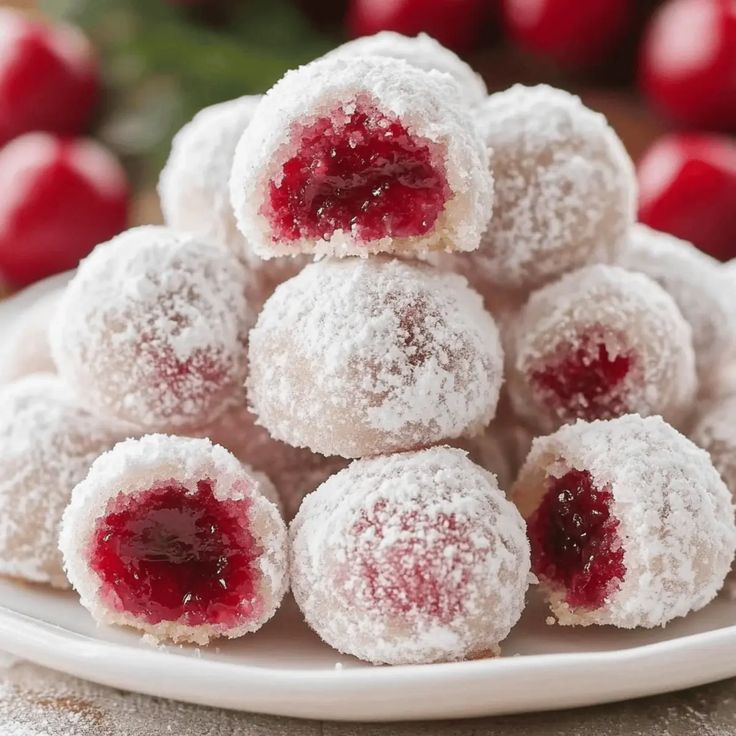
Step 3: Powdered Sugar Coating
Once cooled, place the powdered sugar in a shallow bowl. Gently roll each cookie in the sugar until fully coated. For an extra snow-like effect, consider rolling them a second time after a few minutes to ensure a thicker, even layer. This layer not only enhances sweetness but also gives the cookies their classic snowy appearance.
Step 4: Optional Decoration
For a festive touch, sprinkle finely chopped dried cherries or edible glitter lightly on top of the powdered sugar. This adds color contrast, making your cookies visually stunning for holiday platters or gift boxes.
Step 5: Serving Suggestions
- Serve freshly dusted for the ultimate melt-in-your-mouth experience.
- Pair with hot cocoa, tea, or coffee for a cozy treat.
- Package in clear cellophane bags tied with a ribbon for homemade gifts.
- Arrange on a holiday platter with assorted cookies for an impressive dessert table.
Pro Tip: Store cookies in an airtight container at room temperature for up to 5 days. For longer freshness, layer with parchment paper and refrigerate. They can also be frozen for up to 3 months, retaining both flavor and texture.
Why This Recipe is Loved
These Cherry Snowball Cookies combine the buttery tenderness of classic snowballs with the subtle fruity pop of cherries, making them both comforting and delightfully festive. Each bite melts in your mouth, leaving behind a gentle sweetness and the perfect balance of flavors that keeps everyone coming back for more.
Storage, Freezing & Perfect Presentation for Cherry Snowball Cookies
After baking and coating your Cherry Snowball Cookies, proper storage and presentation are key to keeping them fresh, flavorful, and visually stunning. These cookies are perfect for holiday gifting, dessert platters, or simply enjoying at home with family and friends.
Step 1: Storage at Room Temperature
Store the cookies in an airtight container at room temperature for up to 5 days. Layer the cookies with parchment paper to prevent sticking and maintain the delicate powdered sugar coating. Avoid stacking too many at once, as the weight may flatten the cookies.
Pro Tip: If the powdered sugar starts to fade, lightly dust the cookies again before serving to restore their snowy appearance.
Step 2: Refrigeration
For extended freshness, especially in warmer climates, refrigerate the cookies. Place them in an airtight container with parchment layers. They can last up to 10 days in the refrigerator without losing their softness and flavor.
Step 3: Freezing for Longer Storage
Cherry Snowball Cookies freeze exceptionally well, making them ideal for preparing ahead of time. Wrap each cookie individually in plastic wrap, then place them in a freezer-safe container or zip-top bag. Freeze for up to 3 months. Thaw at room temperature for 1–2 hours before serving. This method preserves the cookie’s delicate texture and the cherry flavor perfectly.
Step 4: Presentation Tips
- Arrange cookies on a festive platter with a dusting of extra powdered sugar for a winter wonderland effect.
- Use small cupcake liners to separate individual cookies for elegant presentation at parties or gatherings.
- Pair with a warm beverage, such as hot cocoa, spiced tea, or coffee, to enhance the melt-in-your-mouth experience.
- Wrap in clear cellophane bags and tie with a ribbon for charming homemade gifts during holidays or special occasions.
- For added holiday cheer, sprinkle finely chopped dried cherries or edible glitter on top of the cookies right before serving.
Step 5: Tips for Serving
These cookies are best served slightly chilled or at room temperature. Encourage guests to enjoy them immediately after rolling in powdered sugar to experience the signature snowball texture. They also pair beautifully with other holiday treats such as peppermint bark, chocolate truffles, or sugar cookies for a diverse dessert platter.
Step 6: Why This Recipe is So Loved
The combination of buttery, tender dough, a delicate powdered sugar coating, and a subtle cherry flavor makes these cookies irresistible. The ease of preparation, adaptability for gifting, and the classic snowy appearance make them a staple for holiday celebrations. Every bite melts in your mouth while delivering a gentle sweetness and a comforting, festive aroma.

Pro Tip: If serving at a large gathering, consider placing small decorative labels or tags with each platter, highlighting “Cherry Snowball Cookies” to make them feel extra special. This adds a professional touch for dessert tables or holiday events.