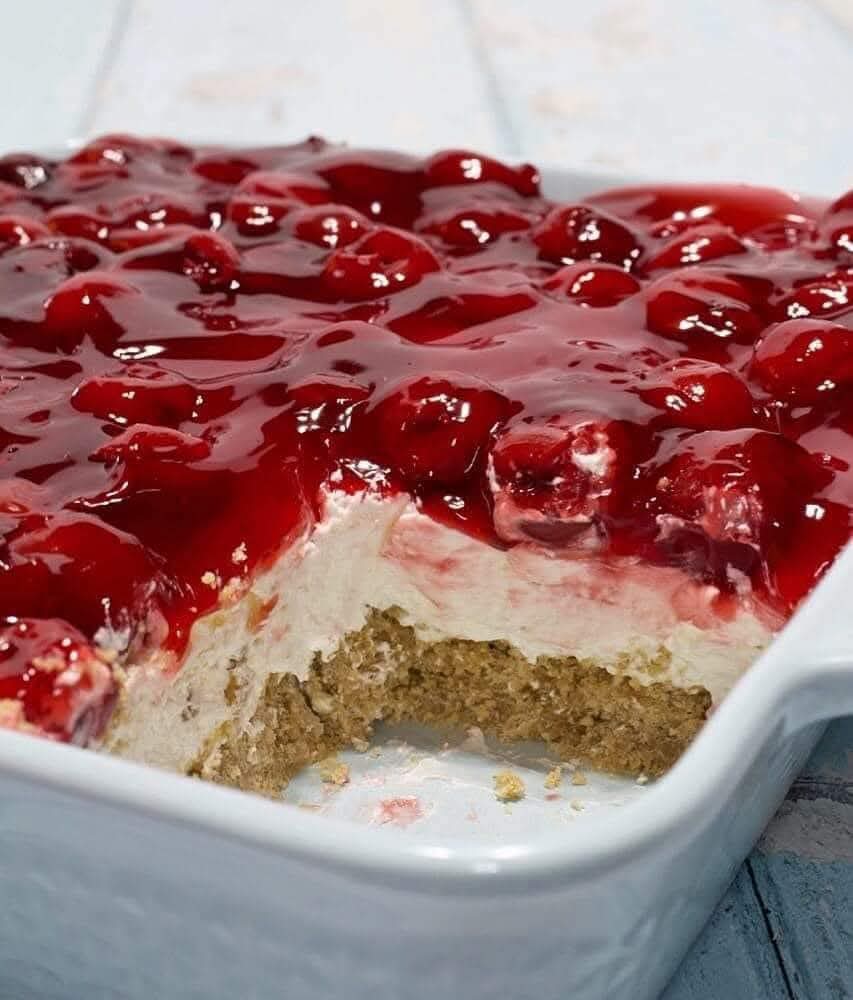
Classic Cherry Delight
Welcome to a world of sweet indulgence with our Classic Cherry Delight. This dessert perfectly balances a buttery graham cracker crust, a rich creamy filling, and a vibrant cherry topping. It’s a timeless treat that captivates both the eyes and the taste buds, making it ideal for holidays, special occasions, or anytime you want to impress your guests with minimal effort but maximum flavor.
Ingredients for the Crust
- 7 tablespoons unsalted butter: Provides richness, moisture, and binds the graham cracker crumbs to create a firm and buttery foundation for the dessert.
- 1 1/2 cups graham cracker crumbs (about 9 whole crackers): Offers a sweet, slightly crunchy base that contrasts beautifully with the creamy filling.
- 3 tablespoons granulated sugar: Enhances the sweetness of the crust and balances the tartness of the cherry topping, adding a delicate caramelized flavor when baked.
Pro Tips for the Crust
For a perfectly uniform crust, use finely crushed graham crackers and ensure the melted butter is fully incorporated. Press the mixture firmly into the pan to prevent crumbling when cutting the dessert. Chilling the crust for 10 minutes before adding the filling helps it maintain structure.
Step-by-Step Preparation of the Crust
- Preheat your oven to 350°F (175°C) and grease an 8×8-inch baking dish with a thin layer of butter or non-stick spray.
- In a medium bowl, combine the graham cracker crumbs and sugar. Stir until evenly mixed.
- Melt the butter over low heat or in the microwave, then pour it over the crumb mixture.
- Use a spatula or your fingers to mix until all crumbs are coated and the mixture resembles wet sand.
- Press the crumbs firmly into the bottom of the prepared baking dish. Ensure an even layer without gaps.
- Bake the crust for 8–10 minutes or until lightly golden. Allow it to cool completely before adding the filling.
Ingredients for the Filling
- 8 ounces cream cheese, softened: The star of the filling, providing a rich, smooth, and slightly tangy flavor. Softened cream cheese ensures easy mixing and a creamy texture without lumps.
- 1/3 cup granulated sugar: Sweetens the cream cheese mixture, balancing the tanginess and enhancing the cherry flavor to come.
- 1 teaspoon pure vanilla extract: Adds depth, warmth, and aroma, complementing both the cream cheese and cherry topping.
- 1/2 cup heavy whipping cream: Whipped, it lightens the filling, creating a mousse-like consistency that melts in your mouth.
- Optional: 1 tablespoon lemon juice: Brightens the flavor and adds a subtle zing to contrast the sweetness.
Step-by-Step Instructions for the Filling
- In a large mixing bowl, beat the softened cream cheese with an electric mixer on medium speed until smooth and creamy.
- Add the granulated sugar gradually, continuing to beat until fully incorporated and silky smooth.
- Mix in the vanilla extract and, if using, lemon juice. Beat for another 30 seconds to evenly distribute the flavors.
- In a separate bowl, whip the heavy cream until soft peaks form. Be careful not to overwhip, as it may turn into butter.
- Gently fold the whipped cream into the cream cheese mixture using a spatula. Use a folding motion to maintain the airy texture of the filling.
- Pour the filling evenly over the cooled graham cracker crust. Smooth the top with an offset spatula or back of a spoon for a professional finish.
- Chill the dessert in the refrigerator for at least 2–3 hours, or until the filling is set. For best results, cover with plastic wrap to prevent it from absorbing other fridge odors.
Pro Tips for the Filling
- Always use room temperature cream cheese to prevent lumps in the filling.
- Whipping the cream separately and folding it gently ensures the filling is light and airy rather than dense.
- If you want an extra smooth texture, sift the sugar before adding it to the cream cheese.
- For a flavor twist, add a pinch of cinnamon or almond extract to the filling to complement the cherry topping.
Cherry Topping Ingredients
- 1 can (21 ounces) cherry pie filling: Provides a sweet, slightly tart layer that balances the creamy filling. The canned filling ensures consistency in flavor and texture.
- Optional: 1 teaspoon fresh lemon juice: Enhances the cherry flavor and adds a subtle tanginess that contrasts the sweet cream cheese filling.
- Optional: 1 tablespoon cornstarch: Helps thicken the cherry topping if it is too runny, ensuring it stays neatly on top without seeping into the filling.
Step-by-Step Instructions for the Topping
- If using, drain some of the liquid from the cherry pie filling to avoid a soggy dessert base.
- In a small saucepan over medium heat, combine the cherry pie filling and lemon juice. Warm gently for 2–3 minutes to blend the flavors.
- If the topping appears too thin, dissolve the cornstarch in 1 tablespoon of water and stir into the warm filling. Cook until slightly thickened, about 1–2 minutes, stirring constantly.
- Allow the topping to cool slightly to room temperature to prevent it from melting the cream cheese layer when assembled.
- Once cooled, spoon the cherry topping evenly over the chilled cream cheese filling. Spread gently using a spatula to create an even layer.
- For a professional finish, leave a small border around the edges so the crust is visible, creating a clean presentation.
Assembling the Classic Cherry Delight
- Ensure the graham cracker crust is fully cooled before adding the filling to avoid sogginess.
- Pour the whipped cream cheese filling over the crust and smooth with an offset spatula.
- Chill in the fridge for 2–3 hours until set.
- Top with the prepared cherry topping just before serving to maintain the vibrant color and prevent moisture from seeping into the filling.
- Optional garnish: sprinkle shaved chocolate, crushed nuts, or a light dusting of powdered sugar for added texture and elegance.
Pro Tips for Cherry Topping & Assembly
- Use room temperature cherries if freshly cooked or canned to prevent cold spots on the creamy layer.
- Folding cornstarch slurry carefully ensures a glossy, thick topping that sits perfectly atop the filling.
- Chill the dessert for the full recommended time—this helps all layers firm up, making slicing clean and professional.
- When slicing, use a serrated knife dipped in hot water to create smooth, neat pieces without smearing the cherry topping.
Advanced Serving Tips
- Chill before serving: Ensure the dessert is well chilled for at least 3–4 hours. This helps the filling and cherry topping set properly, making it easier to cut clean slices.
- Slice neatly: Use a serrated knife dipped in warm water and wipe it between cuts. This prevents the cherry topping from smearing and gives professional-looking slices.
- Individual servings: For parties, serve in small dessert cups or jars. Layer crust, cream cheese filling, and cherry topping for an elegant, portable presentation.
- Pairings: Serve with a dollop of whipped cream, a drizzle of chocolate, or a sprig of fresh mint to enhance visual appeal and flavor complexity.
Creative Garnishing Ideas
- Chocolate curls: Sprinkle dark or milk chocolate shavings over the cherry topping for contrast and added texture.
- Chopped nuts: Walnuts, pecans, or almonds add crunch and a nutty complement to the sweet and creamy layers.
- Fresh berries: Top with fresh raspberries or sliced strawberries for extra color and natural tartness.
- Edible flowers: Use small edible flowers like violets or pansies to elevate the presentation for special occasions.
- Layer variations: Consider adding a thin layer of chocolate ganache between the crust and filling or incorporating maraschino cherries inside the cream layer for surprise bites.
Serving for Guests & Special Occasions
- Plate each slice individually with a small pool of extra cherry topping on the side.
- For buffets or holiday gatherings, place the dessert on a tiered cake stand to showcase the layers and colors.
- Provide small dessert spoons or forks for effortless serving when using mini parfait cups or jars.
- Label the dessert as “Classic Cherry Delight” with a description highlighting its creamy, fruity, and buttery layers to entice guests.
- Prepare in advance: Make the crust and filling a day ahead and store in the refrigerator. Add the cherry topping just before serving to maintain freshness.
Pro Tips for Perfect Presentation
- Wipe any spilled cherry juice off the plate edges for a clean, professional look.
- Use uniform portioning when cutting slices or filling individual cups for consistent presentation.
- Experiment with layering in glass cups to showcase each ingredient distinctly for a visually stunning effect.
- Consider using colored toothpicks or small decorative flags for themed parties or events.
- Keep extra cherry topping handy for guests to add more if desired, making the dessert interactive and fun.
Classic Cherry Delight
Why This Dessert Stands Out
The Classic Cherry Delight is a harmonious blend of creamy, buttery, and fruity elements, creating a dessert that’s both indulgent and visually stunning. Its graham cracker crust provides a buttery, crunchy base that contrasts perfectly with the soft, tangy cream cheese filling and the vibrant cherry topping. This trifecta of textures and flavors is what makes this dessert irresistible and a guaranteed crowd-pleaser.
Final Pro Tips for Perfect Results
- Chill thoroughly: Always refrigerate for at least 4 hours or overnight. This ensures the filling sets perfectly and the slices hold their shape.
- Use high-quality ingredients: Opt for premium cream cheese, fresh cherries, and unsalted butter for superior taste and texture.
- Cut with precision: Warm the knife with hot water between cuts to maintain clean slices without smearing the cherry layer.
- Personalize creatively: Add chocolate drizzle, crushed nuts, or edible flowers for festive occasions or to match your personal taste.
- Serve thoughtfully: Pair with whipped cream, a scoop of vanilla ice cream, or a light coffee to elevate the dining experience.
Serving Suggestions
Classic Cherry Delight is versatile for family gatherings, holidays, or dinner parties. You can serve it as a large, elegant centerpiece dessert or as individual portions in dessert cups or jars. Its bright red cherry topping makes it visually striking, perfect for special occasions. Consider layering the dessert in clear cups to showcase each distinct layer: crust, cream filling, and cherry topping.
Final Words
The Classic Cherry Delight is not only simple to prepare but also guaranteed to impress. Its perfect balance of creamy filling, buttery crust, and luscious cherry topping makes it a dessert that everyone will love. Whether you’re baking for friends, family, or a special occasion, this recipe ensures your dessert is delicious, visually stunning, and memorable. Give it a try, follow each detailed step, and enjoy the satisfaction of serving a dessert that truly delights every palate.
Embrace the simplicity, savor the flavors, and make Classic Cherry Delight a signature dessert in your kitchen!