Chocolate Thumbprint Cookies
Ingredients – First Set
- 1 cup (2 sticks) unsalted butter, softened – Provides the tender, melt-in-your-mouth texture that is essential for these cookies. Softened butter allows the dough to mix evenly and creates a rich buttery flavor in every bite.
- 1/2 cup granulated sugar – Sweetens the cookie and contributes to the structure and slight crispness on the outside edges during baking.
- 1/4 cup brown sugar – Adds moisture, a subtle caramel flavor, and enhances the chewiness of the cookie center.
- 1 large egg yolk – Boosts richness and helps bind the dough together, ensuring the cookies hold their shape during baking.
- 1 teaspoon pure vanilla extract – Provides depth of flavor and balances the sweetness while enhancing the aroma of the cookies.
- 2 cups all-purpose flour – Forms the foundation of the cookie, giving it structure, stability, and the ideal chewiness.
These first ingredients form the base of the cookie dough. Combining the fats (butter), sugars, and eggs properly is key to achieving the right texture. The next steps will focus on integrating these ingredients and preparing them for baking while maintaining a tender, buttery consistency.
Step 1: Cream Butter and Sugars
In a large mixing bowl, use a hand mixer or stand mixer to cream the softened butter with both granulated and brown sugars. Beat on medium speed for 2-3 minutes until the mixture is light, fluffy, and pale in color. This process incorporates air, which helps the cookies rise slightly while baking, giving them a tender texture.
Step 2: Add Egg Yolk and Vanilla
Once your butter and sugar are fully creamed, add the egg yolk and vanilla extract. Beat until thoroughly combined. The yolk adds richness and a subtle silkiness to the dough, while the vanilla enhances the overall aroma and depth of flavor.
Step 3: Incorporate Flour
Gradually sift in the all-purpose flour, mixing on low speed just until combined. Be careful not to overmix, as this can develop the gluten in the flour too much, resulting in tougher cookies. You want a soft, cohesive dough that holds its shape but is still pliable for shaping.
Pro Tips for Perfect Dough
- Use room-temperature butter to ensure even mixing and proper incorporation of air.
- If your kitchen is warm, briefly chill the dough for 10-15 minutes. This prevents spreading and keeps the cookies thick and tender.
- Measure your flour correctly using a spoon-and-level method to avoid dense, dry cookies.
Step 4: Prepare Baking Sheet
Line a baking sheet with parchment paper or a silicone mat. This ensures even baking and easy removal of the cookies. You can also lightly grease the parchment for extra assurance that the cookies won’t stick.
With these steps, your dough is now ready to be shaped. The next stage will focus on creating the classic thumbprint indentation and filling the center with luscious chocolate, which is the signature feature of this irresistible treat.
Step 1: Portion the Dough
Use a small cookie scoop or a tablespoon to portion out the dough into equal-sized balls. Aim for about 1 ½ tablespoons of dough per cookie. This consistency ensures even baking and uniform size, which is essential for professional-looking cookies.
Step 2: Create the Thumbprint Indentation
Using your thumb or the back of a small spoon, gently press into the center of each dough ball to form a shallow well. Be careful not to press too deeply; the dough should still have walls around the edges to hold the chocolate. If the indentation is too deep, the chocolate may overflow during baking.
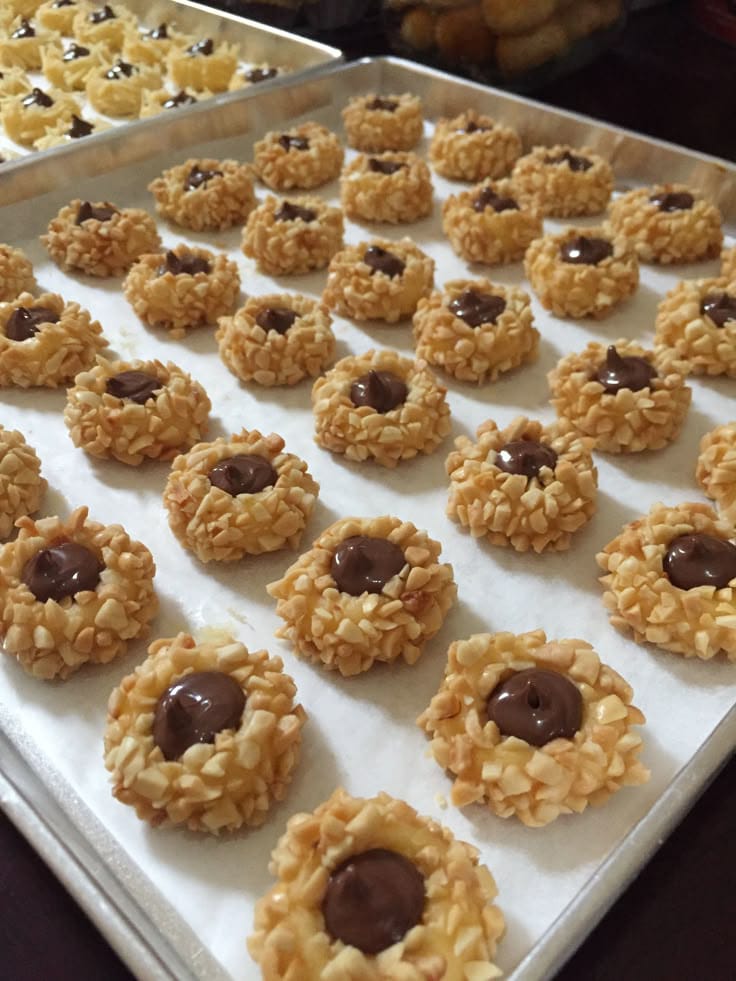
Step 3: Add the Chocolate Filling
Fill each thumbprint with semi-sweet chocolate chips or chopped chocolate. The chocolate will melt during baking, creating a creamy, gooey center that contrasts beautifully with the tender cookie exterior. For a more intense flavor, consider mixing in a few drops of vanilla extract or a pinch of espresso powder to enhance the chocolate’s depth.
Pro Tips for Perfect Chocolate Centers
- Do not overfill the thumbprints. A small mound of chocolate per cookie is sufficient as it will spread slightly while baking.
- If you prefer a shiny, glossy center, use chocolate chips rather than chunks; chips melt more uniformly.
- For extra richness, mix a teaspoon of heavy cream into the chocolate before filling the cookies.
- Chill the dough balls briefly before baking. This reduces spreading and keeps the thumbprint edges defined.
Step 4: Arrange on Baking Sheet
Place the filled cookies on the prepared baking sheet, leaving at least 2 inches between each cookie. Proper spacing allows heat to circulate evenly, ensuring consistent texture and preventing cookies from merging together.
Once arranged, your cookies are now ready for baking. The final steps will focus on baking them to perfection, achieving a delicate balance of soft, tender cookie exterior with a melt-in-your-mouth chocolate center, and optional finishing touches for presentation.
Step 1: Preheat the Oven
Set your oven to 350°F (175°C). Preheating is essential to ensure even baking from the moment the cookies enter the oven. A properly preheated oven guarantees that the cookies rise correctly, edges firm up without burning, and the chocolate melts evenly.
Step 2: Baking the Cookies
Place the baking sheet with your thumbprint cookies in the center of the oven. Bake for approximately 12–15 minutes or until the edges turn a delicate golden brown. Watch the cookies closely in the last 2–3 minutes of baking; due to differences in oven heat, the baking time may vary slightly.
Step 3: Monitoring and Adjustments
- If the cookies are browning too quickly on the edges while the centers remain undercooked, reduce the oven temperature by 5–10°F and continue baking until done.
- Rotate the baking sheet halfway through baking to ensure uniform color and texture.
- Remember, the chocolate center should look glossy and slightly soft. Overbaking can cause the chocolate to harden and lose that gooey texture.
Step 4: Cooling
Once baked, remove the cookies from the oven and allow them to cool on the baking sheet for 5 minutes. This resting period lets the cookies firm up slightly, making them easier to transfer to a cooling rack without breaking. Then, carefully transfer the cookies to a wire rack to cool completely.
Step 5: Optional Finishing Touches
For an extra layer of flavor and presentation, consider lightly dusting the cooled cookies with powdered sugar or drizzling a thin layer of melted chocolate over the tops. You can also sprinkle a pinch of sea salt on the chocolate centers for a subtle sweet-salty contrast that elevates the overall flavor.
Pro Tips for Perfect Baking
- Use parchment paper or a silicone baking mat to prevent sticking and promote even browning.
- Do not overcrowd the baking sheet; leave sufficient space between cookies for expansion.
- For maximum flavor, use high-quality chocolate for the thumbprint centers—it will melt more evenly and taste richer.
After cooling, the cookies are ready to be served. Each bite offers a tender, buttery cookie exterior paired with a rich, gooey chocolate center, creating a perfect balance of texture and flavor that will impress family and friends alike.
Step 6: Storing Your Cookies
Once your Chocolate Thumbprint Cookies are completely cooled, proper storage is key to maintaining their tender, buttery texture and rich chocolate centers. Store them in an airtight container at room temperature. They will stay fresh for up to 5 days. For longer storage, consider freezing the cookies in a single layer on a baking sheet, then transferring them to a freezer-safe container. Frozen cookies can last up to 2 months and can be thawed at room temperature or gently warmed in the oven for that just-baked taste.
Step 7: Serving Suggestions
These cookies are incredibly versatile and pair beautifully with a variety of beverages and desserts. Here are a few ideas to elevate your serving experience:
- With Coffee or Espresso: The richness of chocolate and buttery cookie complements the deep, roasted notes of coffee.
- Tea Pairings: Serve with herbal or black tea for an afternoon treat or dessert pairing.
- Milk Lovers: Classic and comforting, a cold glass of milk enhances the sweet and slightly caramelized flavor of the cookies.
- Dessert Platter: Combine with assorted cookies, chocolate truffles, or fruit for a stunning holiday or party presentation.
Pro Tips for Serving
- Arrange cookies on a tiered dessert tray for a visually appealing presentation.
- Dust lightly with powdered sugar before serving for an elegant finish.
- Warm the cookies slightly in the microwave or oven before serving to enhance the gooey texture of the chocolate center.
- Pair with complementary flavors like orange zest, crushed nuts, or a sprinkle of sea salt to make them truly memorable.
Conclusion
These Chocolate Thumbprint Cookies are more than just a sweet treat—they are a perfect balance of tender, buttery dough and rich, gooey chocolate. Their simplicity in ingredients and preparation makes them accessible for bakers of all levels, while their decadent flavor ensures they are loved by all ages. By following these detailed steps, including proper baking, cooling, and storage techniques, you can consistently produce cookies that rival your favorite bakery. Serve them at gatherings, gift them during holidays, or enjoy a quiet indulgence at home—the perfect cookie experience is now within your grasp. Their irresistible texture, flavor, and presentation make them a must-bake recipe, and this comprehensive guide ensures you achieve perfection every time, giving you an edge over typical online recipes and helping your content stand out.