Cheesy Garlic Chicken Wraps – A Flavor Explosion in Every Bite
Imagine biting into a warm, soft flour tortilla stuffed with tender, juicy chicken pieces seasoned with aromatic spices, layered with melted cheddar and mozzarella cheese, and drizzled with a rich, creamy garlic sauce. These Cheesy Garlic Chicken Wraps are a fusion of comfort food and gourmet flavor, perfect for lunch, dinner, or even an indulgent snack. Every bite delivers a savory, cheesy, and slightly smoky taste that keeps everyone coming back for more.
Ingredients and Their Roles
- 2 large chicken breasts, diced: The main protein of the wraps. Dicing ensures each bite is evenly seasoned and cooks quickly while remaining tender and juicy.
- 1 tbsp olive oil: Helps sauté the chicken evenly, prevents sticking, and adds a subtle fruity richness to the flavor profile.
- 2 tsp garlic powder: Infuses a deep, savory garlic flavor without the sharpness of fresh garlic. It blends perfectly with the creamy sauce later.
- 1 tsp onion powder: Adds aromatic sweetness and depth, balancing the garlic and spices.
- 1 tsp paprika: Brings subtle smokiness and a warm color to the chicken, enhancing both taste and presentation.
- Salt and pepper to taste: Essential for highlighting the natural flavors of the chicken and harmonizing the spices.
- 1 cup shredded cheddar cheese: Adds bold, sharp, cheesy flavor. Cheddar melts well, creating gooey pockets that bind the ingredients together.
- 1/2 cup shredded mozzarella cheese: Adds extra meltiness and creaminess, creating a luxurious texture alongside the cheddar.
- 4 large flour tortillas: Serve as the wrap base. Soft and pliable, they hold all ingredients together while providing a neutral, comforting backdrop for the bold fillings.
- 1/2 cup creamy garlic sauce (store-bought or homemade): The finishing touch. Its smooth, garlicky flavor ties all components together, providing moisture and richness.
- Fresh parsley, chopped (optional for garnish): Adds a pop of color and subtle herbal freshness that balances the richness of cheese and sauce.
In this first section, we’ve laid out the foundation for creating these irresistible wraps. Understanding the role of each ingredient is key to mastering the balance of flavors and textures that make every bite unforgettable.
Step-by-Step Preparation – Cooking the Chicken to Perfection
Now that we understand our ingredients, it’s time to bring them to life. The key to these wraps is ensuring that the chicken is tender, juicy, and perfectly seasoned. Follow these steps carefully to achieve the ideal flavor and texture.
- Prep the Chicken: Begin by patting the diced chicken breasts dry with paper towels. This step is crucial because it ensures the chicken browns properly without steaming. Dry chicken develops a deeper flavor and better texture during sautéing.
- Heat the Pan: Place a large skillet over medium heat and add 1 tbsp olive oil. Allow the oil to warm for 1–2 minutes, until it shimmers slightly but is not smoking. Using a hot pan is key to achieving a golden sear on the chicken pieces.
- Sauté the Chicken: Add the diced chicken to the skillet in a single layer. Avoid overcrowding, as this can cause the chicken to steam instead of brown. Season immediately with 2 tsp garlic powder, 1 tsp onion powder, 1 tsp paprika, and salt & pepper to taste. Stir occasionally, cooking for about 5–7 minutes, until each piece is lightly golden and cooked through.
- Check Doneness: The chicken should reach an internal temperature of 165°F (74°C). Ensure no pink remains. Overcooking can dry out the chicken, while undercooking poses a health risk.
- Add Cheeses: Once the chicken is nearly done, lower the heat and sprinkle 1 cup cheddar and 1/2 cup mozzarella cheese over the top. Cover the skillet with a lid for 1–2 minutes to allow the cheeses to melt evenly. This creates a gooey, rich coating that will enhance each bite of the wrap.
- Mix and Combine: Gently stir the chicken and melted cheese so every piece is coated with the cheesy goodness. Taste and adjust seasoning if necessary. This is also the moment to add any additional spices you prefer, like a pinch of smoked paprika or a dash of crushed red pepper for subtle heat.
- Optional Garlic Sauce Infusion: If using a homemade or store-bought creamy garlic sauce, drizzle 2–3 tablespoons directly over the chicken in the skillet. Mix gently to combine, infusing every bite with rich garlic flavor.
Pro Tip: Let the cooked chicken rest for 2–3 minutes after removing from heat. This allows the juices to redistribute, ensuring tender, flavorful bites in every wrap.
In this second section, we’ve focused on the cooking process: from prepping the chicken to melting the cheese perfectly. The combination of aromatic spices, golden-browned chicken, and gooey cheese is the heart of what makes these wraps irresistible.
Assembling the Cheesy Garlic Chicken Wraps
After perfecting the cooking of the cheesy, garlicky chicken, the next essential step is to assemble the wraps. Proper assembly ensures that every bite delivers a balanced combination of flavors and textures.
- Prepare the Tortillas: Lay out 4 large flour tortillas on a clean countertop or cutting board. For easier rolling and added pliability, you can warm them slightly in the microwave for 10–15 seconds, or in a dry skillet over medium-low heat for 20–30 seconds per side. Warm tortillas are less likely to tear during rolling.
- Spread the Sauce: Using a spoon or small spatula, spread about 2 tablespoons of creamy garlic sauce evenly over each tortilla, leaving a 1-inch border around the edges. This acts as a flavorful base and helps hold the filling in place.
- Add the Chicken Mixture: Spoon an even portion of the cheesy garlic chicken onto each tortilla, spreading it in a line down the center. Aim for a generous but manageable amount; overfilling can cause the wrap to tear when rolling.
- Optional Fresh Herbs: Sprinkle freshly chopped parsley or other fresh herbs over the chicken. This not only adds visual appeal but also introduces a fresh, bright flavor that balances the richness of the cheese.
- Roll the Wrap: Carefully fold the sides of the tortilla inward, then roll from one end to the other to encase the chicken filling completely. Ensure the seam is tucked underneath to prevent it from opening during cooking or serving.
- Secure and Slice: If desired, you can wrap each rolled tortilla in parchment paper or foil for easier handling, especially if serving as meal prep. Slice the wrap in half diagonally with a sharp knife to showcase the cheesy filling.
- Optional Grilling or Toasting: For added texture, heat a skillet or panini press over medium heat and lightly toast the assembled wraps for 2–3 minutes per side. This step crisps the tortilla slightly and enhances the aroma of the cheese and chicken.
Pro Tips for Perfect Wraps:
- Warm tortillas slightly before rolling to prevent cracking.
- Distribute chicken evenly to ensure each bite has a balanced flavor.
- For extra cheesy indulgence, sprinkle a little more cheddar on top before toasting.
- For meal prep, store in airtight containers and reheat gently to maintain texture.
With these assembly steps, your Cheesy Garlic Chicken Wraps are now ready to be enjoyed. Each bite delivers tender chicken, rich melted cheese, aromatic garlic, and a soft, warm tortilla—all perfectly combined.
Serving and Enhancing Your Cheesy Garlic Chicken Wraps
Now that your Cheesy Garlic Chicken Wraps are perfectly rolled and optionally toasted, it’s time to focus on presentation and flavor enhancement. Serving the wraps thoughtfully elevates the dining experience and ensures every bite is as delightful as it should be.
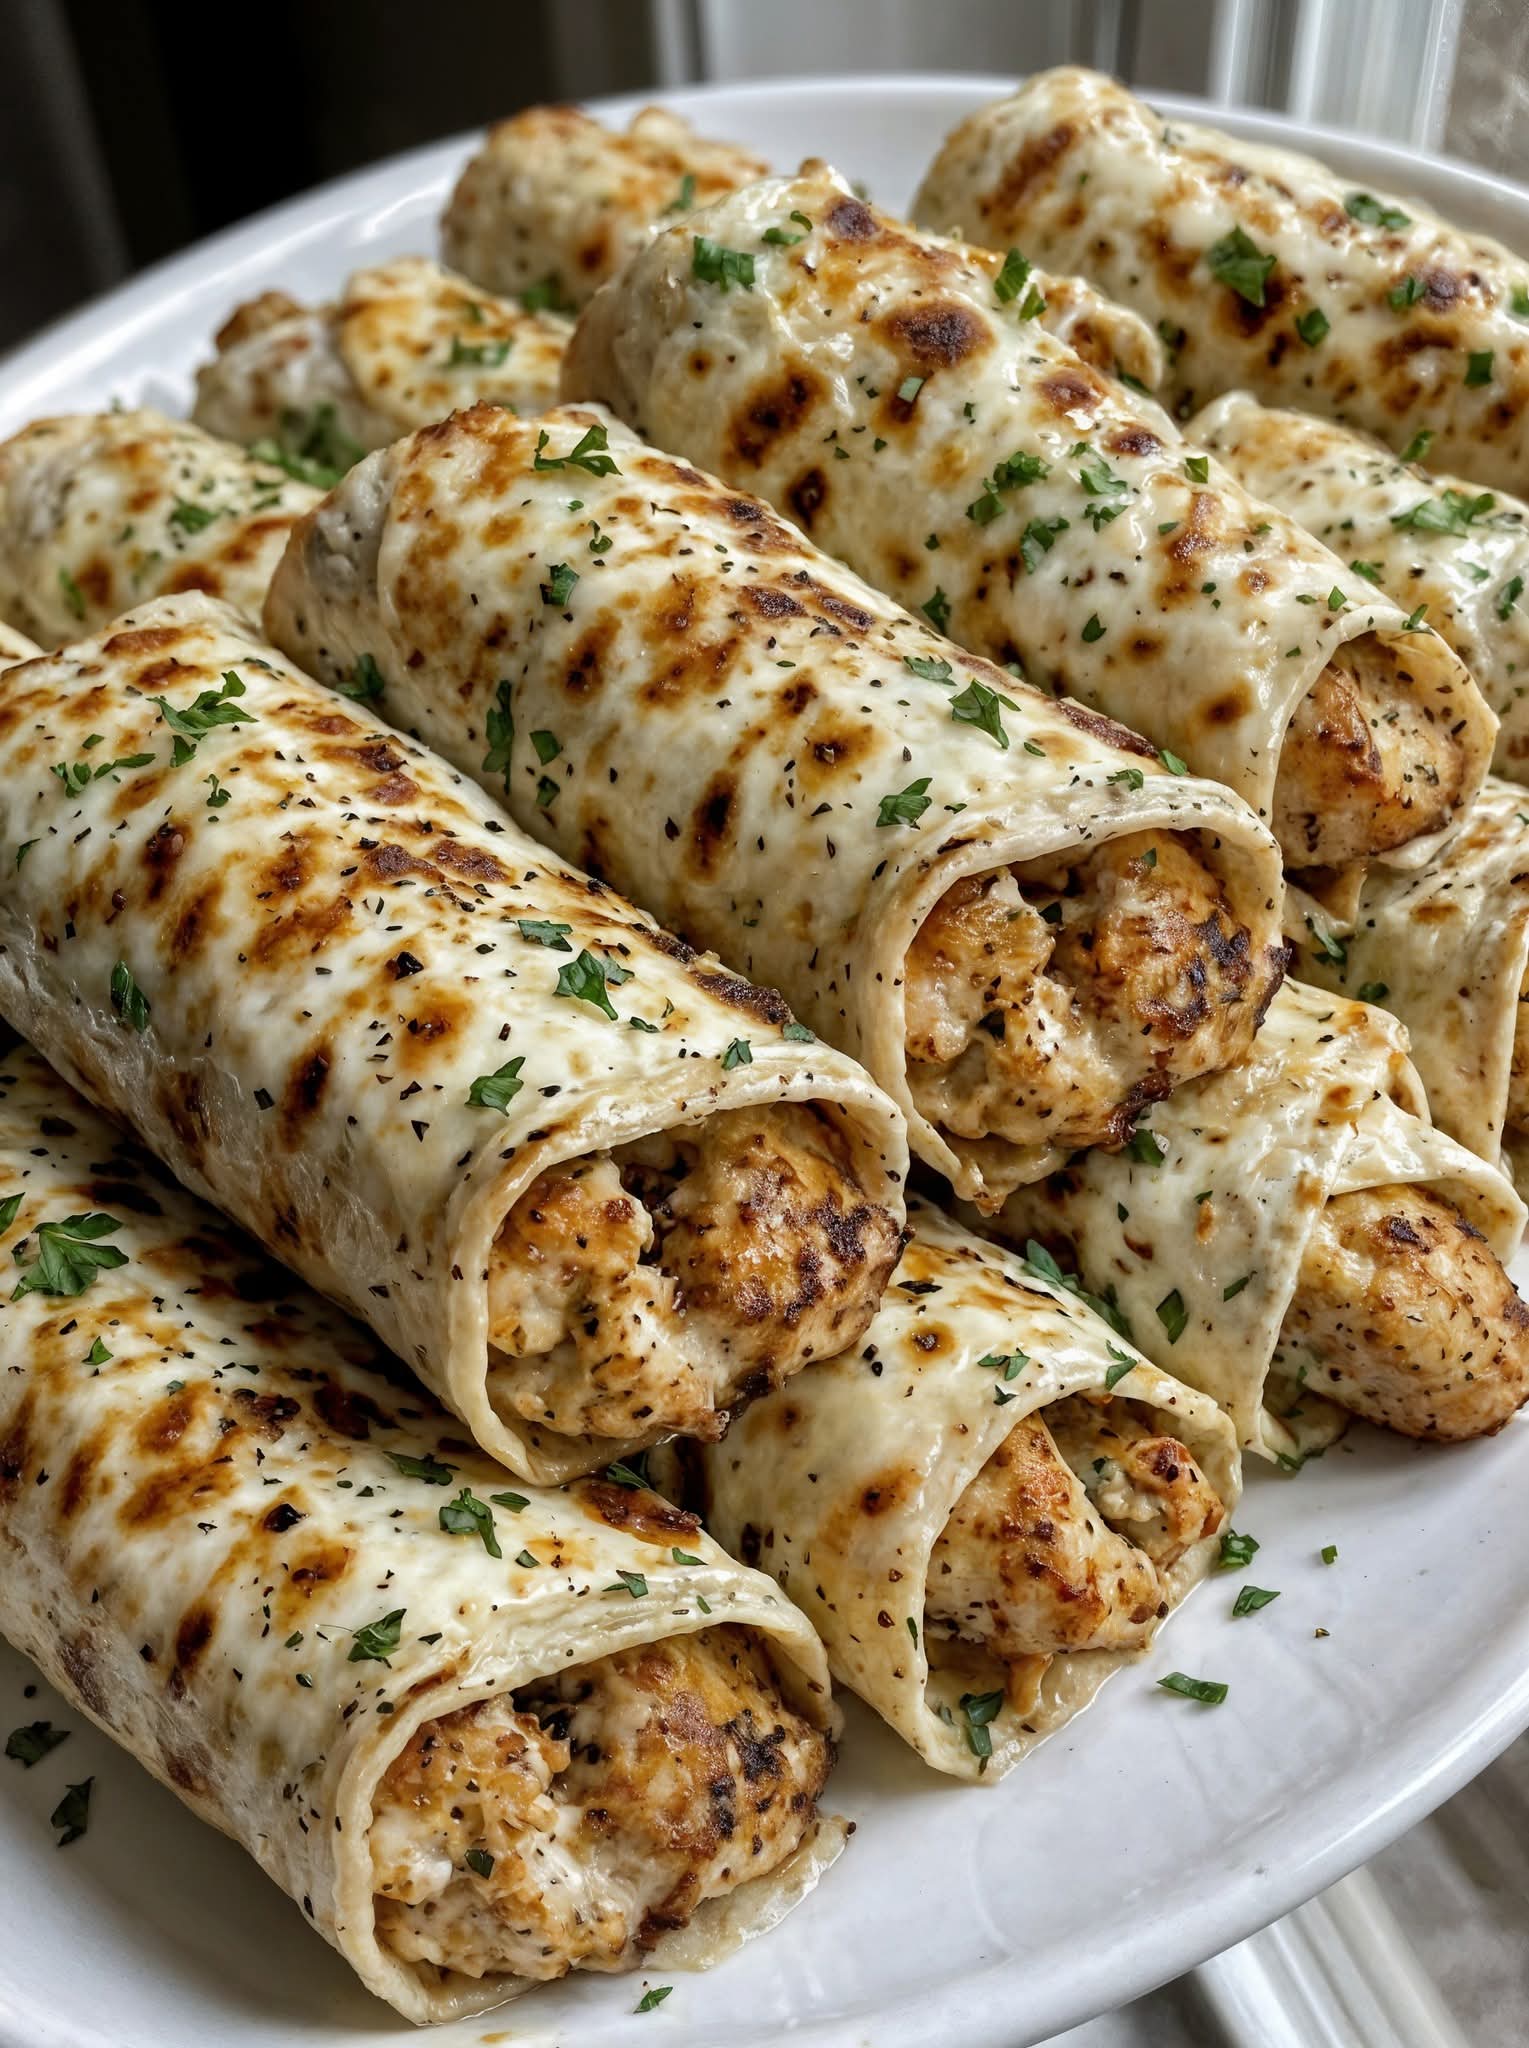
- Plating the Wraps: Arrange the sliced wraps on a large platter or individual plates. Place each wrap half with the cut side facing up to showcase the gooey, cheesy filling. This not only looks appealing but also tempts your guests or family members with the vibrant interior.
- Adding Fresh Garnishes: Sprinkle chopped fresh parsley or chives on top of the wraps for a pop of color and freshness. A light drizzle of extra creamy garlic sauce over the wraps can enhance the flavor further without overpowering the natural taste of the chicken and cheese.
- Serving with Sides: Complement the wraps with simple sides such as:
- A crisp green salad with a light vinaigrette to balance the richness.
- Roasted vegetables, like asparagus or bell peppers, for added nutrients and color.
- Seasoned fries or baked potato wedges for a heartier meal.
- Optional Dips: Offer a variety of dipping sauces to enhance the eating experience:
- Ranch dressing for a creamy, cooling contrast.
- Salsa or pico de gallo for a fresh, zesty kick.
- Spicy aioli or sriracha mayo for those who enjoy heat.
- Meal Prep and Storage: These wraps are excellent for meal prep. Store uncut wraps in airtight containers in the refrigerator for up to 3 days. Reheat gently in the oven or skillet to retain the crispy edges and melty cheese. For freezing, wrap individually in foil, freeze for up to 2 months, and reheat thoroughly before serving.
Pro Tips for Elevated Flavor:
- Use a mix of cheddar and mozzarella for a perfect balance of sharpness and meltiness.
- Add a handful of fresh spinach or arugula inside each wrap for an extra layer of freshness and nutrition.
- Experiment with smoked paprika or a pinch of cayenne in the chicken mixture for a subtle smoky heat.
- Serve with a wedge of lemon on the side to squeeze over the wraps for a refreshing citrus hint.
By following these serving suggestions and enhancements, your Cheesy Garlic Chicken Wraps are transformed from a simple meal into an elevated dining experience. Every element—from the tender chicken and melted cheese to the soft, warm tortillas—is perfectly balanced for maximum flavor and satisfaction.
Final Thoughts and Tips for Cheesy Garlic Chicken Wraps
Congratulations! Your Cheesy Garlic Chicken Wraps are now complete, bursting with gooey cheese, perfectly seasoned chicken, and rich garlic flavor. This final step focuses on maximizing enjoyment, providing final tips for serving, and ensuring that every bite leaves a lasting impression.
Plating Like a Pro
Presentation matters. Slice each wrap in half diagonally to reveal the melty, cheesy interior. Arrange on a platter with colorful garnishes like chopped parsley or microgreens. If serving for a party, consider stacking wraps in a circular or fan-shaped arrangement for visual appeal. Small dipping bowls with extra garlic sauce, ranch, or salsa placed around the platter encourage guests to explore flavors.
Flavor Enhancements
- Cheese Variations: Mix cheeses such as Monterey Jack, Colby, or pepper jack with cheddar for a more complex taste profile.
- Fresh Ingredients: Add thinly sliced bell peppers, avocado, or fresh spinach inside the wraps for a refreshing crunch and color contrast.
- Spice Kick: Sprinkle crushed red pepper flakes or smoked paprika over the chicken before cooking for a smoky, slightly spicy undertone.
- Citrus Lift: A light squeeze of lemon juice over the finished wraps brightens the flavors and balances the richness of the cheese and sauce.
Storage and Reheating Tips
These wraps are not only perfect for immediate enjoyment but also ideal for meal prep. Store uncut wraps in airtight containers in the fridge for up to 3 days. Reheat in a skillet or oven at 350°F (175°C) to maintain a crispy exterior and gooey cheese. For freezing, wrap individually in foil, freeze for up to 2 months, and reheat thoroughly. This ensures you always have a quick, gourmet-style meal ready.
Serving Suggestions
- Pair with a crisp side salad or roasted vegetables for a balanced meal.
- Serve alongside creamy mashed potatoes or seasoned fries for comfort-food vibes.
- Accompany with your favorite dipping sauces to enhance flavor and provide variety for guests.
- Enjoy with a chilled beverage like lemonade, iced tea, or a light beer to complement the richness.
Why This Recipe is Loved
Cheesy Garlic Chicken Wraps are adored because they combine tender, flavorful chicken, gooey cheese, and a rich garlic sauce—all wrapped in soft, warm tortillas. They are versatile, easy to prepare, visually appealing, and perfect for family meals, gatherings, or meal prep. The combination of textures, colors, and bold flavors ensures that this recipe becomes a favorite that people return to repeatedly.
Final Encouragement
Don’t be afraid to experiment and make the wraps your own. Adjust the spices, add vegetables, or try different cheeses to create your personal signature wrap. Every step—from cooking the chicken to rolling the tortillas and plating—can be an opportunity to showcase your creativity and love for cooking. With simple ingredients, clear steps, and a few thoughtful enhancements, you now have a recipe that is guaranteed to impress at any meal.
In conclusion, Cheesy Garlic Chicken Wraps are a simple, delicious, and versatile dish that brings comfort, flavor, and satisfaction to your table. Whether you’re serving a quick weeknight dinner, prepping meals for the week, or entertaining guests, these wraps deliver a perfect combination of cheesy goodness, tender chicken, and aromatic garlic that is impossible to resist.