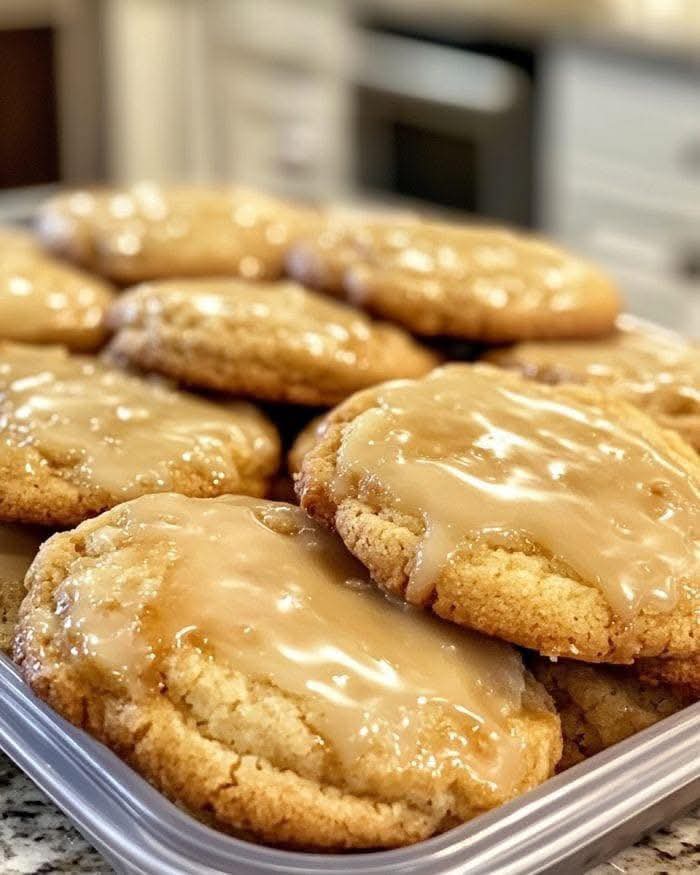
Maple Glazed Cookies
These Maple Glazed Cookies are a heavenly combination of soft, chewy texture and the rich, deep sweetness of real maple syrup. Perfect for fall mornings, holiday gatherings, or any time you crave a warm, comforting treat, these cookies are simple enough for beginner bakers yet elegant enough to impress guests. The subtle caramelized flavor of maple complements the buttery cookie base beautifully, making each bite irresistible.
Ingredients & Their Roles
- 1/2 cup unsalted butter (softened): Provides the rich, creamy foundation of the cookie. Softened butter ensures even mixing and contributes to tenderness.
- 1/2 cup granulated sugar: Adds sweetness and helps cookies achieve a lightly crisp edge while keeping the interior soft.
- 1/4 cup packed brown sugar: Enhances the flavor with a subtle molasses undertone and adds chewiness to the cookie.
- 1 large egg: Acts as a binder, adding moisture and structure to the cookie dough.
- 1 teaspoon vanilla extract: Adds warmth and depth to the flavor profile, complementing the maple syrup.
- 1/4 cup pure maple syrup: The star ingredient. Provides natural sweetness and that signature maple flavor that makes these cookies unique.
- 1 3/4 cups all-purpose flour: Forms the structure of the cookies. Precise measurement ensures soft and tender cookies.
- 1/2 teaspoon baking powder: Helps the cookies rise slightly, giving them a delicate, airy texture.
- 1/4 teaspoon baking soda: Works with the brown sugar to create light chewiness and slight spread.
Understanding the role of each ingredient allows you to tweak the recipe to suit your taste. Using real maple syrup instead of imitation flavoring ensures that your cookies have a natural, deep sweetness that is impossible to replicate with extracts alone. The combination of granulated and brown sugar creates a perfect balance of crisp edges and soft centers, while the precise flour and leavening ratios guarantee a tender, flavorful cookie every time.
Pro Tip: For the best texture, make sure your butter is just softened, not melted. This ensures the dough holds together properly while baking without losing its structur
Step-by-Step Dough Preparation
Now that you have gathered all your ingredients, it’s time to combine them to create a perfectly balanced cookie dough. Following each step carefully ensures that your Maple Glazed Cookies come out soft, chewy, and full of flavor.
Step 1: Cream the Butter and Sugars
In a large mixing bowl, combine the softened butter, granulated sugar, and brown sugar. Use an electric mixer on medium speed or a sturdy wooden spoon to beat the ingredients together for 2-3 minutes. The goal is to achieve a light, fluffy mixture where the sugars are well incorporated into the butter. This step is critical because it creates air pockets, contributing to the cookie’s tender, airy texture.
Step 2: Add the Egg, Vanilla, and Maple Syrup
Next, add the large egg to the creamed butter and sugars, followed by the vanilla extract and pure maple syrup. Beat the mixture until it is smooth and uniform. These liquid ingredients bind the dough together and infuse it with rich flavor. The maple syrup adds moisture and its signature sweet, slightly caramelized flavor, which is key to these cookies’ unique taste.
Step 3: Mix the Dry Ingredients Separately
In a separate bowl, whisk together the all-purpose flour, baking powder, and baking soda. Whisking not only combines the ingredients evenly but also aerates the flour slightly, helping the cookies achieve a light texture. Proper mixing ensures there are no pockets of leavening or flour, which could lead to uneven baking.
Step 4: Combine Wet and Dry Ingredients
Gradually add the dry ingredients to the wet mixture, folding gently with a spatula or using a low-speed mixer. The goal is to create a uniform dough without overmixing, which can lead to dense, tough cookies. You want a dough that is slightly sticky but holds its shape well when scooped onto the baking sheet.
Step 5: Chill (Optional)
If time allows, chill the dough in the refrigerator for 30 minutes. Chilling helps solidify the butter, reducing spread during baking and resulting in thicker, chewier cookies. However, these cookies can also be baked immediately if you’re short on time, thanks to the balancing effect of the brown sugar and maple syrup.
Pro Tip: Always use room-temperature eggs and butter unless specified. Cold eggs can cause the butter to harden when mixing, leading to uneven dough, while melted butter can result in flat, overly thin cookies.
Baking the Maple Glazed Cookies
With your dough prepared, it’s time to transform it into the soft, chewy, and maple-sweet cookies that make this recipe irresistible. Precision and attention during baking are key to achieving perfect results.
Step 1: Preheat the Oven
Preheat your oven to 350°F (175°C). Proper oven temperature is crucial for even baking. An oven thermometer can ensure accuracy, preventing underbaked centers or overly browned edges.
Step 2: Prepare the Baking Sheet
Line a baking sheet with parchment paper or a silicone baking mat. This ensures the cookies don’t stick and allows easy removal without breaking or flattening. You can also lightly grease the sheet, but parchment is preferable for consistent browning and cleanup.
Step 3: Portion the Dough
Using a medium cookie scoop or two spoons, portion the dough into approximately 2-tablespoon balls. Space the cookies about 2 inches apart to allow for expansion during baking. This spacing prevents overcrowding, which can cause cookies to merge into one another.
Step 4: Bake the Cookies
Place the sheet in the preheated oven and bake for 10–12 minutes, or until the edges are lightly golden, and the centers appear set but soft. The centers may look slightly underdone; this is desirable for a chewy texture. The residual heat will finish the baking process after removal.
Step 5: Cooling on the Sheet
Remove the cookies from the oven and allow them to cool on the baking sheet for 5 minutes. This resting period helps the cookies firm up slightly, making transfer easier and preventing breakage. The buttery edges continue to crisp slightly, enhancing the contrast with the soft centers.
Step 6: Transfer to Wire Rack
Using a spatula, transfer the cookies to a wire cooling rack. Cooling completely on a wire rack ensures air circulation around the cookies, preventing soggy bottoms and helping maintain their signature texture.
Pro Tip: Rotate the baking sheet halfway through baking if your oven has hot spots. This guarantees even browning and prevents one side of the batch from overcooking.
Optional: For extra maple flavor, lightly brush the warm cookies with a bit of maple syrup while they are still slightly warm. This enhances aroma and gives a subtle glaze that deepens sweetness.
After baking and cooling your cookies, the final step is creating a luscious maple glaze that takes these cookies from delicious to irresistible. This glaze not only adds sweetness but also enhances the aroma and presentation.
Step 1: Prepare the Maple Glaze
In a small mixing bowl, combine 1 cup powdered sugar with 3–4 tablespoons pure maple syrup. Stir until smooth and free of lumps. The consistency should be thick but pourable. If it’s too thick, add a little more maple syrup; if too thin, add more powdered sugar gradually.
Step 2: Optional Flavor Boost
For a subtle depth of flavor, add a few drops of vanilla extract or a pinch of ground cinnamon. This creates a warm undertone that pairs beautifully with the buttery, soft cookie base.
Step 3: Glazing the Cookies
Once the cookies are fully cooled on a wire rack, spoon or drizzle the maple glaze over each cookie. For a smooth finish, use a spoon and gently spread the glaze across the surface. For a more rustic, homemade look, lightly drizzle in a zigzag pattern.
Step 4: Allow the Glaze to Set
Let the glazed cookies rest at room temperature for about 20–30 minutes. This allows the glaze to firm up slightly while still remaining soft to the touch. Avoid stacking the cookies during this period to prevent smudging the glaze.
Step 5: Serving Suggestions
- Serve with a cup of hot coffee or tea for a comforting treat.
- Pair with vanilla ice cream for a decadent dessert option.
- Arrange on a platter for holiday gatherings or brunches; the glossy maple glaze adds a festive touch.
Pro Tips for Perfect Maple Glazed Cookies
- Use softened butter in the dough for a tender, chewy texture.
- Ensure cookies are completely cooled before glazing to prevent melting and sliding.
- Experiment with maple glaze thickness to achieve your preferred balance of sweetness and drizzle effect.
- Store glazed cookies in an airtight container at room temperature for up to 5 days. Layer with parchment paper to prevent sticking.
With this glaze, each cookie transforms into a sweet, aromatic masterpiece, highlighting the rich, buttery dough and deep maple flavor.
Storage, Gifting, and Final Tips
Now that your Maple Glazed Cookies are beautifully baked and glazed, it’s time to think about storage, gifting, and ensuring every bite remains as delightful as the first.
Storing Your Cookies
To keep the cookies fresh and maintain the soft, chewy texture with a shiny glaze:
- Use an airtight container at room temperature for up to 5 days. Place layers of cookies separated with parchment paper to prevent sticking.
- If you prefer a longer shelf life, cookies can be frozen for up to 2 months. Wrap them individually in plastic wrap and place them in a freezer-safe container. Thaw at room temperature before serving.
- Keep cookies away from direct sunlight or heat sources to prevent the glaze from melting.
Gifting Ideas
These cookies make an exceptional gift for any occasion due to their attractive maple glaze and delicious flavor. Consider these presentation ideas:
- Package in a decorative tin with parchment layers between cookies.
- Wrap individually in cellophane and tie with a ribbon for a charming homemade gift.
- Create a cookie gift box with a mix of flavors for a thoughtful holiday present.
Why This Recipe Stands Out
These Maple Glazed Cookies are beloved because they combine:
- **Simplicity:** Only pantry staples and a few key ingredients.
- **Flavor:** Rich buttery dough enhanced by the natural sweetness and aroma of real maple syrup.
- **Texture:** Chewy, soft centers with a delicate, glossy glaze.
- **Versatility:** Perfect for breakfast, snacks, dessert, or gifting.
- **Presentation:** The maple glaze adds visual appeal and a professional touch without extra effort.
Pro Tips for Perfection
- Measure flour correctly by spooning into the cup and leveling to avoid dense cookies.
- For even glazing, ensure cookies are completely cooled before applying the maple drizzle.
- Experiment with drizzle patterns—zigzags, swirls, or full coating—for creative presentation.
- Add a light sprinkle of chopped nuts, sea salt, or cinnamon on top of the glaze for added flavor and texture.
Final Thoughts
This Maple Glazed Cookies recipe is a must-try for cookie enthusiasts. The combination of a soft, buttery base, perfectly balanced sugars, and a shiny, sweet maple glaze makes every bite unforgettable. Easy to prepare yet visually stunning and delicious, these cookies are ideal for everyday treats, festive celebrations, or thoughtful homemade gifts. By following the steps carefully and incorporating the tips above, you can create a batch of cookies that are not only delectable but also impressive in presentation, ensuring they become a favorite recipe in your collection.
Enjoy the simplicity, savor the flavor, and share these delightful Maple Glazed Cookies with friends and family—they’re guaranteed to bring smiles to every occasion!