Lemon Truffles: Creamy, Zesty, and Irresistible
These Lemon Truffles are a stunning combination of creamy white chocolate and bright, refreshing lemon. Perfect for spring gatherings, gift-giving, or a simple indulgence, these truffles bring sophistication and flavor to any occasion. Their soft, melt-in-your-mouth texture, paired with the vibrant citrus notes, makes them impossible to resist. This recipe is crafted for both beginners and experienced bakers, with detailed instructions that ensure success every time.
Ingredients & Their Roles
Understanding each ingredient’s purpose ensures your truffles are both visually appealing and delectably smooth.
- Freshly Squeezed Lemon Juice (2 tablespoons): The star of the truffles, providing zesty brightness that balances the rich, sweet chocolate. Always use fresh juice for the most vibrant flavor.
- White Chocolate Chips (1 cup): Creates the creamy, luscious base of the truffle. High-quality white chocolate melts smoothly, ensuring a silky consistency without graininess.
- Heavy Cream (1/4 cup): Adds richness and moisture, allowing the chocolate to form a smooth ganache-like texture. The cream also softens the chocolate, making the truffles tender yet stable.
- Unsalted Butter (2 tablespoons): Contributes to the creamy texture and adds a subtle richness, enhancing the overall mouthfeel. Butter also helps the mixture set slightly firmer, making it easier to roll into balls later.
- Lemon Zest (from 2 lemons): Infuses concentrated citrus aroma and flavor without adding extra liquid. Zest complements the lemon juice, giving each truffle a pronounced lemon note that feels fresh and fragrant.
- Powdered Sugar (2 cups): Sweetens and stabilizes the truffles while giving them a smooth finish. Powdered sugar ensures the mixture is pliable for shaping without being gritty.
- Yellow Food Coloring (optional, a few drops): Enhances visual appeal by giving truffles a vibrant, sunny color. It’s purely decorative but adds to the presentation, especially for parties or gifts.
Why This Recipe Works
Combining high-quality white chocolate with freshly squeezed lemon ensures a balance of richness and acidity. The heavy cream and butter create a velvety texture, while the powdered sugar stabilizes the mixture for easy shaping. Optional food coloring allows the truffles to look as delightful as they taste, perfect for bright dessert tables or gift boxes. Following the detailed steps guarantees smooth, creamy truffles with bold citrus flavor in every bite.
Pro Tips Before You Start
- Always measure ingredients accurately for consistent results.
- Use a heatproof bowl when melting chocolate to avoid burning.
- Ensure the butter is at room temperature to blend smoothly with chocolate.
- Fresh lemon juice and zest dramatically improve flavor compared to bottled juice.
- If your chocolate mixture is too stiff, gently warm it over a double boiler while stirring to regain smoothness.
Next, we’ll dive into the first steps of preparing the truffle base, ensuring a perfectly smooth, creamy mixture that’s ready to be flavored and shaped.
Step 1: Melting the White Chocolate and Butter
Begin by combining your white chocolate chips and unsalted butter in a heatproof bowl. This combination forms the foundation of your truffle base. White chocolate is sensitive to heat, so it is essential to melt it gently to avoid seizing. To do this:
- Set a medium saucepan over low simmering water and place the bowl over it, creating a double boiler. Make sure the bowl does not touch the water.
- Stir the chocolate and butter constantly with a heat-resistant spatula or wooden spoon. The mixture should melt slowly, forming a smooth, velvety ganache.
- Once fully melted, remove the bowl from heat and allow it to cool slightly while still remaining pourable. This ensures the mixture will blend easily with the cream in the next step.
Step 2: Preparing the Cream
While the chocolate and butter are melting, prepare the heavy cream. The cream adds essential richness and creates a smooth, supple texture for your truffles:
- Heat the cream gently in a small saucepan until it begins to steam and simmer, but do not allow it to boil. Boiling cream can separate the fat and water, affecting the texture.
- Pour the hot cream directly over the melted chocolate and butter. You will notice the mixture bubbling slightly – this is normal and helps emulsify the ingredients.
- Stir gently and continuously until the chocolate, butter, and cream combine into a smooth, glossy ganache. The consistency should be thick yet pourable, ready for flavoring with lemon.
Step 3: Incorporating Lemon Flavor
To create that iconic citrus kick, add freshly squeezed lemon juice and lemon zest to the ganache. Both components are essential:
- The lemon juice adds bright, tangy acidity that cuts through the sweetness of the white chocolate.
- The zest delivers concentrated citrus oils, enhancing the aroma and providing depth of flavor.
Gradually stir the lemon juice and zest into the ganache until fully incorporated. Taste carefully – the balance should be vibrant but not overpowering.
Step 4: Sweetening and Coloring
Next, blend in the powdered sugar. This sweetener stabilizes the truffle mixture and gives it a pliable texture for shaping:
- Sift the powdered sugar to remove lumps, then add it gradually to the ganache while stirring.
- Continue mixing until the sugar is fully absorbed and the mixture is silky smooth. This process ensures a fine, creamy texture that’s ideal for forming truffle balls.
- If desired, add a few drops of yellow food coloring to enhance the visual appeal. Stir gently to distribute the color evenly.
Pro Tips for a Smooth Base
- Do not rush the melting process; low and slow heat prevents scorching.
- Constant stirring ensures the chocolate and butter emulsify perfectly with the cream.
- Taste the ganache before adding sugar to ensure the lemon flavor is balanced.
- Use room-temperature butter to avoid clumps when blending.
- Cover with plastic wrap and let the ganache cool slightly before shaping into truffles. This prevents sticking and maintains a clean finish.
With these steps completed, your truffle base is ready to chill and firm up. In the next batch, we’ll move into chilling, shaping, and coating your truffles, ensuring each one is perfectly smooth, creamy, and zesty.
Step 5: Chilling the Ganache
Once your ganache is smooth and flavored with lemon, it’s time to chill it. Chilling solidifies the mixture, making it easier to shape into uniform truffle balls. Follow these tips:
- Transfer the ganache into a shallow, lightly greased dish. Spreading it out helps it chill evenly and speeds up the firming process.
- Cover the dish tightly with plastic wrap to prevent the ganache from absorbing any odors from the fridge.
- Place the ganache in the refrigerator for at least 2 hours, or until firm but still pliable. For a slightly firmer texture, chill overnight.
- Check occasionally; the ganache should be scoopable but not too soft, ensuring your truffles hold their shape.
Step 6: Preparing Your Workstation
Before you begin shaping, gather all necessary tools and materials. This ensures smooth handling and consistent results:
- A small cookie scoop or teaspoon for measuring even portions.
- A large mixing bowl filled with powdered sugar or finely shredded coconut for coating (optional).
- A baking sheet lined with parchment paper or a silicone mat to place the formed truffles.
- A small spoon or offset spatula to help lift the ganache from the dish if needed.
Step 7: Shaping the Truffles
Shaping is the key to creating beautiful, uniform truffles. Follow these steps for perfect results:
- Using the cookie scoop or teaspoon, scoop out small portions of chilled ganache. Aim for roughly 1-inch balls for consistent size and serving portions.
- Roll each portion between your palms to form smooth, round truffles. The warmth of your hands should be just enough to soften the ganache slightly for rolling, but not so much that it melts completely.
- Place each rolled truffle onto the prepared baking sheet, spacing them evenly. This prevents them from sticking together during further handling.
- If the ganache becomes too soft while rolling, return it to the fridge for 10–15 minutes to firm up.
Step 8: Optional Coating Preparation
While traditional lemon truffles are delicious as is, a coating enhances texture, presentation, and flavor. Consider these options:
- Powdered Sugar: Lightly dust each truffle for a sweet, elegant finish.
- White Chocolate: Melt additional white chocolate and dip each truffle for a glossy, protective shell. Add a few drops of yellow food coloring for a vibrant look.
- Citrus Zest: Sprinkle finely grated lemon zest over the truffles for an extra pop of flavor and aroma.
- Desiccated Coconut: Roll truffles in shredded coconut for texture contrast and visual appeal.
Step 9: Storing Before Serving
Proper storage ensures your truffles remain creamy and fresh:
- Refrigerate rolled truffles in an airtight container for up to 1 week. Place parchment paper between layers to prevent sticking.
- For longer storage, freeze truffles in a single layer, then transfer to an airtight container for up to 3 months. Thaw in the fridge before serving.
- Serve chilled or allow them to rest at room temperature for 10–15 minutes for optimal creaminess.
Pro Tips for Perfect Truffles
- Work with slightly firm ganache to prevent sticky hands and misshapen truffles.
- Use a gentle rolling motion; pressing too hard can flatten the truffles.
- Chill coated truffles briefly to set the outer layer, ensuring clean presentation.
- Experiment with coatings: a drizzle of dark chocolate contrasts beautifully with the sweet, tangy interior.
- Keep the ganache covered when not rolling to prevent a skin from forming on the surface.
With these steps, your lemon truffles are now perfectly shaped, coated, and ready to enjoy. The next batch will focus on final finishing touches, decorative presentation, and serving ideas to make these truffles irresistible for any occasion.
Step 10: Coating the Truffles
Once your truffles are shaped and chilled, it’s time to add coatings that enhance flavor, texture, and presentation. A well-coated truffle not only looks professional but also provides an extra layer of indulgence.
- Powdered Sugar: Lightly roll truffles in powdered sugar for a delicate, elegant finish. This coating is especially suitable if you prefer a soft, melt-in-your-mouth outer layer that complements the creamy interior.
- White Chocolate Dip: Melt high-quality white chocolate in a heatproof bowl over a pot of simmering water or in short bursts in the microwave. Carefully dip each truffle using a fork or dipping tool, letting excess chocolate drip off. Place coated truffles on parchment paper to set.
- Colored Chocolate: Add a few drops of yellow or pastel food coloring to white chocolate to create visually appealing truffles. This adds a festive and personalized touch for holidays, parties, or special events.
- Shredded Coconut or Citrus Zest: Roll freshly dipped truffles in shredded coconut or finely grated lemon zest for added texture, aroma, and a vibrant appearance. This step also reinforces the citrus flavor, enhancing the overall tasting experience.
- Edible Sprinkles: Lightly dust or press small decorative sprinkles onto the chocolate coating before it sets. This step makes the truffles appealing for celebrations and gifts.
Step 11: Setting and Chilling After Coating
After coating, the truffles need a brief period to set and achieve their final consistency:
- Place the coated truffles on a parchment-lined baking sheet, spacing them evenly to prevent sticking.
- Refrigerate for 20–30 minutes to allow chocolate coatings to harden. For coconut or powdered sugar coatings, this ensures the outer layer adheres well.
- Check the consistency by lightly pressing a truffle; it should feel firm but still yield slightly to gentle pressure, maintaining the creamy interior.
- If using drizzled chocolate or intricate designs, allow those elements to set fully at room temperature or in the fridge.
Step 12: Decorative Finishing Touches
Adding thoughtful finishing touches can elevate your truffles from delicious treats to elegant confections:
- Chocolate Drizzle: Melt a small amount of dark or white chocolate and use a fork or piping bag to drizzle over the truffles. This adds contrast and visual interest.
- Edible Glitter or Dust: Lightly sprinkle edible gold or silver dust for a sophisticated, professional look.
- Mini Candied Lemon Peel: Top each truffle with a tiny strip of candied lemon for a hint of tang and attractive presentation.
- Custom Shapes: Use small molds or shaping tools for themed or seasonal truffles, such as hearts, stars, or spheres.
- Layered Coatings: For added texture, consider dipping truffles twice, first in chocolate and then rolling in crushed nuts, coconut, or colored sugar.
Step 13: Serving Suggestions
Lemon truffles are versatile treats perfect for any occasion. Here are some serving tips to impress your guests:
- Serve in small paper candy cups for individual portions that look elegant and make handling easy.
- Arrange truffles on a decorative platter, alternating coatings and shapes for a visually appealing display.
- Pair with tea, coffee, or sparkling wine. The citrusy sweetness of the truffles complements both hot beverages and light, bubbly drinks.
- Include in gift boxes or jars for holidays, birthdays, or special events. They make a sophisticated and personal homemade gift.
- For gatherings, label each truffle with flavor or coating information to guide guests through tasting experiences.
Step 14: Storing and Maintaining Freshness
Proper storage ensures your truffles stay fresh and maintain their perfect texture:
- Keep truffles in an airtight container in the refrigerator for up to 1 week.
- Separate layers with parchment paper to avoid sticking.
- For longer storage, freeze truffles in a single layer, then transfer to a freezer-safe container for up to 3 months. Thaw in the fridge before serving.
- Avoid leaving truffles in a warm environment, as the chocolate coatings may melt and lose their shape.
- Serve chilled or allow truffles to rest at room temperature for 10–15 minutes for optimal creaminess and flavor release.
With these steps, your lemon truffles are fully decorated, perfectly coated, and ready for presentation. The final batch will focus on final tasting notes, tips for perfection, and a persuasive conclusion that highlights why this recipe is irresistible and a must-try for any home baker.
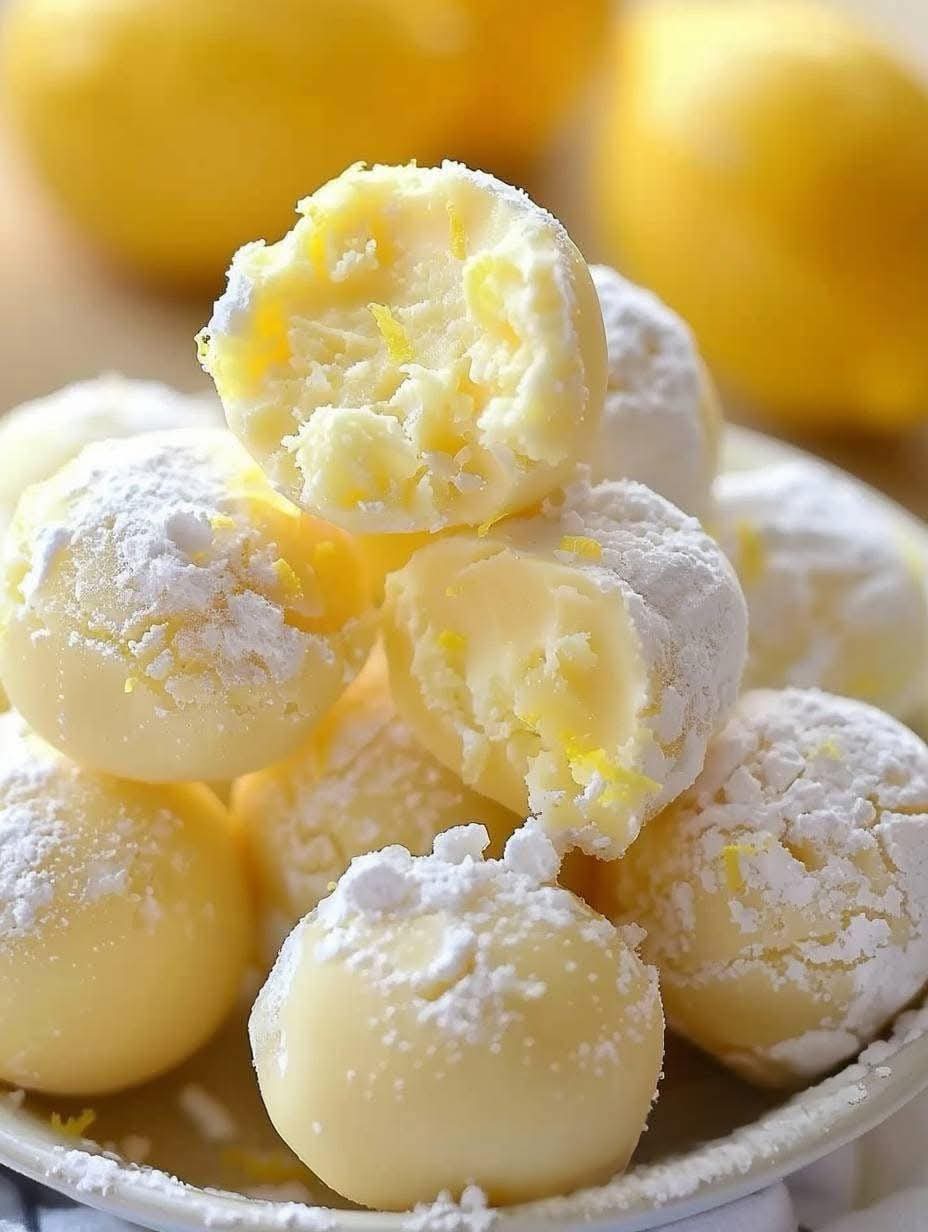
Step 15: Tasting and Flavor Notes
Your lemon truffles are now complete and ready to enjoy. Each bite should offer a harmonious combination of flavors and textures:
- Creamy Center: The interior should be smooth, rich, and slightly tangy from the cream cheese and lemon juice, melting effortlessly on your tongue.
- Zesty Lemon Punch: The lemon zest and juice deliver a bright citrus note that balances the sweetness of the white chocolate and powdered sugar, creating a refreshing and sophisticated flavor profile.
- Chocolate Coating: The outer chocolate layer adds a subtle firmness and sweetness, contrasting with the creamy interior for a satisfying bite.
- Optional Enhancements: Sprinkles, coconut, or candied peel not only elevate the presentation but also introduce additional textures that enhance the overall eating experience.
Step 16: Pairing Suggestions
These lemon truffles are versatile and pair wonderfully with various beverages and treats. Here’s how to serve them for maximum enjoyment:
- Tea Pairing: Serve with Earl Grey or chamomile tea. The citrusy notes of the truffles complement the floral and bergamot flavors of the tea.
- Coffee Pairing: A lightly brewed coffee, cappuccino, or latte enhances the creaminess of the truffles while providing a contrasting warmth.
- Wine or Sparkling Beverages: Champagne or a light, fruity white wine brings out the bright citrus notes, making these truffles ideal for celebratory occasions.
- Fruit Pairings: Fresh berries, such as raspberries or blueberries, provide natural tartness that enhances the lemon flavor.
- Chocolate Pairings: Pair with dark chocolate squares or a chocolate fondue for those who love a decadent contrast between sweet and slightly bitter chocolate flavors.
Step 17: Serving Presentation
Presentation makes a huge difference in making your lemon truffles memorable:
- Use mini candy cups or cupcake liners to keep truffles neat and easy to serve.
- Arrange truffles on a decorative platter, alternating coatings or colors for visual appeal.
- Garnish with small edible flowers, zest curls, or powdered sugar dusting to create a professional-looking dessert table display.
- Consider creating themed sets for holidays, birthdays, or parties to make your truffles an attractive centerpiece.
- Use labels or small cards to indicate flavors or special ingredients, adding an elegant touch to gift boxes or party platters.
Step 18: Storage and Shelf Life
Proper storage ensures your lemon truffles remain fresh, flavorful, and visually appealing:
- Store truffles in an airtight container in the refrigerator for up to 1 week.
- Separate layers with parchment paper to prevent sticking.
- For long-term storage, freeze truffles in a single layer and then transfer to a freezer-safe container for up to 3 months. Thaw in the fridge before serving.
- Avoid exposure to heat or sunlight to prevent melting or discoloration.
- Serve chilled or allow to rest at room temperature for 10–15 minutes for optimal texture and flavor release.
Step 19: Tips for Perfect Truffles
- Always use high-quality chocolate for a smoother coating and richer flavor.
- Ensure the cream mixture is fully smooth before chilling to prevent grainy texture.
- Chill the truffles adequately before dipping or rolling in coatings to maintain shape.
- Experiment with flavor enhancements like a hint of orange, lime, or raspberry extracts for creative variations.
- Handle gently to preserve the delicate texture and prevent fingerprints on the chocolate coating.
Conclusion: Why These Lemon Truffles Are Irresistible
These lemon truffles combine creamy, tangy, and sweet flavors in every bite. With simple ingredients and step-by-step instructions, you can achieve bakery-quality results at home. The combination of smooth white chocolate, zesty lemon, and optional decorative coatings makes them visually stunning and delightfully flavorful. Perfect for gifts, celebrations, or just a personal indulgence, these truffles are a testament to the power of simple ingredients crafted with care.
By following this guide, home bakers of all skill levels can confidently create lemon truffles that impress both visually and in taste. Their creamy centers, bright citrus notes, and elegant presentation make them a must-try dessert that will leave a lasting impression on anyone lucky enough to taste them.