Recreating Grandma’s Peanut Butter Balls — The Ultimate No-Bake Family Recipe
There are few things as comforting as Grandma’s Peanut Butter Balls. These classic, no-bake candies deliver a perfect balance of creamy peanut butter, sweet powdered sugar, and a glossy chocolate coating. They’re nostalgic, deceptively simple, and endlessly adaptable. This long-form guide walks you through every detail — from ingredient selection to shaping, coating, troubleshooting, and styling them as heartwarming gifts.
Why These Peanut Butter Balls Are Timeless
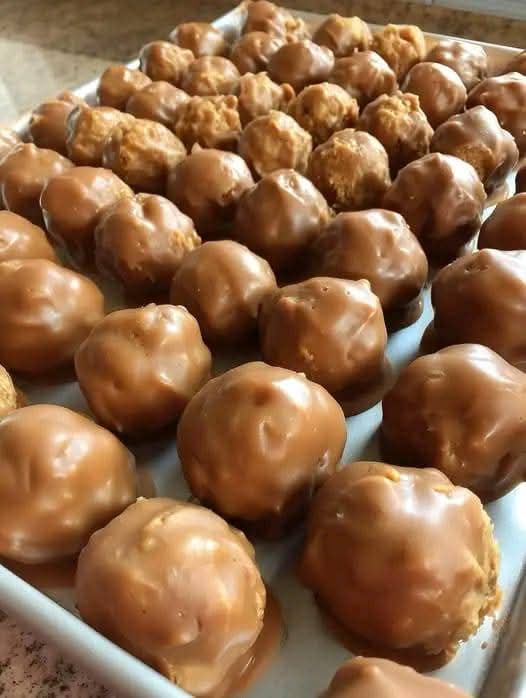
The beauty of Grandma’s Peanut Butter Balls is in their simplicity and the memory they carry. A handful of pantry staples transforms into candy that’s creamy, rich, and evocative of holiday kitchens and family gatherings. Unlike elaborate confections, these treats require no tempering, no baking, and almost no special equipment — yet each bite delivers a sophisticated contrast of texture and flavor: a tender peanut butter center enrobed in a snappy chocolate shell.
Ingredients & What Each One Does
Below is a classic ingredient list with explanations so you understand how to tune results like a pro.
| Ingredient | Typical Amount | Role / Tips |
|---|---|---|
| Creamy peanut butter | 1 cup | The foundation: provides flavor, fat, and structure. Use a high-quality creamy peanut butter for smooth centers. If using natural PB, stir well and adjust powdered sugar to firm up. |
| Powdered (confectioners’) sugar | 1 cup (plus extra if needed) | Sweetens and firms the peanut butter mixture. Sift to avoid lumps and to keep centers silky. |
| Unsalted butter | 1/2 cup (softened) | Adds richness, tenderness, and helps bind the mixture. Room-temperature butter folds in smoothly. |
| Vanilla extract | 1 tsp | Rounds and brightens flavors; a small but essential aromatic lift. |
| Pinch of salt | 1/8–1/4 tsp | Balances sweetness and enhances peanut flavor — omit only if using salted butter and very salty peanut butter. |
| Chocolate for coating | 8–12 oz (chips, wafers, or chopped chocolate) | Semi-sweet or milk chocolate are classic; use compound candy melts for easier handling, or real chocolate for the best flavor (temper if needed for snap). |
| Optional add-ins | varies | Mini chocolate chips, chopped nuts, crispy rice, or a swirl of caramel can be folded in or used as topping. |
Essential Equipment
- Mixing bowl and rubber spatula
- Electric mixer (hand or stand) — helpful but optional
- Sifter for powdered sugar (recommended)
- Candy thermometer (only if tempering chocolate)
- Small cookie scoop (1 Tbsp or ¾ inch) or teaspoon for portioning
- Wax or parchment paper lined baking sheet
- Double boiler or microwave-safe bowl for melting chocolate
- Dipping tool or fork (or toothpicks) for coating
Step-by-Step: How to Make Grandma’s Peanut Butter Balls
Step 1 — Prepare the Peanut Butter Filling
In a large bowl, beat together 1/2 cup softened unsalted butter and 1 cup creamy peanut butter until smooth and slightly fluffy. Beat in 1 tsp vanilla extract and a pinch of salt. Gradually add 1 cup sifted powdered sugar, beating on low until incorporated. The mixture should be firm enough to shape; if too sticky, add more powdered sugar 1–2 tbsp at a time until it holds a ball shape.
Texture target: Smooth, pliable, slightly tacky but not wet. It should hold its shape when rolled.
Step 2 — Portion and Shape
Use a small cookie scoop (about 1 tablespoon) or a rounded teaspoon to portion the filling. Roll each portion quickly between your palms to create smooth spheres. Place the formed balls on a parchment-lined sheet and chill for 20–30 minutes — this firms the centers and makes dipping simpler.
Step 3 — Melt the Chocolate
Melt 8–12 oz of chocolate in 30-second bursts in the microwave, stirring in between, or melt gently over a double boiler. If using high-quality chocolate, allow it to cool slightly so it’s fluid but not scalding hot before dipping.
If you want a glossy professional shell with snap, temper the chocolate. For quick home use, compound melts or microwave-melted chocolate chips work perfectly.
Step 4 — Dip the Balls
Using a dipping fork or two forks, dip each chilled peanut butter ball into the melted chocolate, tapping off excess, then place back on the parchment. Alternatively, you can spoon chocolate over each ball. For a neat finished look, drag the tip of a knife under each ball to release and smooth the bottom.
Step 5 — Garnish & Set
While the chocolate is still wet, add any garnish — a sprinkle of sea salt, crushed peanuts, or a drizzle of contrasting chocolate. Chill until the coating is fully set, about 30–60 minutes in the refrigerator.
Pro Tips for Flawless Peanut Butter Balls
- Consistency is king: If your centers are too wet, they’ll collapse or cause the chocolate to crack. Adjust with powdered sugar until firm but not chalky.
- Chill before dipping: Cold centers handle dipping much better and reduce chocolate seeping through.
- Use a small cookie scoop: For uniform size and easier assembly, a #70 (1 tbsp) scoop is ideal.
- Work quickly when melting chocolate: Don’t overheat — chocolate burns easily. Stir frequently and remove from heat while small unmelted pieces remain; they’ll melt from the residual heat.
- Prevent bloom: Avoid repeatedly heating and cooling the same chocolate. If using real couverture, temper for a glossy finish and stable shell.
- Double-dip for thicker shells: If you want a sturdier shell, let the first coat set and dip again for a second layer.
- Keep hands dry: Moisture and chocolate don’t mix — dry hands and utensils are essential.
Troubleshooting — Quick Fixes
Too Sticky to Shape
Add powdered sugar 1–2 tbsp at a time until mixture is shapeable. Refrigerating the mixture for 20 minutes can also help.
Chocolate Seeping Through
Centers are likely too soft or warm. Chill longer. A thicker first coat or double-dipping helps prevent leaks.
Chocolate Too Thick or Grainy
You likely overheated it. Add a small splash of neutral oil or vegetable shortening to smooth it, or start a fresh batch of melted chocolate.
Centers Fall Apart When Biting
Not enough binding sugar or butter. Rework the filling: press it together in a bowl with extra powdered sugar and a little melted butter if needed.
Flavor Variations & Creative Twists
The classic formula is endlessly adaptable. Here are ideas to riff on Grandma’s recipe:
- Nutella or Almond Butter swap: Replace some or all peanut butter with Nutella or almond butter for a different flavor profile.
- Chocolate Peanut Butter Crunch: Fold in 1/3 cup mini chocolate chips or crisped rice cereal for texture.
- Salted Caramel Core: Add a smear of caramel in the center before rolling for a gooey surprise.
- Spiced PB Balls: Add 1/4 tsp cinnamon or a pinch of cayenne for subtle warmth and complexity.
- PB & Jelly Balls: Drop a small dab of jam in the center, seal, and then coat with chocolate.
- Mint Chocolate: Add 1/4 tsp peppermint extract to the filling and use dark chocolate coating.
- Mini Buckeyes: Leave a small circle of peanut butter exposed on top instead of fully coating for a classic buckeye look.
Packaging & Gifting Ideas
Peanut butter balls are fantastic homemade gifts. Present them beautifully:
- Layer in a decorative tin with parchment rounds between layers.
- Wrap 6–8 in cellophane with a ribbon and a hand-written tag.
- Place in mini cupcake liners inside a small box for a bakery-style presentation.
- Include a tiny card with storage instructions (“Keep refrigerated; best within 5–7 days”).
Storage & Shelf Life
- Room temperature: If coated in stable candy melts and kept cool, they can be stored up to 2 days (avoid warm, humid conditions).
- Refrigerator: Best stored in an airtight container for up to 2 weeks. Place parchment between layers to prevent sticking.
- Freezer: Freeze on a tray until solid, then transfer to a sealed container for up to 3 months. Thaw overnight in the fridge before serving.
Frequently Asked Questions (FAQ)
Can I make these with natural peanut butter?
Yes — but natural peanut butter tends to be oilier. Stir thoroughly and consider reducing added butter or adding more powdered sugar to firm the mixture.
Do I have to temper chocolate?
No — tempering isn’t required for taste, but it gives a glossy, snappy finish that resists bloom. For home use, compound melts are easiest and produce consistent results.
How do I keep the bottoms flat and neat?
After dipping, rest each ball briefly on a fork tines or a lettuce leaf to allow excess chocolate to drip. Alternatively, press the bottom gently with a spatula to flatten slightly.
Can I make the filling ahead?
Yes — make the peanut butter mixture and refrigerate for up to 48 hours in a covered container. Bring to room temp slightly for easier scooping before rolling.
The Emotional & Cultural Value of Grandmother’s Recipe
Recipes like Grandma’s Peanut Butter Balls are heirlooms — portable love notes that carry family history. Making them connects us to rituals: measuring with worn spoons, passing plates at holiday gatherings, and teaching new generations how to make comfort from simple ingredients. This guide preserves the technique and scales it up with modern tips, ensuring the same familiar taste and texture that earned them a place in your memory.
Full Classic Recipe (Printable)
Ingredients
- 1 cup creamy peanut butter
- 1/2 cup unsalted butter, softened
- 1 tsp pure vanilla extract
- Pinch of fine salt (omit if using salted butter & salted PB)
- 1 cup sifted powdered sugar (plus extra as needed)
- 8–12 oz chocolate for coating (chopped or chips)
Directions
- In a bowl, beat butter and peanut butter until smooth. Add vanilla and salt.
- Gradually add powdered sugar and beat until firm but pliable. Add more sugar if necessary.
- Portion with a small scoop and roll into balls. Place on parchment and chill 20–30 minutes.
- Melt chocolate and dip chilled balls, tapping off excess. Place back on parchment.
- Garnish if desired and chill until set. Store as directed.
Closing Thoughts — Why These Will Be Your Go-To Candy
Grandma’s Peanut Butter Balls are proof that the best recipes needn’t be complicated. With careful attention to texture, a few professional tips, and a bit of patience during chilling and dipping, you’ll recreate a candy that tastes like home and looks like a gift. They’re perfect for celebrations, cookie exchanges, or whenever you want a small, satisfying indulgence.