Candy Cane Cookies — Soft Peppermint Holiday Swirls
Welcome to your ultimate guide for making Candy Cane Cookies, the quintessential holiday treat. These cookies are soft, tender, buttery, and bursting with refreshing peppermint flavor. Their red-and-white swirls evoke the classic candy cane, making them not only delicious but also visually stunning for holiday gatherings. This recipe is designed to give you bakery-quality results from the comfort of your own kitchen, with step-by-step instructions, detailed explanations, and professional tips that will elevate your baking.
Why Candy Cane Cookies Are Irresistible
The charm of these cookies lies in a balance of texture, flavor, and appearance. Soft, melt-in-your-mouth centers contrast with slightly firm edges, creating a delightful bite. Peppermint extract delivers a crisp, cool flavor reminiscent of candy canes, while vanilla extract adds warmth and depth. The vibrant red-and-white swirls are eye-catching and festive, making these cookies a showstopper at any holiday table. Whether you’re baking for family, friends, or gifts, the combination of taste and appearance makes these cookies unforgettable.
Ingredients and Their Purpose
Understanding the role of each ingredient ensures your cookies turn out perfectly every time. Here’s a detailed breakdown:
- 2 ½ cups all-purpose flour: Provides the structure for the cookies. Flour contains proteins that form gluten when mixed with liquid, giving cookies shape while remaining tender.
- ½ teaspoon salt: Enhances flavors, balances sweetness, and strengthens the dough slightly.
- 1 teaspoon baking powder: Acts as a leavening agent to produce soft, slightly puffed cookies. It prevents them from becoming dense or hard.
- 1 cup unsalted butter, softened: Adds richness and moisture. Soft butter creams easily with sugar, incorporating air for a light texture and tender crumb.
- 1 cup granulated sugar: Sweetens the dough and helps create structure. When creamed with butter, sugar traps air, producing a soft, fluffy cookie.
- 1 large egg: Adds moisture, binds ingredients together, and contributes to the richness of the cookie.
- 1 teaspoon vanilla extract: Enhances overall flavor and complements peppermint extract, providing a warm, aromatic depth.
- ½ teaspoon peppermint extract: Provides the signature peppermint flavor. A little goes a long way, so measure carefully to avoid overpowering sweetness.
- Red food coloring: Used to create the iconic red swirls. Gel-based coloring works best, as it provides vibrant color without affecting dough consistency.
Professional Tips on Ingredients
- Use high-quality butter and extracts; they make a noticeable difference in flavor.
- Accurately measure flour to avoid dry, crumbly cookies. Spoon flour into measuring cups and level with a knife rather than scooping directly.
- Gel food coloring prevents extra moisture in the dough and gives vivid, professional-looking swirls.
Preparation and Mixing
Preheat your oven to 350°F (175°C) and line baking sheets with parchment paper. Softened butter is crucial; it should be pliable but not melted. In a large mixing bowl, cream together butter and sugar until light, fluffy, and pale in color. This process incorporates air, which contributes to a tender, soft texture. Beat in the egg, followed by vanilla and peppermint extracts, mixing gently to avoid curdling the butter.
In a separate bowl, whisk together flour, baking powder, and salt to ensure even distribution. Gradually fold the dry ingredients into the wet mixture using a spatula or low-speed mixer until just combined. Avoid overmixing, as this can develop gluten excessively, resulting in tougher cookies. Your dough should be smooth, soft, and slightly sticky but firm enough to shape.
Coloring and Shaping
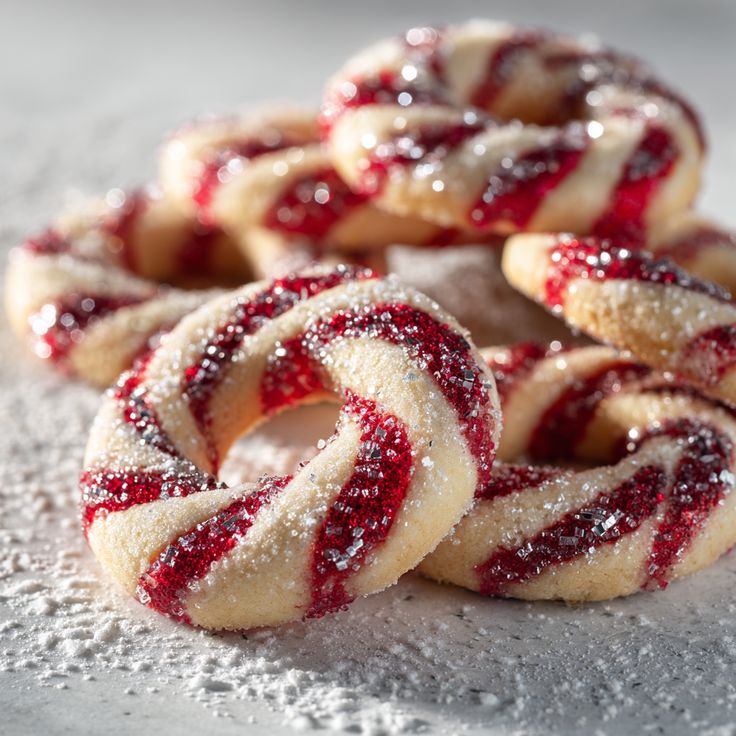
Divide the dough into two portions. Leave one portion plain and color the other with a few drops of red food coloring. Knead gently until color is evenly distributed. Roll each portion into long, even ropes. Place the red and white ropes side by side and twist them together to create the classic candy cane swirl. Curve one end to form the hook shape, or leave straight for spiral cookies. If dough becomes too soft while shaping, chill it for 10–15 minutes. This prevents spreading and maintains swirl definition.
Shaping Tips for Perfection
- Keep rope thickness uniform for consistent baking.
- Handle dough gently to preserve the soft texture.
- Refrigerate dough if sticky or hard to shape.
- Experiment with pattern variations for decorative effect, like spirals or small candy cane hooks.
Baking Instructions
Arrange shaped cookies on prepared baking sheets, leaving at least 2 inches between each cookie. Bake in the preheated oven for 10–12 minutes until edges are lightly golden and centers remain soft. Check at 8 minutes if your oven tends to run hot. Overbaking can turn soft cookies into hard ones. Let cookies cool on the sheet for 5 minutes, then transfer to a wire rack to finish cooling. This helps retain soft centers while preventing bottoms from becoming soggy.
Decorating Options
While the red-and-white swirls are beautiful, you can enhance the festive look with additional decorations:
- Dip one end in melted white or dark chocolate.
- Sprinkle crushed candy canes on top while chocolate sets.
- Add edible glitter or colored sugar for sparkle.
- Pipe simple royal icing designs for elegant details.
Serving Suggestions
Serve Candy Cane Cookies on a festive platter with hot chocolate, coffee, or tea. Arrange creatively in spirals, stacks, or lined up like a candy cane display. Pair with marshmallows, holiday mugs, or pinecone decor for a cozy presentation. Perfect for parties, cookie exchanges, or family gatherings, they double as both a treat and a decoration.
Gifting Ideas
These cookies make ideal holiday gifts. Package in clear cellophane bags tied with red and white ribbons, decorative tins with parchment paper layers, or small boxes with window cutouts. Add a personalized tag or sprinkle crushed candy canes for an extra festive touch. Handmade gifts like this show thoughtfulness and skill, making them perfect for neighbors, friends, or coworkers.
Storage Tips
Store cooled cookies in an airtight container at room temperature for up to one week. Use parchment between layers to prevent sticking. For longer storage, freeze in airtight containers for up to 3 months. Wrap individual cookies in plastic wrap for easy thawing. Thaw at room temperature before serving to retain softness and flavor.
Why This Recipe Works
Every step in this recipe is designed to ensure soft, tender cookies with vibrant color and unmistakable peppermint flavor. Creaming the butter and sugar traps air, folding in dry ingredients gently preserves tenderness, and careful shaping creates visually striking candy cane swirls. The combination of texture, flavor, and presentation makes these cookies truly irresistible. They are a festive staple that evokes nostalgia and holiday cheer.
Extra Tips for Success
- Do not overbake; soft cookies are achieved when centers remain slightly underbaked.
- Use high-quality extracts and butter for best flavor.
- Chill dough if necessary to maintain shape while twisting swirls.
- Experiment with flavors by adding almond extract or chocolate dipping variations.
- For professional presentation, place cookies in single layers or with parchment paper in gift packaging.
Conclusion
Candy Cane Cookies combine the best elements of festive baking: soft, buttery texture, refreshing peppermint flavor, and striking red-and-white swirls. They are perfect for sharing, gifting, decorating, and celebrating the holiday season. With attention to preparation, careful mixing, shaping, baking, and presentation, anyone can achieve bakery-quality results at home. These cookies embody the spirit of the holidays and are sure to delight family, friends, and yourself with every bite.