Creamy Fried Bombs: Ingredients and Dough Preparation
Ingredients:
- 170 g warm milk
- 14 g brewer’s yeast
- 55 g sugar
- 335 g all-purpose flour (“0”)
- 1 pinch of salt
- 2 egg yolks
- 40 g butter, softened
Step 1: Activate the Yeast
Begin by pouring 170 g of warm milk into a small bowl. The milk should be warm to the touch but not hot, ideally around 37°C (98°F), to properly activate the yeast without killing it. Add the 14 g of brewer’s yeast and 10 g of sugar from the total amount, stirring gently until dissolved. Let this mixture sit for 5–10 minutes until it becomes frothy and bubbly, indicating that the yeast is active and ready to leaven the dough.
Step 2: Combine Dry Ingredients
In a large mixing bowl, combine 335 g of all-purpose flour and a pinch of salt. Whisk together to distribute the salt evenly throughout the flour. This step ensures that the dough develops consistent flavor and texture. Create a small well in the center of the flour mixture to prepare for the wet ingredients.
Step 3: Mix Wet Ingredients
In a separate bowl, lightly beat the 2 egg yolks. Add the remaining sugar (45 g) to the egg yolks and mix until creamy. Gradually add the softened 40 g of butter to the mixture. The eggs and butter will provide richness, tenderness, and flavor to the dough.
Step 4: Form the Dough
Pour the frothy yeast mixture into the well of the dry ingredients. Add the egg and butter mixture gradually, stirring continuously with a wooden spoon or your hands. Once a rough dough forms, transfer it to a floured surface and knead for 10–15 minutes. The dough should become smooth, elastic, and slightly tacky, indicating proper gluten development. If the dough is too sticky, add small amounts of flour until manageable, but do not over-flour, as this can make the bombs dense.
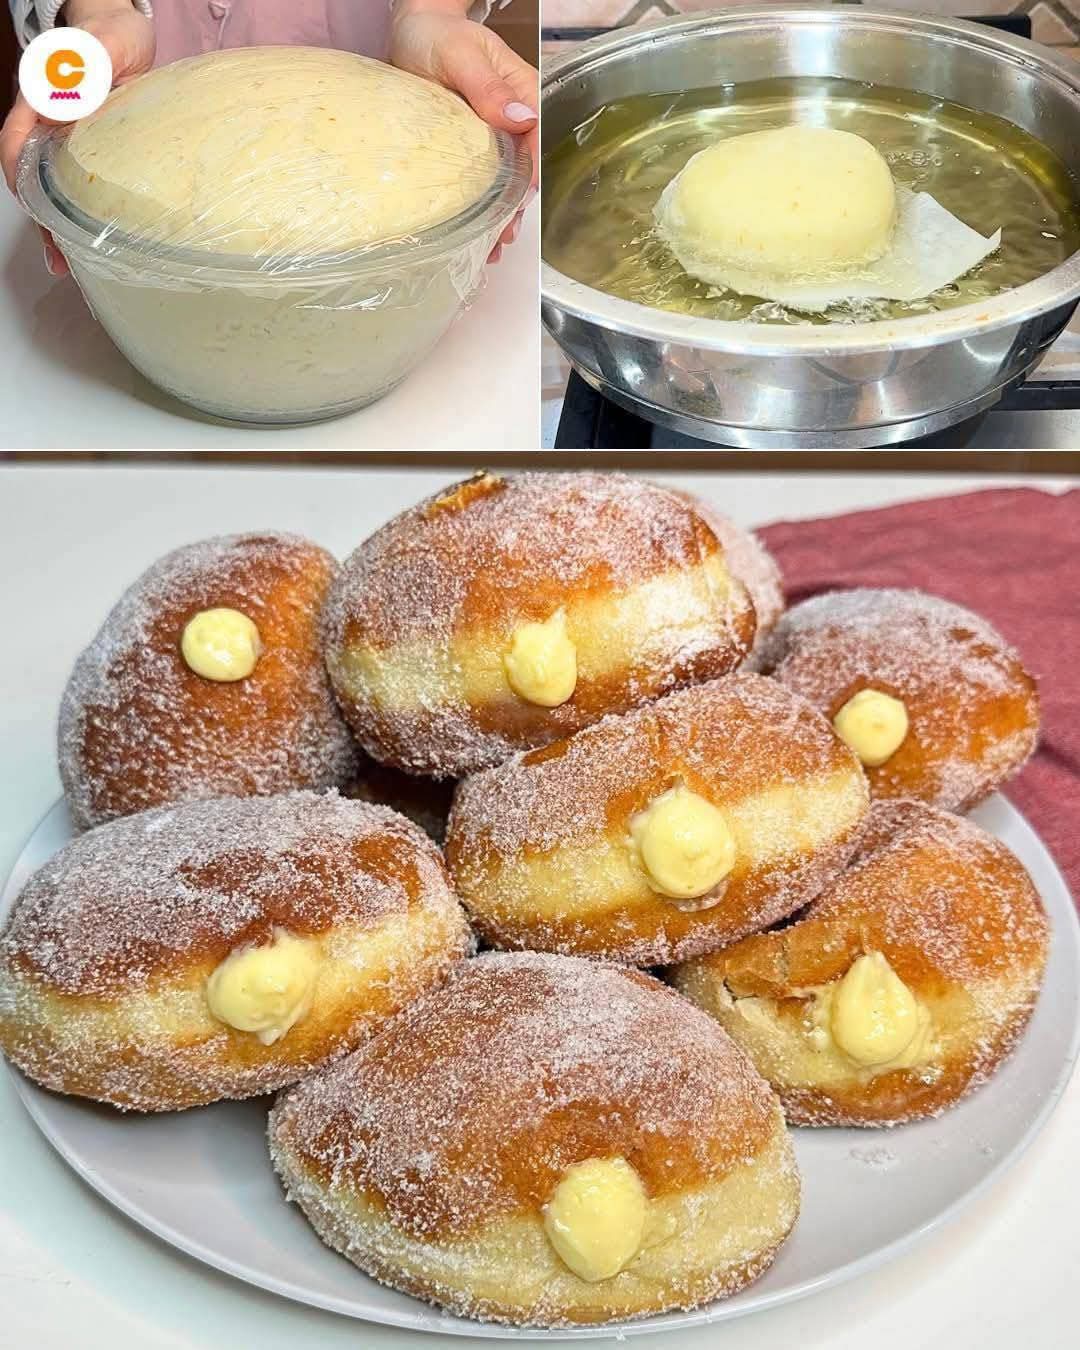
Step 5: First Proofing
Place the kneaded dough in a lightly greased bowl and cover with a clean kitchen towel or plastic wrap. Let it rise in a warm, draft-free area for 60–90 minutes, or until doubled in size. During this proofing stage, the yeast ferments, producing gas that creates a soft and airy dough.
Creamy Fried Bombs: Filling Preparation and Shaping
Step 6: Prepare the Creamy Filling
While the dough is rising, it’s time to prepare the creamy filling. This filling can be customized based on taste, but a classic choice is a rich vanilla cream. In a medium saucepan, pour 200 ml of whole milk and heat it over medium heat until it just begins to steam. In a separate bowl, whisk together 2 egg yolks, 40 g of sugar, 10 g of cornstarch, and 1 teaspoon of vanilla extract until the mixture is smooth and free of lumps.
Gradually pour about one-third of the warm milk into the egg mixture while whisking constantly to temper the eggs and prevent curdling. Slowly add the remaining milk, continuing to whisk. Return the mixture to the saucepan and cook over medium heat, stirring constantly, until the cream thickens and coats the back of a spoon. Remove from heat and allow it to cool slightly. Cover the surface with plastic wrap to prevent a skin from forming while the dough finishes proofing.
Step 7: Punch Down and Divide the Dough
Once the dough has doubled in size, gently punch it down to release any trapped air. Transfer it to a floured surface and divide it into equal portions, approximately 50–60 g each, depending on the desired bomb size. Rolling the portions into smooth balls helps ensure even cooking and a uniform appearance.
Step 8: Flatten the Dough
Take each dough ball and flatten it gently into a small disc about 3–4 inches in diameter. The center of the disc should be slightly thinner than the edges to accommodate the creamy filling without causing leaks. This technique ensures that the bombs hold their shape during frying and that the filling remains encased within the dough.
Step 9: Fill the Bombs
Using a spoon or piping bag, place 1–2 teaspoons of the prepared creamy filling in the center of each flattened dough disc. Be careful not to overfill, as excessive filling may leak during frying. Fold the edges of the dough over the filling, pinching them tightly to seal completely. Roll the filled dough gently between your palms to create a smooth, round bomb. Check each bomb to ensure there are no openings or cracks.
Step 10: Second Proofing
Place the filled bombs on a baking sheet lined with parchment paper, leaving at least 2 inches of space between each one to allow for expansion. Cover loosely with a kitchen towel and let them rest for 20–30 minutes. During this short second proofing, the dough relaxes and slightly puffs up, making the bombs light and airy once fried.
Creamy Fried Bombs: Frying, Finishing, and Serving
Step 11: Prepare the Frying Oil
Pour enough neutral oil such as vegetable or canola into a deep, heavy-bottomed pot or deep fryer to reach a depth of approximately 3–4 inches. Heat the oil over medium heat to 350°F (175°C). Use a thermometer for accuracy, as maintaining the correct temperature ensures even cooking and prevents the bombs from becoming greasy. If the oil is too hot, the exterior will brown too quickly while the interior remains undercooked. If too cool, the bombs will absorb excess oil.
Step 12: Fry the Bombs
Carefully lower the bombs into the hot oil using a slotted spoon or spider strainer, one at a time to avoid overcrowding. Fry in small batches to maintain oil temperature. Fry each bomb for 3–4 minutes on each side, turning gently halfway through. The exterior should turn golden brown and slightly crispy while the interior remains soft and filled with creamy goodness. Adjust the heat as necessary to maintain a steady, gentle sizzle.
Step 13: Drain Excess Oil
Once fried to perfection, remove the bombs from the oil and place them on a paper towel-lined tray. Let them drain for 2–3 minutes to remove excess oil. This step ensures the exterior stays crisp without being greasy, preserving the contrast between the crunchy shell and the smooth, creamy interior.
Step 14: Optional Dusting and Garnishing
For added sweetness and visual appeal, dust the fried bombs with powdered sugar, cocoa powder, or cinnamon while still warm. You can also drizzle melted chocolate or a caramel sauce over the top. For a more decadent version, sprinkle finely chopped nuts or shredded coconut over the drizzle. This step elevates both flavor and presentation, making the bombs suitable for special occasions or dessert platters.
Step 15: Serving Tips
Serve the creamy fried bombs warm for the best texture and taste. Pair them with a scoop of vanilla ice cream, fresh berries, or a light fruit coulis to balance the richness. These bombs can also be enjoyed on their own as a decadent snack or dessert. Encourage diners to bite into the bombs carefully to savor the creamy filling without spilling.
Step 16: Storage Recommendations
If you have leftovers, store them in an airtight container in the refrigerator for up to 2 days. Reheat gently in a 350°F (175°C) oven for 5–7 minutes to restore crispiness. Avoid microwaving, as this can make the exterior soggy and compromise the creamy interior. For best results, prepare only the quantity you intend to serve immediately, as freshly fried bombs have the optimal texture and flavor.
Step 17: Troubleshooting and Notes
- Ensure the dough is properly proofed before frying; under-proofed dough may result in dense bombs.
- Seal the edges tightly to prevent filling leakage during frying.
- Maintain consistent oil temperature for even cooking.
- Use high-quality cream filling; overly runny filling can leak and cause hot oil splatter.
- Experiment with flavor variations such as chocolate cream, custard, or fruit-infused creams for creative twists.
Creamy Fried Bombs: Advanced Tips, Long-Term Storage, and Creative Variations
Step 18: Long-Term Storage
For longer preservation, place cooled bombs on a parchment-lined baking sheet and freeze them individually for 1–2 hours. Once frozen, transfer them to an airtight container or resealable freezer bag. They can be stored in the freezer for up to 1 month. When ready to serve, reheat in a preheated 350°F (175°C) oven for 8–10 minutes or until golden and heated through. Freezing preserves the creamy filling and allows you to prepare in bulk for parties or gatherings.
Step 19: Creative Filling Variations
- Chocolate Cream: Replace the standard custard with chocolate pastry cream or Nutella for a rich, decadent version.
- Fruit-Flavored Cream: Incorporate pureed strawberries, raspberries, or mango into the cream filling for a refreshing fruity twist.
- Caramel or Butterscotch: Swirl homemade caramel or butterscotch sauce into the filling before sealing the dough for a gooey, indulgent treat.
- Matcha or Coffee Cream: For an exotic flavor, blend matcha powder or espresso into the cream for a sophisticated dessert.
Step 20: Decorative Presentation
Presentation elevates the dessert experience. Dust bombs lightly with powdered sugar, cocoa, or cinnamon. For a gourmet touch, drizzle with chocolate ganache, caramel sauce, or fruit coulis. Arrange on a serving platter with edible flowers, berries, or mint leaves to create a visually stunning display. Individual serving cups or ramekins enhance the elegance for parties or formal events.
Step 21: Pairing Suggestions
Pair creamy fried bombs with complementary beverages such as hot coffee, rich hot chocolate, spiced chai, or chilled dessert wine. For brunch or afternoon tea, serve alongside fresh fruit, whipped cream, or small pastries. Combining textures and flavors provides a multi-sensory experience, balancing the richness of the fried dough and creamy interior.
Step 22: Health-Conscious Adaptations
- Use whole wheat or spelt flour to add fiber and nutrients while retaining a soft texture.
- Swap butter for coconut oil or avocado oil to create dairy-free or plant-based bombs.
- Use low-fat milk or plant-based milk alternatives for the cream filling to reduce calories without compromising flavor.
- Bake instead of fry for a lighter version; brush with a light coating of oil and bake at 375°F (190°C) until golden and crisp.
Step 23: Serving Ideas for Different Occasions
- Birthday Parties: Add colorful sprinkles, chocolate chips, or edible glitter for a festive look.
- Holiday Desserts: Incorporate seasonal flavors like pumpkin spice, peppermint, or gingerbread cream.
- Gourmet Dessert Platters: Offer a variety of fillings, sauces, and toppings to create an interactive dessert bar.
- Snack or Brunch: Serve warm with a side of fruit salad or yogurt for a balanced meal component.
Step 24: Final Tips and Expert Advice
- Always allow bombs to cool slightly before serving to avoid burning the mouth on hot filling.
- Practice consistent portioning to ensure even cooking and presentation.
- Experiment with seasonal ingredients and toppings to keep the recipe fresh and exciting.
- Encourage family and friends to try different dipping sauces, including chocolate, caramel, or fruit reductions.
- Document your variations and favorite combinations to perfect your signature version of creamy fried bombs.
With these advanced tips, storage instructions, creative filling variations, and presentation ideas, your creamy fried bombs recipe becomes a versatile, long-lasting, and crowd-pleasing dessert that can adapt to any occasion. Whether for daily indulgence, special celebrations, or festive gatherings, these bombs offer a balance of crunch, creaminess, and flavor that keeps everyone coming back for more.