Cherry Pie Bars
These Cherry Pie Bars transform the nostalgic flavor of a homemade cherry pie into a
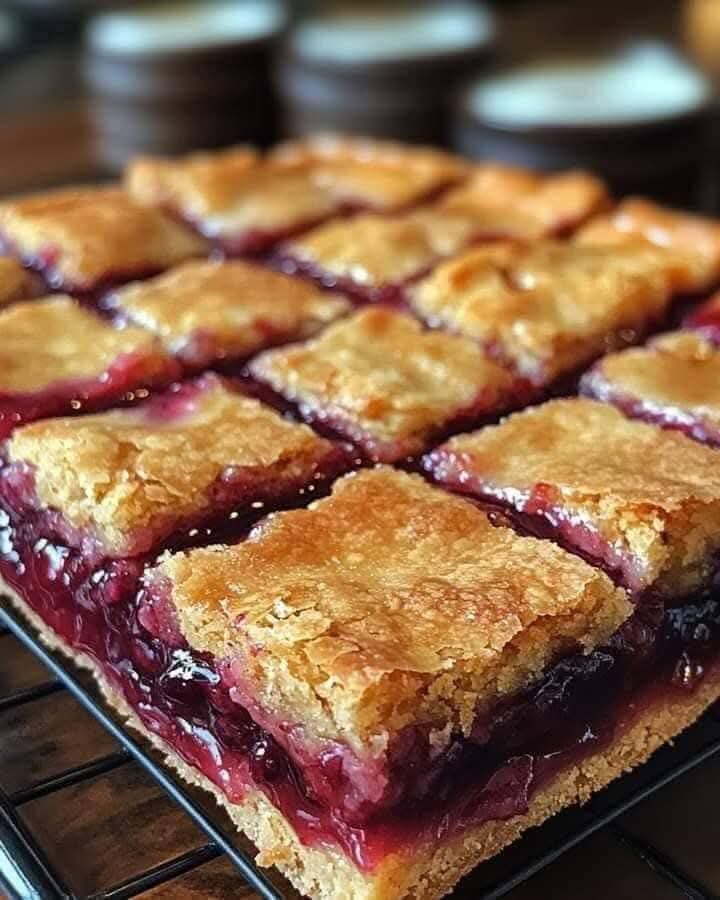
portable, easy-to-share dessert. Imagine buttery, golden crust layers filled with a sweet, juicy cherry
filling and finished with a smooth, almond-scented glaze that ties everything together. Whether served warm
with a scoop of vanilla ice cream or cooled to room temperature for a picnic treat, these bars capture all
the comfort of cherry pie in an elegant, simplified form.
Perfect for potlucks, family dinners, holidays, or just a weekend baking project, this recipe delivers
bakery-quality results without needing to roll out any pie dough. The batter bakes up soft and buttery like
cake, yet sturdy enough to hold the luscious cherry filling. The final touch—an almond and vanilla glaze—adds
just the right amount of sweetness and shine, making these bars as beautiful as they are delicious.
Ingredients
For the Crust:
- 1 cup butter, softened to room temperature
- 2 cups granulated sugar
- 4 large eggs
- 1 teaspoon vanilla extract
- 1/4 teaspoon almond extract
- 3 cups all-purpose flour
- 1 teaspoon salt
For the Filling:
- 2 cans (21 oz each) cherry pie filling
For the Glaze:
- 1 cup powdered sugar
- 1/2 teaspoon vanilla extract
- 1/2 teaspoon almond extract
- 2 tablespoons milk (add more for thinner consistency)
Preparation Instructions
Step 1 – Preheat & Prepare the Pan
Begin by preheating your oven to 350°F (175°C). Prepare a 15x10x1-inch baking
pan by greasing it with butter or cooking spray. If desired, line it with parchment paper for
easier removal and cleanup later.
Step 2 – Make the Butter Batter
In a large mixing bowl, use an electric mixer or stand mixer to beat together the softened butter
and sugar until light and fluffy, about 2–3 minutes. This step incorporates air into the batter,
giving the crust its tender, cake-like texture.
Once the butter and sugar are creamed, add the eggs one at a time, beating well after
each addition. Stir in both the vanilla extract and almond extract, which
give the bars their signature aroma and subtle sweetness.
Step 3 – Add Dry Ingredients
In a separate bowl, whisk together the flour and salt. Gradually add
these dry ingredients into the wet mixture, stirring until just combined. Avoid overmixing to keep the
crust tender.
Step 4 – Assemble the Layers
Spread about 3 cups of the batter evenly into the prepared pan, forming a smooth, even
base layer. Use a spatula to level it out and push the batter gently into the corners. Spoon the
cherry pie filling evenly over the crust layer, ensuring complete coverage.
Drop spoonfuls of the remaining batter over the cherry filling, creating a cobblestone-like pattern. The
batter will expand as it bakes, creating lovely golden pockets around the cherries.
Step 5 – Bake to Golden Perfection
Place the assembled pan into your preheated 350°F (175°C) oven. Bake for
30 to 35 minutes, or until the edges are golden brown and a toothpick inserted into the
center comes out clean (a little cherry filling on the toothpick is fine).
If you’re using a smaller 9×13-inch pan, the bars may need a few additional minutes to
bake completely. The key is to look for that perfectly golden crust on top with a slightly bubbling
cherry layer underneath.
As the bars bake, your kitchen will fill with the irresistible aroma of buttery crust, cherries, and
almond — a scent that’s pure comfort and nostalgia.
Step 6 – Cool Completely
Once baked, remove the pan from the oven and place it on a cooling rack. Allow the bars to cool completely
in the pan before adding the glaze. This helps the cherry filling set and ensures that the glaze won’t
melt into the warm crust.
For a quicker cooling process, you can set the pan in a cool, drafty area or near an open window. Avoid
refrigeration at this stage, as it can make the crust soggy.
Step 7 – Prepare the Almond Glaze
In a small mixing bowl, whisk together powdered sugar, vanilla extract,
almond extract, and milk. Start with 2 tablespoons of milk, and if the
glaze feels too thick, add another teaspoon at a time until it reaches a smooth, pourable consistency.
The almond extract adds a luxurious touch of nutty sweetness that beautifully complements the cherry filling
— but if you prefer a classic vanilla glaze, you can omit the almond extract entirely.
Step 8 – Glaze and Finish
Once the bars are completely cool, drizzle the glaze generously across the top using a spoon or piping bag.
For a neater finish, you can pour it in thin ribbons, but for that rustic, bakery-style look, let the glaze
fall freely over the surface.
The glaze will set slightly after a few minutes, forming a delicate sheen that contrasts beautifully with
the ruby-red cherry filling.
Step 9 – Slice and Serve
After the glaze has set, slice the bars into squares or rectangles using a sharp knife. Wipe the knife
between cuts for clean edges. These bars can be served at room temperature or slightly chilled.
For a special treat, serve warm Cherry Pie Bars with a scoop of vanilla ice cream or a dollop of whipped
cream on top — it turns this simple dessert into an irresistible indulgence.
Tips for the Best Cherry Pie Bars
- Room Temperature Ingredients: Always make sure your butter and eggs are at room temperature. This helps the batter blend smoothly and evenly.
- Don’t Overmix: Mix the dry and wet ingredients only until combined to maintain a soft, tender crumb.
- Filling Variations: You can substitute cherry pie filling with blueberry, apple, or raspberry filling for variety.
- Storage: Store leftovers in an airtight container at room temperature for up to 3 days or refrigerate for up to 5 days.
- Freezing: These bars freeze beautifully. Wrap them tightly in plastic wrap and freeze for up to 2 months. Thaw overnight in the refrigerator before serving.
How to Serve Cherry Pie Bars
Cherry Pie Bars are an elegant yet comforting dessert that can be served in many delightful ways.
Their buttery crust and juicy cherry filling make them versatile enough for both casual family
gatherings and more formal celebrations.
For a cozy touch, serve each bar slightly warm with a scoop of vanilla bean ice cream.
The creamy coldness of the ice cream melting over the warm cherry filling creates a luscious contrast
of textures and temperatures. If you prefer something lighter, a spoonful of freshly whipped
cream or a dusting of powdered sugar adds just the right finishing touch.
For festive occasions, these bars look beautiful when topped with a few fresh cherries,
edible flower petals, or a drizzle of white chocolate. They can be cut into small
squares for dessert trays, brunch spreads, or picnic boxes, making them perfect for sharing.
Perfect Pairings
The light sweetness of Cherry Pie Bars pairs wonderfully with a variety of beverages. A hot cup of
freshly brewed coffee or black tea highlights their buttery undertones,
while a glass of cold milk brings out the comforting warmth of the cherry filling.
For a brunch pairing, consider serving them with mimosas or a refreshing
iced latte. Their balanced flavor makes them a delightful complement to both
sweet and savory dishes.
Texture and Flavor Profile
Each bite of these Cherry Pie Bars offers a harmony of flavors and textures. The buttery crust
is tender yet slightly crisp around the edges, the cherry filling adds a burst of fruity sweetness,
and the almond glaze ties everything together with its smooth, nutty fragrance.
Unlike traditional cherry pies, these bars are less messy and more portable, yet they retain the same
heartwarming flavor that makes cherry desserts so beloved. The almond extract in both the batter and the glaze
deepens the complexity of the dessert, enhancing the natural tang of the cherries without overpowering them.
Storage and Make-Ahead Instructions
Cherry Pie Bars are ideal for preparing ahead of time. They can be made one day in advance, stored in an airtight
container at room temperature, and served the next day with even richer flavor. If you’re planning to store them
longer, refrigeration will keep them fresh for up to five days.
To freeze, arrange the bars in a single layer on a baking sheet until solid, then transfer to a freezer-safe bag
or container. When ready to serve, thaw overnight in the refrigerator and bring to room temperature before glazing
or serving.
Why Cherry Pie Bars Are a Must-Try Dessert
This dessert captures everything wonderful about homemade baking — simplicity, nostalgia, and incredible flavor.
With minimal ingredients and straightforward preparation, Cherry Pie Bars are proof that you don’t need complicated
recipes to create something truly special.
The combination of a buttery vanilla-almond crust, luscious cherry filling,
and sweet glaze makes each bite a moment of pure indulgence. These bars travel well, store easily,
and can feed a crowd — making them one of the most versatile desserts in any baker’s collection.
Whether you serve them warm from the oven or chilled straight from the fridge, these bars bring comfort and joy
with every forkful. One taste, and it’s easy to see why Cherry Pie Bars remain a beloved classic in kitchens everywhere.
Final Thoughts: The Irresistible Charm of Cherry Pie Bars
Few desserts capture the nostalgic charm of homemade comfort like Cherry Pie Bars. They combine the richness
of buttery crust, the brightness of cherries, and the gentle sweetness of almond glaze into a dessert that’s
as beautiful as it is delicious. Whether served warm at a holiday table, neatly sliced for a bake sale,
or enjoyed with your morning coffee, these bars never fail to impress.
The real beauty of this dessert lies in its balance — soft yet structured, sweet yet tangy, indulgent yet simple.
The familiar flavor of cherry pie meets the convenience of a bar cookie, making it perfect for sharing or savoring solo.
If you’re looking for a dessert that checks all the boxes — easy to make, visually stunning, crowd-pleasing, and
absolutely delicious — Cherry Pie Bars are it. Every bite tells a story of warmth, tradition, and love baked into
golden layers of buttery goodness.
Expert Tips for the Perfect Cherry Pie Bars
- Use quality butter: Unsalted, high-fat butter gives the crust a melt-in-your-mouth texture.
- Don’t overmix: Mix the batter until ingredients are just combined to keep it tender.
- Let it cool before glazing: A slightly cooled surface helps the glaze set beautifully without soaking in.
- Customize the filling: Swap cherries for blueberries, peaches, or even apple pie filling for variation.
- Add texture: Sprinkle chopped almonds, pecans, or shredded coconut over the glaze for a delightful crunch.
Perfect for Every Occasion
Cherry Pie Bars aren’t just a dessert — they’re a moment of joy. Serve them at birthdays, potlucks, holidays,
or cozy family dinners. Their elegant look and comforting flavor make them suitable for both casual and formal settings.
You can dress them up with whipped cream and cherries on top or keep them simple and classic — either way, they shine.
They’re also a great make-ahead option for busy schedules. Bake them a day early, glaze them when cool, and keep them
covered until ready to serve. They stay moist, flavorful, and every bit as irresistible the next day.
Cherry Pie Bars – Easy Homemade Dessert Recipe
Cherry Pie Bars are a simple and delicious dessert that transforms classic cherry pie into
buttery, cake-like bars topped with almond glaze. Perfect for parties, potlucks, and family gatherings, these
bars feature layers of rich crust, juicy cherry filling, and a sweet almond drizzle. Learn how to make this
easy, crowd-pleasing dessert in under an hour — no pie crust rolling required! Serve warm with vanilla ice cream
or chilled with coffee for a nostalgic treat everyone will love.