Made-from-Scratch Chocolate Coconut Bars – Irresistibly Rich & Easy
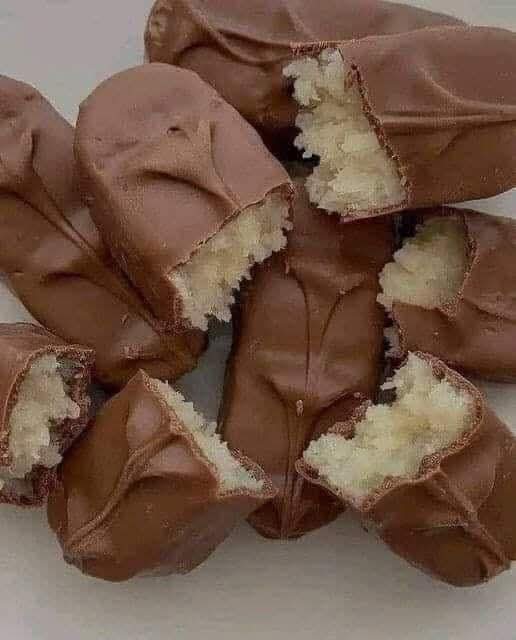
Imagine a candy bar that perfectly balances creamy, chewy coconut with a smooth, glossy coat of chocolate. That’s exactly what these Chocolate Coconut Bars deliver. Handmade, no-bake, and freezer-friendly, they are the ultimate indulgence for anyone craving a tropical twist on a classic treat.
Why You’ll Love These Bars
- No-Bake Convenience: Skip the oven and still achieve a professional candy bar texture.
- Real Ingredients: Made with shredded coconut, sweetened condensed milk, and real chocolate for authentic flavor.
- Freezer-Friendly: Perfect for make-ahead treats or gifting.
- Versatile: Ideal for snacks, parties, holidays, or edible gifts.
- Rich, Tropical Flavor: Chewy coconut center with a glossy chocolate exterior creates irresistible contrast.
Ingredients & Their Role
For the Coconut Base:
- 2 cups shredded coconut: The star ingredient; unsweetened for subtle sweetness, sweetened for a classic candy bar feel.
- ½ cup sweetened condensed milk: Binds the coconut and adds creamy sweetness.
- 2 tablespoons coconut oil or unsalted butter: Adds moisture and richness to ensure a chewy texture.
- 1 teaspoon vanilla extract: Enhances the tropical coconut flavor and adds aromatic depth.
For the Chocolate Coating:
- 1 cup semi-sweet chocolate chips: Smooth, glossy chocolate layer that complements the chewy coconut base.
- 1 tablespoon coconut oil: Helps the chocolate melt evenly and gives a shiny finish.
Pro Tips for Perfect Bars
- Use freshly shredded coconut for maximum flavor.
- Press bars firmly but gently to ensure even thickness for consistent chocolate coating.
- Keep the coconut mixture chilled before dipping to prevent melting or collapsing during chocolate coating.
- Use high-quality chocolate for smooth melting and glossy finish.
- Consider lining your tray with parchment paper for easy removal and minimal sticking.
Equipment You’ll Need
- Large mixing bowl
- Spatula or wooden spoon
- Parchment-lined baking sheet
- Microwave-safe or heatproof bowl for melting chocolate
- Spoon or fork for dipping chocolate
- Refrigerator or freezer for setting bars
- Optional: candy thermometer for precision melting
Preparation Overview
In this recipe, you’ll:
- Prepare the coconut base mixture.
- Shape the mixture into even bars and chill.
- Melt chocolate with coconut oil to glossy perfection.
- Dip each bar in chocolate and let set.
- Store or gift your bars with professional-quality results.
With all ingredients, tips, and equipment ready, you’re prepared to move to the detailed step-by-step preparation in the next batch.
Step-by-Step Preparation – Part 1
Step 1: Mix the Coconut Base
In a large mixing bowl, combine the following ingredients:
- 2 cups shredded coconut
- ½ cup sweetened condensed milk
- 2 tablespoons coconut oil or unsalted butter (softened)
- 1 teaspoon vanilla extract
Stir the mixture thoroughly using a spatula or wooden spoon until all ingredients are fully incorporated. You should achieve a thick, sticky consistency that holds together when pressed. If your mixture feels too dry, add a tiny bit more coconut oil or condensed milk, 1 teaspoon at a time, to maintain a cohesive texture.
Step 2: Shape the Bars
Scoop small portions of the mixture (about 2 tablespoons each) and shape them into rectangular bars using your hands. Press gently but firmly to ensure even thickness, which helps with uniform chocolate coating later. Aim for consistent sizing to create a professional look and ensure each bar sets evenly in the freezer.
Step 3: Chill the Bars
Line a baking sheet with parchment paper. Place each shaped bar onto the sheet, leaving at least ½ inch of space between them. Refrigerate for 1–2 hours, or until the bars are firm enough to handle without losing shape. For quicker setting, you can place them in the freezer for 30–45 minutes, but avoid freezing solid if you plan to coat immediately with chocolate.
Pro Tips During Chilling
- Ensure bars are evenly spaced to prevent sticking together.
- Use parchment paper or silicone mats to make removal easier.
- For uniform bars, consider using a small rectangular mold or measuring spoon to portion consistently.
- If the mixture sticks to your hands, lightly grease them with coconut oil or wear disposable gloves.
- Check firmness before moving to chocolate coating; they should hold shape but still have slight flexibility for easier dipping.
Step 4: Preparing for Chocolate Coating
Once the bars are chilled and firm, they are ready for the chocolate coating process. At this stage, set up your workspace with the following:
- A microwave-safe or heatproof bowl for melting chocolate and coconut oil.
- A spoon or fork for dipping each bar individually.
- A parchment-lined tray for placing coated bars to set.
- Optional: A candy thermometer if you want to monitor the chocolate temperature for perfect glossy finish.
By completing these steps, your coconut base is fully prepared, shaped, and chilled — ready for the decadent chocolate layer. The next batch will cover melting the chocolate, coating each bar, and ensuring a flawless finish.
Step-by-Step Preparation – Part 2
Step 5: Melt the Chocolate Coating
Choose one of the following methods to melt your chocolate chips with coconut oil for a smooth, glossy coating:
Bain-Marie Method:
- Place 1 cup semi-sweet chocolate chips and 1 tablespoon coconut oil in a heatproof bowl.
- Set the bowl over a pot of simmering water (make sure the bottom of the bowl does not touch the water).
- Stir gently until the chocolate is completely melted and smooth.
- Remove from heat and keep warm for coating.
Microwave Method:
- Combine the chocolate chips and coconut oil in a microwave-safe bowl.
- Heat in 30-second intervals on medium power, stirring after each interval until fully melted and glossy.
- Do not overheat; chocolate can seize and become grainy.
Step 6: Coat the Coconut Bars
Once your chocolate is melted, it’s time to coat the bars:
- Remove the chilled coconut bars from the refrigerator.
- Using a fork or dipping tool, carefully dip each bar into the melted chocolate, ensuring full coverage.
- Lift the bar and gently tap the fork against the edge of the bowl to remove excess chocolate.
- Place the coated bar onto a parchment-lined tray.
- Repeat for all bars, working quickly but carefully to prevent the chocolate from cooling and thickening too fast.
Step 7: Achieve a Smooth, Glossy Finish
- For an even coating, dip the bars once and let set slightly before adding a second thin layer if needed.
- If chocolate starts to thicken, gently rewarm it using low heat or short microwave bursts.
- Optional: Use a spatula to smooth the tops or create decorative swirls.
- Let coated bars sit at room temperature or refrigerate until chocolate is fully set.
- Avoid touching or stacking bars until chocolate has hardened completely.
Step 8: Pro Tips for Perfection
- Ensure coconut bars are fully chilled before dipping to prevent melting or losing shape.
- Use high-quality chocolate for a shiny, professional-looking finish.
- If desired, sprinkle finely chopped toasted coconut or nuts over the chocolate immediately after dipping for extra texture.
- For a polished gift look, drizzle white chocolate over the set bars for contrast and visual appeal.
- Work in small batches if making a large quantity to maintain optimal chocolate temperature and prevent seizing.
By following these steps, your coconut bars now have a smooth, glossy chocolate coating, perfectly ready to set before serving, storing, or gifting. The next and final batch will cover final setting, serving, storage, gift ideas, and closing professional tips.
Step 9: Final Setting
After coating, let the chocolate set completely for best results:
- Place the chocolate-coated coconut bars on a parchment-lined tray.
- Allow them to sit at room temperature for 30–60 minutes until the chocolate hardens.
- Alternatively, refrigerate for 20–30 minutes to speed up the setting process.
- Ensure bars are fully firm before moving, stacking, or packaging.
Step 10: Serving Suggestions
These Chocolate Coconut Bars are versatile and perfect for multiple occasions:
- Serve on a dessert platter for parties or gatherings.
- Pair with coffee, hot chocolate, or tea for an indulgent snack.
- Slice into smaller pieces to use as toppings for cakes, cupcakes, or ice cream.
- Create a dessert board with fruits, nuts, and other chocolate treats for an elegant presentation.
Step 11: Storage Tips
Keep your bars fresh, chewy, and chocolatey:
- Store in an airtight container at room temperature for up to 1 week.
- Refrigerate for up to 3 weeks for longer shelf life.
- Freeze for up to 2 months; thaw at room temperature before serving.
- Layer with parchment or wax paper to prevent sticking.
- Avoid humid environments as moisture can soften the chocolate and coconut.
Step 12: Gifting Ideas
These bars make perfect homemade gifts. Ideas for presentation:
- Package in festive boxes or tins lined with parchment paper.
- Tie with ribbons or decorative string and add a personalized tag.
- Mix with other treats like nuts or candies in a jar for a gourmet gift.
- Decorate with drizzled white chocolate or sprinkles for an elegant look.
Step 13: Pro Tips for Professional Results
- Use high-quality chocolate for glossy finish and smooth texture.
- Ensure bars are fully chilled before coating to prevent melting.
- Work in small batches to maintain optimal chocolate temperature.
- Add extra toppings immediately after dipping while chocolate is still soft.
- Store in cool, dry conditions to maintain chewiness and chocolate sheen.
Step 14: Why This Recipe Stands Out
The magic of Made-from-Scratch Chocolate Coconut Bars lies in the combination of textures and flavors: chewy coconut base, creamy sweetened condensed milk, and smooth glossy chocolate coating. Each bite delivers an irresistible tropical sweetness balanced with rich chocolate indulgence.
Step 15: Conclusion
This recipe proves that homemade treats can rival store-bought candy bars in both flavor and presentation. With simple ingredients, clear step-by-step guidance, and professional tips, you can create chocolate coconut bars that are perfect for snacking, gifting, or sharing. Indulge, impress, and savor the satisfaction of a dessert that is both luxurious and delightfully easy to make.