No-Bake Cherry Cheesecake Cookie Layer Dessert
A luscious, no-fuss, layered dessert that pairs velvety cheesecake filling with bright cherry layers and classic Nilla Wafers. This reader-directed, copy-ready recipe is written for home bakers and content creators — long-form, highly detailed, and optimized for clarity and repeatable success.
Quick Summary — What This Recipe Delivers
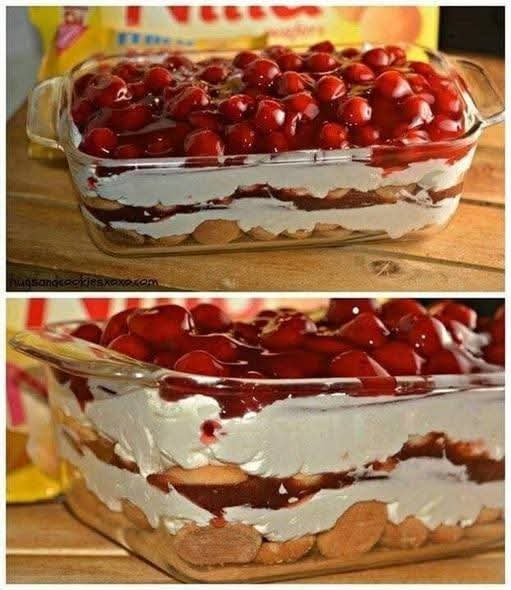
This No-Bake Cherry Cheesecake Cookie Layer Dessert is an easy layered “lasagna” of cookies and cheesecake filling: a crisp cookie base that softens overnight, a light and fluffy cream-cheese layer, a bright cherry preserves ribbon, a second cookie layer, a final cheesecake layer, and a glossy cherry pie filling on top. No oven required. Minimal hands-on time. Make it the night before for best texture and flavor melding.
Ingredients — Complete List & Roles
| Ingredient | Quantity | Role / Notes |
|---|---|---|
| Nilla Wafers (mini or regular) | 5 mini bags OR 1 regular package (~10–12 oz) | Cookie layers — provide crunch initially and soften to cake-like texture overnight. |
| Cream cheese | 8 oz (225 g), softened | Rich, tangy base for the cheesecake layer. Full-fat yields best texture. |
| Granulated sugar | 1/3 cup (67 g) | Sweetens the cream cheese; adjust slightly to taste if using very sweet toppings. |
| Cool Whip (or whipped topping) | 8 oz tub (or ~1 cup real whipped cream) | Lightens the filling, making it airy and spreadable. See substitution notes below for homemade options. |
| Cherry preserves | 1/2 cup (160 g) | Bright, slightly textured layer — brush or spread thinly to avoid sliding. |
| Cherry pie filling | 1 can (20–21 oz typical) | Glossy, chunky topping that completes the dessert visually and flavorwise. |
Tools & Prep
Basic Tools
- Loaf pan (recommended: 8.5 × 4.5 in) — or small rectangular pan
- Mixing bowl & hand mixer (or stand mixer)
- Spatula and small offset spatula
- Spoon for preserves and pie filling
- Plastic wrap or airtight lid for chilling
Optional (for polished finish)
- Piping bag and star tip for decorative whipped cream
- Bench scraper or straight edge knife for clean slices
- Measuring cups & kitchen scale for accuracy
Directions — Step-by-Step (Copy-Ready)
Follow these clear steps to assemble the dessert. Read all steps first so you understand timing and chilling requirements.
- Prepare your pan: Line the bottom of a loaf pan (or similar small rectangular pan) with a single, even layer of Nilla Wafers. If you are using full-size wafers, break them as needed to create a snug, gap-free bottom layer.
- Soften the cream cheese: Remove the cream cheese from the refrigerator at least 30 minutes before starting so it’s soft and easy to whip. If short on time, cut into small cubes to speed softening.
- Make the cheesecake filling: In a mixing bowl, add 8 oz softened cream cheese and 1/3 cup granulated sugar. Beat with a hand mixer on medium speed until smooth and lump-free (about 1–2 minutes). Scrape the bowl as needed.
- Fold in Cool Whip: Gently fold the entire 8 oz tub of Cool Whip into the creamed cheese using a spatula. If you prefer, use freshly whipped heavy cream (1 cup heavy cream whipped to soft peaks with 2–3 tbsp powdered sugar) — fold that in instead. The goal is a light, spreadable cheesecake layer.
- Spread the first cheesecake layer: Using an offset spatula, spread half of the cheesecake mixture (about 1/2 of the total) evenly over the Nilla Wafer base. Smooth the surface gently; avoid pressing down hard, which can compact the wafer layer.
- Apply cherry preserves: Spoon 1/2 cup cherry preserves into a small bowl and stir to loosen. Dollop small amounts over the cheesecake layer, then gently spread into a thin, even ribbon. Aim for a visible but not overpowering layer — it should add brightness and a little chew.
- Add the second cookie layer: Place another even layer of Nilla Wafers over the preserves. If some preserves seep between cookies, that’s fine — it will flavor the cookies as they soften.
- Spread the remaining cheesecake mixture: Spread the remaining cheesecake mixture evenly over the second wafer layer. Smooth the top carefully.
- Top with cherry pie filling: Spoon the canned cherry pie filling across the top, spreading gently to the edges. If you prefer a thinner top layer, use 3/4 of the can and reserve the rest for serving.
- Chill & set: Cover the pan with plastic wrap and refrigerate for at least 6–8 hours; overnight is ideal. Chilling allows the wafers to soften into a tender, almost cake-like texture and lets flavors meld.
- Serve: Serve chilled. Use a sharp knife dipped in hot water and wiped dry to cut cleaner slices. Top individual servings with extra whipped cream or a fresh cherry if desired.
Pro Tips for Consistent Success
- Room temperature ingredients: Softened cream cheese blends smoothly for a lump-free filling.
- Folding technique: Fold the Cool Whip or whipped cream gently to keep the mixture airy — overmixing deflates the texture.
- Even layers: Use an offset spatula for smooth, restaurant-style layers.
- Prevent sliding: If the preserves are runny, chill them briefly before spreading or simmer and reduce slightly to thicken (cool before using).
- Make-ahead: This dessert improves after a night in the fridge — plan accordingly.
- Clean slices: For clean presentation, chill thoroughly and warm the knife between cuts.
Creative Variations & Serving Ideas
Strawberry Cheesecake Cookie Layer
- Swap cherry preserves and pie filling for strawberry preserves and pie filling. Top with sliced fresh strawberries for brightness.
Chocolate Cherry Twist
- Add 1/4 cup cocoa powder to the cream cheese mixture (sift first). Use chocolate sandwich cookies (remove filling) as the base for a Black Forest vibe.
Tropical Cherry Fusion
- Layer in crushed pineapple or mango between the cheesecake and cherry layers for a tropical contrast.
Stabilized Whipped Cream Option
- For longer shelf life at room temp (briefly for events), fold in 2 tbsp mascarpone or 1 tsp gelatin (bloomed and dissolved) into the whipped cream before folding into the cream cheese base.
Scaling & Batch Cooking
To serve more people or make a party pan, scale the recipe proportionally:
- Double (9×13 pan): Multiply ingredients by 2; use two even cookie layers and two cream layers. Bake time irrelevant — assembly and chilling are the same. Use a full 21 oz pie filling or two cans if you like extra topping.
- Triple / Event Size: Multiply accordingly and use sheet pans or hotel pans. Prepare in trays, chill thoroughly, and cut into portions for service.
Troubleshooting — Quick Fixes
- Filling is lumpy: Beat the cream cheese longer at medium speed (scrape bowl) before folding in Cool Whip. If still lumpy, press through a fine mesh or use a spatula to smooth while spreading.
- Cookies remain too hard: The dessert needs more time to set. Return to fridge for several more hours or overnight.
- Topping slides off slices: Chill longer to firm up layers; when slicing, warm the knife to reduce drag and create cleaner cuts.
- Too sweet: Use less preserves or choose unsweetened whipped cream topping to balance the sweetness. Add a squeeze of lemon zest in the filling for brightness.
Storage & Make-Ahead Tips
- Refrigerate: Store covered in the fridge for up to 3–4 days. Flavor develops after 24 hours.
- Freeze: You may freeze uncut portions (without whipped cream topping) tightly wrapped for up to 2 months. Thaw overnight in refrigerator before topping and serving.
- Transporting: Keep chilled in a cooler with ice packs when transporting to events to maintain structure and food safety.
Nutrition Notes (Approximate)
Nutrition will vary by exact ingredients, portion size and brands. A rough estimate per serving (1 of 10): ~320–420 kcal. This dessert is rich in fat and sugar due to cream cheese, pie filling, and Cool Whip. For lighter options, use reduced-fat cream cheese, light whipped topping, and a smaller amount of pie filling — note that texture and flavor will change.
Frequently Asked Questions
- Can I use real whipped cream instead of Cool Whip? Yes — use 1 cup heavy cream whipped to soft peaks with 2–3 tbsp powdered sugar and fold into the cream cheese. Fresh whipped cream tastes better but is less shelf-stable.
- Can I make it nut-free? Absolutely — check labels for cross-contamination if allergies are a concern.
- Is this safe to leave out at room temperature? No — because of dairy and pie filling, keep refrigerated and avoid leaving out for more than 2 hours.
- Can I substitute other cookies? Yes — shortbread, graham crackers, or vanilla sandwich cookies (without filling) all work; be aware of different absorption rates.