No-Bake Christmas Crunch Cookies – The Ultimate Holiday Treat
Nothing says holiday magic quite like a sweet, crunchy, and festive treat that comes
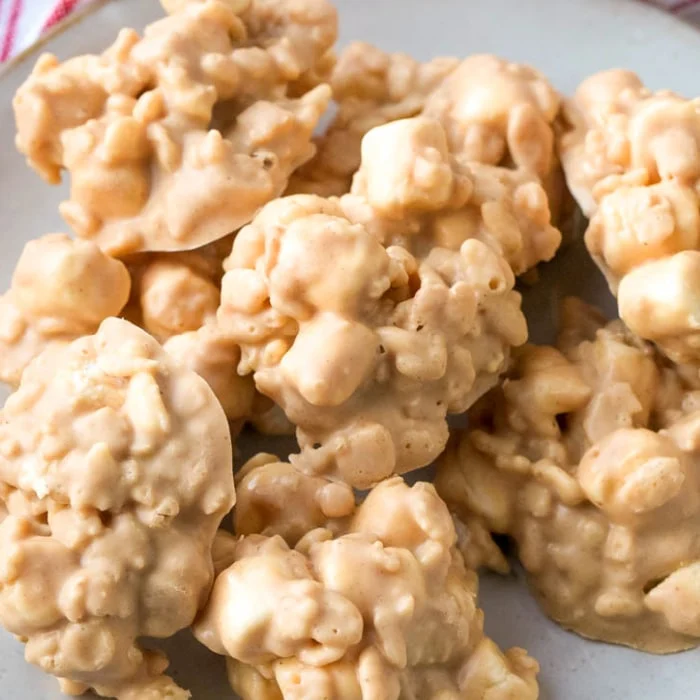
together in minutes. These No-Bake Christmas Crunch Cookies blend creamy
white chocolate, nutty peanut butter, crisp Rice Krispies, and chewy mini marshmallows
into bite-sized delights perfect for cookie trays, gifts, or a simple family snack.
Unlike baked cookies, these require no oven, making them perfect for busy holiday schedules
or for baking with kids. With their simple ingredients and melt-in-your-mouth texture, they
deliver a gourmet experience with minimal effort.
Why You’ll Love This Recipe
This recipe is beloved because it balances flavors and textures expertly. The white
chocolate offers sweetness and creaminess, while the peanut butter
adds richness and a slightly nutty undertone. Rice Krispies provide
crunch and structure, and mini marshmallows soften the bite, creating a
perfect contrast. Additionally, the recipe is highly customizable. Add crushed candy canes
for a festive twist, sprinkle colored holiday sprinkles, or even drizzle extra chocolate
on top for an elegant look.
Ingredients & Why They Matter
- White Chocolate Chips – 12 ounces (340 g): The backbone of the
cookie, providing creaminess and sweetness. Using high-quality chocolate ensures smooth
melting and a decadent flavor profile. - Creamy Peanut Butter – 1/2 cup (120 g): Adds depth, richness,
and a velvety texture that complements the chocolate. Creamy is best for even distribution. - Rice Krispies – 4 cups (100 g): Provides structure and crunch,
keeping each bite satisfying without being hard. - Mini Marshmallows – 1 cup (50 g): Introduces chewiness and
light sweetness. Mini marshmallows melt slightly into the chocolate, binding the mixture
together gently. - Optional Decorations – 1/4 cup crushed candy canes or sprinkles:
For festive color, extra flavor, and holiday presentation.
Step 1 – Melting the Chocolate
Begin by melting the 12 ounces of white chocolate chips. Place them in a heatproof bowl
over a saucepan of simmering water (double boiler). Stir gently and continuously to prevent
burning. The chocolate should be silky, smooth, and fully melted. Avoid direct heat from
the stovetop, as white chocolate burns easily. Proper melting ensures each cluster will
have a luscious, creamy coating that binds the cereal and marshmallows effectively.
Step 2 – Combining Peanut Butter
Once the white chocolate is melted, stir in the 1/2 cup of creamy peanut butter. Blend
thoroughly until smooth and slightly thickened. The peanut butter adds a nutty depth and
helps maintain structure while enhancing flavor. Make sure there are no lumps for a uniform
texture. This mixture is the key to achieving perfect, cohesive clusters.
Pro Tips for Batch 1
- Use a spatula to scrape the sides of the bowl and ensure all chocolate is incorporated
evenly. - If chocolate thickens while working, gently rewarm it for a few seconds to restore
workability. - High-quality chocolate and peanut butter significantly elevate the flavor profile.
This first stage of preparation sets the foundation for perfectly balanced, melt-in-your-mouth
Christmas cookies. In the next batch, we’ll focus on folding in the cereal and marshmallows,
shaping the cookies, and adding festive touches that make them visually irresistible.
Incorporating the Crunch and Chew
Now that your white chocolate and peanut butter mixture is smooth and creamy, it’s time to
introduce the heart of these cookies: Rice Krispies and mini
marshmallows. These ingredients not only create the signature texture but also
ensure every bite has a delightful combination of crunch and softness.
Step 3 – Folding in Rice Krispies
Measure out 4 cups of Rice Krispies cereal. Gently fold them into the chocolate-peanut butter
mixture using a large spatula. Folding, rather than stirring vigorously, is essential to
maintain the cereal’s crispness. Overmixing will crush the cereal and result in dense,
less enjoyable cookies. Ensure each piece is evenly coated with the chocolate mixture for
uniform flavor.
Step 4 – Adding Mini Marshmallows
Next, fold in 1 cup of mini marshmallows. The marshmallows should be distributed evenly
throughout the mixture without breaking down completely. They provide chewiness, subtle
sweetness, and help bind the clusters together. At this stage, you can also add festive
ingredients like crushed candy canes or holiday-colored sprinkles for a visual pop and
seasonal flavor twist.
Step 5 – Ensuring Even Distribution
Once all ingredients are incorporated, check that the mixture is uniform. Scrape the sides
and bottom of the bowl to capture any pockets of unmixed chocolate or peanut butter. Use a
light hand to avoid breaking the cereal pieces while ensuring marshmallows are well
incorporated. A well-mixed base guarantees each cluster has the perfect texture and flavor
combination, with the crunchy Rice Krispies, sweet white chocolate, and gooey marshmallow
all in every bite.
Step 6 – Shaping the Clusters
Line a baking sheet with parchment paper to prevent sticking. Using a tablespoon or small
cookie scoop, drop portions of the mixture onto the sheet. Aim for uniform sizes for even
chilling and aesthetically pleasing presentation. Leave a little space between clusters, as
the chocolate may slightly spread. These clusters do not need to be perfectly round—rustic
shapes add charm and homemade appeal.
Step 7 – Chilling for Perfect Set
Once the clusters are shaped, place the baking sheet in the refrigerator for at least 30
minutes. Chilling allows the chocolate and peanut butter mixture to firm up, making the
cookies easier to handle and enhancing the overall texture. For larger batches, you can
cover the sheet lightly with plastic wrap to prevent condensation from forming. After chilling,
the clusters will hold their shape perfectly and be ready for serving or gift packaging.
Pro Tips for Batch 2
- Gently fold in ingredients: This preserves the crispness of the Rice
Krispies and the integrity of the marshmallows. - Optional add-ins: Consider adding 1/4 cup chopped nuts, dried cranberries,
or festive sprinkles for a holiday twist. - Uniform sizing: Use a cookie scoop for consistent cluster sizes to ensure
even chilling and professional presentation. - Storage tip: Once chilled, clusters can be stored in an airtight container
in the fridge for up to 2 weeks without losing texture or flavor.
By the end of this stage, your No-Bake Christmas Crunch Cookies have taken shape and are
ready for the final touches. In the next batch, we’ll cover presentation, additional
decorative ideas, and serving suggestions that elevate these cookies to a festive star on
any holiday dessert table.
Decorating, Serving, and Presentation
Now that your No-Bake Christmas Crunch Cookies have set in the refrigerator, it’s time to
take them to the next level with presentation, decoration, and serving ideas. While these
cookies are delicious on their own, a few simple touches can transform them into a festive
centerpiece for your holiday dessert table.
Step 8 – Adding Festive Decorations
Before the chocolate and peanut butter fully firm up, you can lightly press in festive
decorations. Consider using:
- Mini candy canes: Break into small pieces and gently press them into the top of each cluster for a peppermint flavor boost.
- Holiday-colored sprinkles: Red, green, or gold sprinkles add visual appeal and sparkle, making each cookie pop on your dessert platter.
- Shaved white chocolate or chocolate drizzle: Use a fork to drizzle extra melted chocolate over the clusters, creating an elegant, gourmet look.
Step 9 – Serving Suggestions
These clusters are versatile and can be served in many ways. Arrange them on a festive platter
lined with parchment or decorative paper. They pair beautifully with:
- Hot cocoa or coffee: The chocolate and peanut butter complement a warm beverage perfectly.
- Holiday cookie platters: Mix with other seasonal cookies like peppermint bark or sugar cookies for a visually appealing assortment.
- Gift packaging: Place the clusters in small cellophane bags or decorative tins for easy gifting to neighbors, friends, or coworkers.
Step 10 – Storage and Shelf Life
To keep your No-Bake Christmas Crunch Cookies fresh:
- Store them in an airtight container in the refrigerator for up to 2 weeks.
- If you want a firmer texture, freeze clusters individually wrapped in parchment for up to 3 months.
- Allow frozen clusters to thaw at room temperature before serving for the perfect bite.
Proper storage ensures they remain crunchy, chocolatey, and irresistibly chewy.
Step 11 – Tips for Professional Presentation
- Uniform size: Using a cookie scoop ensures clusters are evenly sized, making them more visually appealing.
- Layered platters: Present cookies on tiered trays for a professional look at parties or dessert tables.
- Personal touches: Add small tags or ribbons if gifting. It makes the treat feel homemade yet elegant.
- Color coordination: Match sprinkles or chocolate drizzle colors with your holiday theme for a cohesive look.
Why These Cookies Are Loved
These No-Bake Christmas Crunch Cookies have a magical combination of textures and flavors: creamy
white chocolate, sweet and nutty peanut butter, crispy Rice Krispies, and chewy marshmallows.
Their simplicity makes them perfect for kids to help make, while the presentation options let
you create a show-stopping dessert for any holiday gathering. Even those new to baking can
achieve professional-looking results with minimal effort.
With these tips, your cookies will not only taste amazing but also become a visual star on
any dessert table. Guests will marvel at the crunchy, creamy, chocolatey combination that’s
perfect for the holidays.
Expert Tips for Perfect No-Bake Christmas Crunch Cookies
- Temperature matters: When melting chocolate and peanut butter, use a double boiler or microwave in 30-second intervals, stirring frequently. Avoid overheating, which can cause chocolate to seize or become grainy.
- Mix-ins balance: The classic combination of Rice Krispies and marshmallows works beautifully, but make sure you fold gently. Overmixing can deflate the marshmallows and reduce the light, airy texture.
- Use quality ingredients: Opt for high-quality white chocolate chips and creamy peanut butter. It makes a noticeable difference in flavor and texture.
- Timing: Allow clusters to cool completely at room temperature for optimal texture. Rushing the process in the fridge may result in uneven set and sticky bottoms.
- Uniformity: Use a small cookie scoop to portion out the clusters. This ensures even baking, consistent sizing, and professional presentation.
Recipe Variations for Every Holiday Theme
No-Bake Christmas Crunch Cookies are highly adaptable. Here are a few fun variations to make them your own:
- Chocolate Lovers: Swap white chocolate for semi-sweet or dark chocolate chips for a richer flavor.
- Nutty Delight: Add chopped almonds, walnuts, or pecans for extra crunch and nutty undertones.
- Festive Flavors: Add peppermint extract (1 tsp) and crushed candy canes for a wintery twist.
- Healthy Twist: Substitute some Rice Krispies with toasted oats or puffed quinoa for a slightly healthier crunch.
- Holiday Colors: Mix in red and green mini M&Ms or sprinkles to enhance the festive appeal.
Serving Suggestions
No-Bake Christmas Crunch Cookies are versatile and can be served in various ways:
- Pair them with hot chocolate or eggnog for a cozy winter treat.
- Arrange them on a holiday-themed dessert platter alongside brownies, fudge, and peppermint bark for a party-ready tray.
- Package individually in cellophane bags or small decorative boxes for charming homemade gifts.
- Include them in cookie swap parties—they’re easy to transport and always a crowd-pleaser.
Why This Recipe Shines
These cookies combine simplicity, flavor, and visual appeal. They require no oven, making them ideal for both novice bakers and experienced cooks pressed for time. Each bite delivers:
- Creamy, smooth white chocolate
- Sweet, nutty peanut butter
- Crispy Rice Krispies for satisfying crunch
- Chewy, gooey marshmallow texture
This combination makes them irresistible and ensures they’re a holiday favorite year after year.
Final Thoughts
No-Bake Christmas Crunch Cookies are a perfect balance of flavor, texture, and holiday charm. With step-by-step instructions, expert tips, and creative variations, this recipe empowers anyone to create professional-looking, delicious cookies at home. From gifting to party platters, these clusters are versatile, festive, and guaranteed to impress. They are quick to prepare, fun to customize, and loved by kids and adults alike, making them the ultimate no-bake holiday treat.