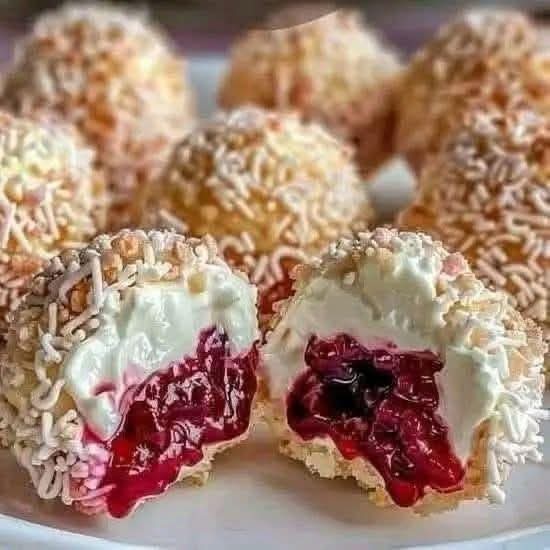
Creamy Cherry Snowball Truffles
Experience the irresistible combination of creamy, fruity, and coconut flavors with these Creamy Cherry Snowball Truffles. These no-bake truffles are perfect for holidays, parties, or simply as a sweet indulgence at home. Each bite offers a smooth, velvety cream center, a fruity cherry heart, and a delicate, snowy coconut coating that melts in your mouth.
Cream Layer Ingredients & Their Roles
- 1 ½ cups cream cheese — Provides a rich, velvety base and structure for the truffle core, giving it a creamy texture that holds its shape.
- ½ cup powdered sugar — Sweetens the cream layer smoothly without graininess, also helps firm up the texture.
- 1 tsp vanilla extract — Adds warmth and depth to the flavor, enhancing the creaminess and pairing beautifully with cherries.
- ½ cup whipped cream — Lightens the filling, preventing the truffles from being too dense while keeping them creamy and luscious.
Pro Tip: Ensure the cream cheese is softened to room temperature before mixing. This ensures a smooth, lump-free cream layer and a uniform texture throughout the truffles.
Cherry Filling Ingredients & Their Roles
- 1 cup cherry jam or cherry pie filling — Serves as the fruity core of each truffle. Using a high-quality cherry preserves ensures bold flavor and a natural balance of sweetness and tartness.
- 1 tbsp cornstarch (optional) — If your cherry filling is too runny, cornstarch helps thicken it so it maintains shape when portioned into truffles and freezes properly.
Instructions – Preparing the Cherry Filling
- Combine ingredients: In a small saucepan, add the cherry jam and optional cornstarch. Mix well to ensure the cornstarch is fully incorporated without lumps.
- Heat gently: Warm the mixture over low-medium heat, stirring constantly. The goal is to slightly thicken the jam without cooking off the fresh cherry flavor.
- Cool slightly: Once the cherry filling reaches a thicker consistency, remove from heat and let it cool to room temperature. This prevents the cream layer from melting when combined.
- Portion the cherries: Using a small spoon or a piping bag, portion the cherry filling into small drops. Set aside on parchment paper or a tray, ready to be encased in the cream mixture.
Pro Tip: Ensure the cherry filling is not too hot when assembling the truffles. A warm filling can make the cream layer too soft, causing uneven truffles that are difficult to coat.
At this stage, you have the cream layer from the first batch and the cherry filling prepared and ready. The next step involves combining these layers to form the truffle centers, ensuring each bite has a creamy exterior with a fruity surprise inside.
Serving Suggestion: At this stage, consider chilling the cream layer slightly in the fridge to make rolling and encasing the cherry filling easier in the next batch.
Instructions – Assembling the Truffles
- Portion the cream layer: Using a small cookie scoop or a tablespoon, scoop out portions of the cream cheese mixture. Flatten each portion slightly in your palm or on a clean surface to create a base for the cherry filling.
- Encapsulate the cherry: Take a small drop of the cherry filling prepared in the previous batch and place it in the center of the cream layer portion. Carefully fold the cream mixture around the cherry, ensuring it is completely enclosed.
- Roll into a ball: Gently roll the filled mixture between your palms to form smooth, even spheres. Aim for consistent size to ensure uniform baking (or chilling) and a professional appearance.
- Chill the truffles: Place the formed truffles on a parchment-lined tray and refrigerate for at least 30 minutes. Chilling firms up the cream cheese layer, making it easier to coat with coconut and other toppings.
- Check for cracks: Before coating, inspect each truffle. Smooth any minor cracks by pressing gently with your fingers to prevent the cherry filling from leaking during the next steps.
Pro Tips for Perfect Truffles
- Keep your hands slightly cool by washing them or chilling briefly between batches to prevent the cream cheese from sticking.
- If the cream layer is too soft, refrigerate it for 10–15 minutes before shaping. This ensures clean, well-formed truffles.
- Use a small ice cream scoop or measuring spoon to maintain consistent truffle sizes.
- For extra flavor, consider adding a pinch of almond extract or lemon zest to the cream layer for subtle aromatic notes that complement the cherry.
At this point, your truffle centers are perfectly formed: each bite contains a soft, creamy exterior with a sweet, fruity cherry core. The next step will focus on coating the truffles to create the signature snowball effect and add texture and visual appeal.
Serving Suggestion: The chilled truffles can be stored temporarily in the fridge while you prepare the coating. Arrange them on a parchment-lined tray to prevent sticking and make the coating process easier.
Ingredients for Coating
- 2 cups shredded coconut – Provides a light, flaky exterior and the iconic snowball appearance. It adds subtle sweetness and delicate texture that contrasts beautifully with the creamy interior.
- ½ cup crushed ladyfingers (optional) – Adds a slightly crunchy texture for contrast and helps the truffles hold their shape.
- Powdered sugar for dusting – Optional, enhances the snowy effect and adds extra sweetness.
Instructions – Coating the Truffles
- Prepare the coating: In a shallow bowl, combine shredded coconut and crushed ladyfingers if using. Mix well to ensure even distribution.
- Roll the truffles: Take each chilled truffle and gently roll it in the coconut mixture, pressing lightly to ensure the coating adheres without squishing the center.
- Check coverage: Inspect each truffle and add more coconut where necessary to achieve uniform coverage. Make sure no cream or cherry is exposed.
- Optional powdered sugar dust: For a festive, snowy look, lightly dust the coated truffles with powdered sugar using a fine-mesh sieve. This adds both visual appeal and a delicate sweetness.
- Chill again: Place the coated truffles back in the refrigerator for 15–30 minutes to set the coating and ensure the truffles maintain their shape.
Pro Tips for Perfect Coating
- Keep your hands cool to prevent the truffles from melting or losing their shape during rolling.
- Gently tap off excess coconut to avoid clumping or messy presentation.
- If the cream layer is slightly too soft, return the truffles to the fridge for 5–10 minutes before coating.
- For variation, consider dipping the truffles partially in melted white chocolate before rolling in coconut for an extra decadent finish.
At this stage, your Creamy Cherry Snowball Truffles are nearly complete. Each truffle is now fully coated, maintaining a creamy center with a beautiful snowy exterior. The next batch will cover final storage, serving suggestions, and concluding tips for the ultimate dessert experience.
Serving Suggestion: Arrange the truffles on a decorative plate or in cupcake liners for a beautiful presentation. They are perfect for holiday gatherings, gifting, or enjoying as a luxurious treat any time.
Serving the Truffles
- Presentation: Place the truffles in small cupcake liners or arrange them neatly on a decorative platter. The snowball effect of the coconut will create an eye-catching contrast with the vibrant cherry interior.
- Garnish: Add a small sprinkle of extra shredded coconut, a light dusting of powdered sugar, or even a few chocolate shavings to enhance both visual appeal and flavor depth.
- Pairing: Serve alongside a cup of coffee, hot chocolate, or a sweet dessert wine. The creamy, tangy cherry center pairs beautifully with beverages that have a slight acidity or richness.
- Event-ready: These truffles are perfect for holidays, gift boxes, dessert tables, or elegant tea parties.
Storing Your Truffles
- Short-term storage: Place truffles in an airtight container and refrigerate for up to 5–7 days. Keeping them cold ensures the creamy center remains firm.
- Long-term storage: Freeze the truffles for up to 2 months. Wrap each truffle individually in wax paper or parchment to prevent sticking, then place in a freezer-safe container.
- Thawing: Remove truffles from the freezer and allow them to thaw in the refrigerator for 1–2 hours before serving to maintain texture and flavor.
Pro Tips for the Perfect Truffles
- Use high-quality cherry jam or pie filling; this is the flavor focal point of your truffles.
- Ensure the cream cheese is well-chilled before shaping the truffles to prevent them from melting during rolling.
- Keep your hands slightly chilled or wear disposable gloves to avoid heat transfer that can soften the truffle centers.
- Experiment with flavor variations: add a teaspoon of almond extract, a hint of lemon zest, or a dash of cinnamon to the cream layer for a unique twist.
Final Thoughts
These Creamy Cherry Snowball Truffles are more than just a dessert; they are an experience. The velvety cream cheese filling perfectly balanced with sweet cherries, encased in a delicate coconut coating, makes them irresistible for both casual and formal occasions. They are simple enough to make at home, yet elegant enough to impress guests, making them the ultimate no-bake dessert for any celebration.
By following this detailed, step-by-step guide, you not only achieve the perfect texture and flavor but also gain insider tips that professional pastry chefs use to make desserts that look and taste spectacular. Your guests will marvel at the creamy interior, delightful chew of the coconut, and the charming snowball aesthetic, all while enjoying a treat that is incredibly easy to prepare.
Whether for gifting, entertaining, or indulging yourself, these truffles are guaranteed to elevate any dessert table and leave a lasting impression. Now that your truffles are ready, serve, savor, and enjoy every bite of this rich, creamy, and fruity delight!