Cherry Bars Recipe – Easy, Scrumptious, and Perfect for Any Occasion
Imagine biting into a dessert that perfectly balances a tender, buttery base with a luscious cherry filling, finishing with a golden, slightly crisp top. Cherry Bars are a versatile treat ideal for holidays, family gatherings, or simply an indulgent snack any day of the week. The bars are soft, moist, and bursting with cherry flavor, offering a delightful contrast between the sweet, rich dough and the tangy cherry notes. Every bite is a celebration of texture and taste.
Ingredients & Their Roles
For the Cherry Bars:
- 1 ½ cups butter, softened – Butter is the foundation of these bars. It provides richness, moisture, and a tender crumb, ensuring that every bite melts smoothly in your mouth.
- 3 cups granulated sugar – Sugar sweetens the dough and promotes browning during baking. The golden crust that forms enhances both flavor and appearance, giving the bars an inviting finish.
- 1 ½ teaspoon salt – Salt intensifies the natural cherry flavor, balances sweetness, and adds depth to the buttery base, preventing the dessert from being overly cloying.
- 5 large eggs – Eggs act as a binder, providing structure and stability. They also contribute to the moist, tender texture that makes these bars so irresistible.
- 1 ½ teaspoon vanilla extract – Vanilla adds warmth and complexity, enhancing the overall flavor and complementing the richness of the butter and sweetness of the sugar.
- 1 ½ teaspoon almond extract – Almond extract intensifies the cherry flavor and introduces a subtle nutty aroma, making the bars fragrant and more sophisticated.
- 5 ½ cups all-purpose flour – Flour provides the necessary structure. The right amount ensures a tender yet firm texture that supports the cherry filling without becoming crumbly or overly dense.
Optional Mix-ins and Toppings:
- Chopped nuts (walnuts or almonds) – Adds a pleasant crunch that contrasts with the soft texture of the bars.
- Powdered sugar – A light dusting on top gives a professional, finished look.
- Extra cherry preserves – To intensify flavor or create a jammy topping that adds moisture and visual appeal.
Step-by-Step Instructions
Step 1: Prepare Your Pan and Oven
Preheat your oven to 350°F (175°C). Grease a 9″x13″ baking pan thoroughly, then line it with parchment paper, leaving a slight overhang on the sides. This ensures easy removal of the baked bars and maintains clean edges. Proper pan preparation is critical for achieving uniform baking and a neat final presentation.
Step 2: Cream Butter and Sugar
In a large mixing bowl, combine the softened butter and granulated sugar. Beat until the mixture is light and fluffy. This creaming process is essential as it incorporates air into the dough, resulting in a tender, slightly airy texture while maintaining richness. Properly creamed butter and sugar ensure that the bars will rise slightly and achieve a golden-brown finish on top.
Step 3: Incorporate Eggs and Extracts
Add the eggs one at a time, mixing well after each addition to ensure they are fully incorporated. Then, add the vanilla and almond extracts. These flavorings not only enhance the taste but also balance the richness of the butter and the sweetness of the sugar. The combination of vanilla and almond extract creates a fragrant base that harmonizes beautifully with the cherry filling.
Step 4: Add Flour Gradually
Sift together the all-purpose flour and salt, then gradually fold them into the wet ingredients. Mix gently until just combined. Overmixing can lead to dense, tough bars, so folding carefully preserves the tender crumb and allows the dough to support the cherry filling. The flour ensures the structure of the bars while maintaining softness.
Step 5: Incorporate Optional Mix-ins
If you like, gently fold in chopped nuts or a small amount of extra cherry preserves to add texture and bursts of flavor throughout the bars. Nuts contribute crunch and depth, while additional cherry preserves enhance the fruity sweetness, making every bite exciting and multi-dimensional.
Step 6: Spread Dough in Pan
Transfer the prepared dough into the lined pan. Use a spatula to evenly spread the dough, smoothing the top for consistent baking. The thickness of the layer will determine the final texture of the bars; aim for uniformity to ensure even cooking. A smooth, even surface also allows for more appealing slices after baking.
Step 7: Pre-Baking Considerations
Before placing the pan in the oven, take a moment to ensure the dough is evenly distributed and smooth. This step is crucial for uniform baking. Check that the dough reaches the corners of the pan and that no thick clumps remain in the center. Even thickness prevents overbaking the edges while leaving the middle undercooked. Additionally, for a more delicate finish, lightly tap the pan on the counter to release any trapped air bubbles, which can cause uneven rising or holes in the baked bars.
Step 8: Baking the Cherry Bars
Preheat your oven to 350°F (175°C) if you haven’t already. Place the prepared pan on the middle rack to ensure even heat distribution. Bake for 40–50 minutes, but start checking at 35 minutes to prevent overbaking. The bars are done when a toothpick inserted in the center comes out clean or with just a few moist crumbs attached. The top should be golden brown and slightly firm to the touch, but the interior remains tender.
Remember that ovens vary, so the key is to monitor the bars closely during the final minutes. If the top begins to brown too quickly, loosely cover it with aluminum foil to prevent burning while allowing the center to finish baking. Achieving the perfect texture—crispy on the edges, tender in the middle—is what makes these bars irresistible.
Step 9: Cooling and Setting
Once the bars are baked, remove the pan from the oven and place it on a wire rack. Allow them to cool completely in the pan for at least 45–60 minutes. Cooling is critical because it allows the structure to set, making slicing clean and preventing the bars from crumbling. The tender, buttery crumb firms up slightly, and the cherry flavors meld perfectly with the dough, creating a harmonious, luscious dessert.
Step 10: Preparing for Slicing
Use the parchment paper overhang to lift the bars gently from the pan. Place them on a cutting board and use a sharp chef’s knife for clean, precise cuts. For even slices, consider marking the dough lightly before cutting. Wipe the knife clean between cuts to maintain neat edges and prevent sticky residue from affecting subsequent slices.
Step 11: Optional Glaze or Toppings
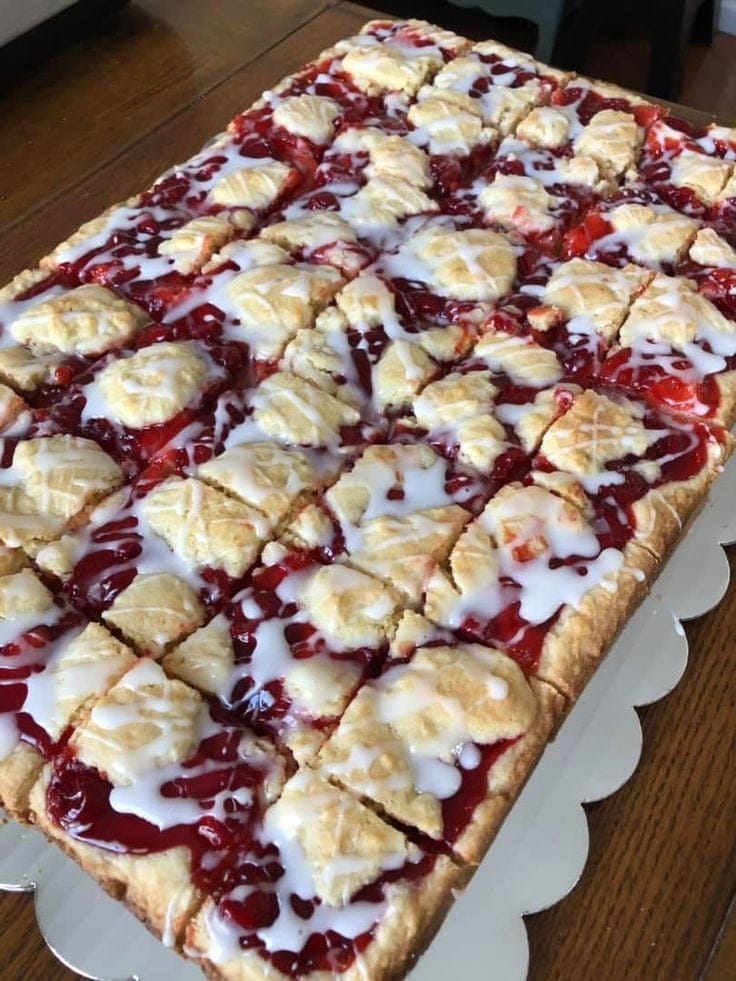
Enhance your cherry bars with optional toppings. A simple powdered sugar dusting adds visual appeal and a hint of sweetness without overpowering the cherry flavor. Alternatively, a thin glaze of cherry preserves or melted white chocolate can be drizzled over the top for a professional touch. For added texture, sprinkle lightly toasted nuts or coconut flakes on top of the glaze. Each option complements the buttery, tender base and the sweet-tart cherry filling beautifully.
Step 12: Storage Tips
Proper storage ensures your cherry bars remain fresh and delicious. Keep them in an airtight container at room temperature for up to 5 days. For longer storage, wrap them individually in parchment or plastic wrap and refrigerate for up to two weeks. Freezing is also an option; place slices in a single layer on a baking sheet, freeze until firm, then transfer to a freezer-safe container for up to 3 months. Thaw at room temperature before serving.
Step 13: Serving Suggestions
Cherry bars are perfect as a dessert on their own, but you can also pair them with a scoop of vanilla ice cream, a dollop of whipped cream, or a drizzle of chocolate sauce for a more indulgent treat. Serve them at brunch, tea parties, or holiday gatherings—the combination of buttery crumb and sweet-tart cherry flavor makes them a crowd favorite every time.
Step 14: Enhancing the Cherry Flavor
For cherry lovers, boosting the fruit flavor can elevate these bars from delicious to unforgettable. Consider folding in a few tablespoons of high-quality cherry preserves directly into the batter before baking. This adds pockets of jammy sweetness that intensify the cherry aroma and flavor. You can also gently fold in a handful of dried cherries, which plump slightly during baking and add natural tartness and chewy texture. These subtle adjustments make the dessert more layered, complex, and satisfying to the palate.
Step 15: Creative Variations
While the classic cherry bars are irresistible, experimenting with variations allows you to adapt the recipe for different occasions or preferences. For example, sprinkling mini chocolate chips over the top before baking introduces a bittersweet contrast to the sweet-tart cherry filling. Alternatively, fold in a tablespoon of orange zest for a citrusy aroma that complements the cherries beautifully. Adding toasted almond slivers or a light crumble topping gives an additional textural element, making the bars more visually appealing and decadent.
Step 16: Perfecting the Texture
Achieving the ideal texture in cherry bars is an art that balances tenderness, moisture, and slight firmness. Creaming the butter and sugar correctly is crucial—it should be fluffy and airy but not overly soft. When adding flour, mix gently to preserve the delicate crumb structure. Avoid overbaking, which can dry out the bars, and monitor the oven closely during the last 10 minutes. Removing the bars slightly before they appear fully set in the center allows residual heat to finish cooking, resulting in moist, tender bars with a perfect bite.
Step 17: Serving Tips for Maximum Enjoyment
Serve cherry bars slightly warm or at room temperature for the best flavor. Pair them with complementary accompaniments such as vanilla bean ice cream, lightly whipped cream, or a drizzle of melted chocolate for an elevated dessert experience. For gatherings, consider cutting the bars into small squares or rectangles and presenting them on a decorative platter, garnished with fresh cherries or a light dusting of powdered sugar. This presentation not only looks impressive but also allows guests to enjoy bite-sized portions.
Step 18: Elevating the Presentation
Visual appeal can enhance the perception of flavor, so consider adding creative touches. A simple chocolate drizzle, alternating cherry and white chocolate swirls, or a sprinkle of toasted coconut can transform a classic bar into a show-stopping dessert. These finishing touches are subtle but effective, making your cherry bars suitable for special occasions, holiday tables, or as a gift for friends and family.
Step 19: Making Ahead and Transporting
Cherry bars are ideal for making ahead. Bake them a day or two before serving, then store in an airtight container at room temperature. For long-distance transport, wrap individual bars in parchment paper or place them in a sturdy container with layers separated by wax paper. This ensures the bars maintain their shape, texture, and flavor without sticking together. The ability to prepare these bars in advance makes them convenient for parties, bake sales, or gifting.
Step 20: Pro Tips for the Perfect Cherry Bar
- Use high-quality butter and extracts for deeper, richer flavor.
- Ensure eggs are at room temperature for better emulsification with the butter and sugar.
- Do not overmix after adding flour; this preserves the tender crumb.
- Check the bars at the minimum baking time to prevent overbaking and dryness.
- Cool completely in the pan before slicing to achieve clean, uniform pieces.
- Optional: For extra shine and flavor, lightly brush the tops with warmed cherry preserves after baking.
Step 21: Understanding Baking Variations
Every oven is unique, and small variations in temperature or pan material can affect the final texture of cherry bars. If you’re using a dark metal pan, the bars may brown more quickly on the edges, so check them 5–10 minutes earlier than the recommended baking time. For glass pans, the baking may take slightly longer, so monitor the bars closely. Adjusting for your specific oven ensures evenly baked bars that are soft in the center but golden on top.
Step 22: Balancing Sweetness
Cherry bars are naturally sweet, but you can control the sugar balance to suit your preferences. Reducing granulated sugar slightly in the dough can prevent overpowering the cherry filling, especially if you fold in extra preserves. Alternatively, using a high-quality tart cherry filling adds a subtle tang that balances the richness of the buttery base. Taste-testing a small amount of the dough with preserves before baking can help you fine-tune the sweetness.
Step 23: Ensuring Clean Slices
Cutting cherry bars cleanly is an essential part of presentation. For precise slices, use a long, sharp knife, and wipe the blade between cuts. A serrated knife can also work well, particularly if the bars have a slightly sticky cherry layer. Chilling the bars for 30 minutes before slicing can further help achieve neat, uniform pieces. For large gatherings, consider cutting the bars into small bite-sized squares, which makes them easier to serve and enjoy.
Step 24: Storage and Longevity
Proper storage keeps cherry bars fresh and flavorful for days. Store cooled bars in an airtight container at room temperature for up to 5 days. For extended storage, wrap individual slices in parchment paper or plastic wrap and refrigerate for up to two weeks. Freezing is also an option: arrange slices in a single layer on a baking sheet, freeze until firm, then transfer to a freezer-safe container. Thaw at room temperature before serving to preserve texture and flavor.
Step 25: Pairing Suggestions
Cherry bars pair beautifully with a variety of accompaniments. For a classic pairing, serve with vanilla ice cream or whipped cream. For more indulgence, drizzle melted dark or white chocolate over the top. Fresh cherries, toasted nuts, or a light dusting of powdered sugar can also enhance visual appeal and flavor. Serving the bars slightly warm brings out the cherry aroma and soft texture, while room-temperature bars highlight the buttery, tender crumb.
Step 26: Holiday and Party Variations
Cherry bars are incredibly versatile for special occasions. Add a layer of white chocolate chips before baking for festive appeal, or swirl in a bit of cream cheese for a marble effect. For holiday parties, cut into small rectangles, top with a dollop of whipped cream, and garnish with a maraschino cherry for a visually stunning dessert. These small touches make the bars ideal for gatherings and gift-giving.
Step 27: Troubleshooting Common Issues
If your bars are too dry, ensure that you don’t overbake and that the butter is measured accurately. Too much flour can also create a dense, dry texture. If the cherry layer sinks or spreads, check that the preserves or cherry filling isn’t too liquidy—drain excess syrup if necessary. Sticky bars can be dusted lightly with powdered sugar, or chilled briefly before slicing to achieve clean pieces. Attention to these small details ensures perfect results every time.
Step 28: Making Cherry Bars Ahead of Time
One of the best features of cherry bars is their ability to be made ahead. Bake a day or two in advance, store in an airtight container, and the flavors will deepen overnight. This makes them perfect for holiday prep, potlucks, or busy weeknight desserts. Chilling or lightly warming before serving allows you to enjoy them at their best, with a tender, buttery texture and a bright cherry flavor.
Step 29: Adding Decorative Finishing Touches
Once your cherry bars have cooled and are ready to serve, consider adding decorative finishing touches to elevate their presentation. A light dusting of powdered sugar across the top creates a professional, bakery-like appearance. Drizzling melted white or dark chocolate in thin zigzag lines over each bar adds visual contrast and complements the cherry flavor. Fresh cherries or finely chopped toasted nuts sprinkled on top bring texture, color, and an extra layer of taste that impresses both visually and gastronomically.
Step 30: Serving Ideas
Cherry bars are wonderfully versatile for serving. They can be sliced into small squares for casual snacking or into larger rectangles for dessert platters. Pairing them with a scoop of vanilla bean ice cream, lightly whipped cream, or even a drizzle of chocolate ganache makes them feel indulgent and special. For a brunch or afternoon tea setting, arrange the bars on a decorative tray, and garnish with mint leaves or edible flowers for a festive touch.
Step 31: Gifting Cherry Bars
Cherry bars make a thoughtful and delicious gift. Wrap individual slices in parchment paper or cellophane, tie with a ribbon, and place in a decorative box or tin. They are perfect for holiday gifting, birthday treats, or as a thank-you gesture. Including a small note about the flavor combination and the buttery, tender texture helps convey the effort and love behind the gift. The combination of rich buttery crust, sweet-tart cherries, and aromatic extracts makes these bars a memorable homemade treat.
Step 32: Storage and Longevity Tips
Proper storage ensures your cherry bars maintain their flavor and texture for days. Store cooled bars in an airtight container at room temperature for up to 5 days. For longer storage, wrap slices individually in parchment paper or plastic wrap and refrigerate for up to two weeks. Freezing is also an option: place slices in a single layer on a baking sheet, freeze until firm, then transfer to a freezer-safe container. Thaw at room temperature before serving to preserve the buttery texture and vibrant cherry flavor.
Step 33: Troubleshooting Common Challenges
Even experienced bakers may encounter minor challenges when preparing cherry bars. If the edges brown too quickly while the center remains undercooked, cover the pan loosely with aluminum foil during the last 10 minutes of baking. If the cherry layer is too runny and causes the bars to sink, drain excess liquid from the cherry filling before adding it to the dough. Overly dense bars can result from overmixing the flour; fold gently to maintain a tender, soft crumb. Following these small adjustments ensures consistently perfect results.
Step 34: Tips for Maximizing Flavor
- Use high-quality butter for richer, more flavorful bars.
- Choose natural cherry preserves with minimal added sugar for balanced sweetness.
- Consider adding a pinch of cinnamon or nutmeg to the dough for subtle warmth.
- Allow the bars to cool completely to enhance flavor melding between the buttery base and cherry layer.
- Experiment with complementary extracts like a hint of orange or almond to deepen aroma and taste.
Final Thoughts on Cherry Bars
These cherry bars are more than just a dessert—they are an experience. The tender, buttery crust, the sweet-tart cherry filling, and the aromatic extracts combine to create a treat that is comforting, indulgent, and irresistible. Perfect for gatherings, gifts, or a simple weekday indulgence, this recipe proves that classic ingredients, carefully combined, can yield extraordinary results. Each bite offers the satisfaction of a bakery-quality dessert made right in your own kitchen.
From preparation to serving, these cherry bars showcase the balance between simplicity and elegance. Whether you are sharing with family, gifting to friends, or enjoying a quiet moment alone, the combination of textures and flavors makes every bite memorable. By following the detailed steps, tips, and suggestions provided, you can achieve a dessert that consistently delights, impresses, and satisfies—making cherry bars a staple in your dessert repertoire.
Now that you have mastered the steps, tips, and variations, it’s time to bake a batch for yourself. Enjoy the buttery, tender crust, the luscious cherry filling, and the fragrant aroma that fills your kitchen. These cherry bars are a testament to how simple ingredients, paired with attention to detail, can create a dessert that is truly extraordinary.